Friday, December 30, 2011

2011 Round-Up & Looking Forward to 2012

Happy Eve to New Year’s Eve! 

This is a first for Torts to Tarts, a recipe round-up for the year featuring the favorite recipes of readers, tasters, and yours truly for 2011.  This has been a big year for Torts to Tarts.  Though not quite a nationally known blog, it has reached more homes this year than ever before.  I am honored so many people have taken time to look at my humble creations (and less than stellar photography).  Thanks so much and it can only keep getting better from here, pinky swear!

Now, on to the favorites, which will be followed by some remarks for the year to come.

Most Popular Recipes Viewed On-line

These recipes, posted in 2011, received the most on-line views:


Most Popular Recipe with Taste-Testers

This recipe was by far the hands-down favorite of taste-testers for 2011.  I originally made this recipe for my officemates.  They loved it.  The second, third, and fourth time I made this recipe, I shipped it out to friends on the East and West Coast, they all loved it (except one coconut disliking friend who shall remain nameless).  As a result of this recipe, I received a marriage proposal and a proclamation of love.  If you are looking for that in 2012, try this recipe (you’re welcome).  The taste-testers favorite recipe of 2011 is:


My Favorite Recipe/Creation

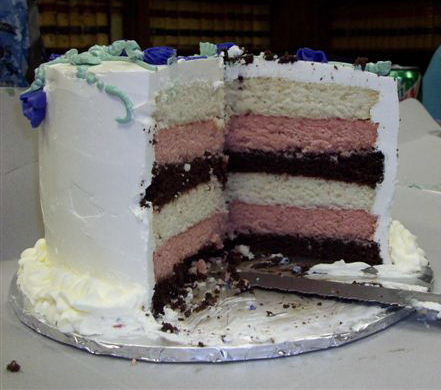
My favorite recipe for 2011, actually has little to do with the recipe itself (which was actually very tasty by the way), and more to do with the technique.  It was time for another office celebration, with cake; it was the hundredth time in a month time span (I may be exaggerating just a bit).  Quite frankly, I assumed everyone might be tired of frosting.  I created this frosting-free cake in celebration of an officemate’s birthday.  This cake was perfect for the warmer summer climate and a step away from the traditional.  I created a layer cake consisting of the most unlike cake technique, in my favorite recipe of 2011:


Exciting Things to Come in 2012

First, I feel the need to make some baking resolutions.  I resolve (that just sounds odd, but I think it is the correct verb form of the noun; I like that resolve sounds complete, like I already know it will be completing this things!)… I resolve to:
(1) take more and better quality photos;
(2) not fail to attempt a recipe just because it looks hard or seems to be very involved; and
(3) bake more.

Second, there are some exciting things to come to the Torts to Tarts blog in 2012.  I am thinking new site design; I mean the busy fork, spoon, and knife background has to go! 

Third, in 2012, I plan to start dedicating more time to my (very small and fledgling) business, Torts to Tarts, LLC.  I currently have the business in name, but I plan to expand in 2012 by taking on more orders and growing my clientele.  Baking is my passion and in growing my business, I do not want it ever to feel like work (just long hours doing what I love!).

I hope you have a safe New Year’s celebration—NO DRINKING AND DRIVING!—and a happy and prosperous 2012.

Wednesday, December 28, 2011

Holiday 2011 Baking Round-Up

Warning—this is a picture free post, due to the fact that I did so much baking, I literally had no time to take pictures.  I was wrapping and distributing cookie packets so fast that I often had to stay up late or wake-up extra earlier to get it done.  But, I did want to share with you some other holiday goodies I made.

Friday, December 16, 2011:  I made the 4 treats featured here.  This was supposed to be my only day of baking.  I took off from work to dedicate the whole day to getting my holiday baking done.  I made treats for my office.  I then took some to the ladies who worked at the gym.  I also gave a few to my Mom to take to work, and this is where the problem began.

Tuesday, December 20, 2011: Not everyone at my Mom’s job got treats on the first go round and more specifically, the people who the treats were intended for, did not receive them.  Also, one of the ministers at my church loves chocolate chip cookies and I wanted to give him and his lovely wife some at the Christmas program on Thursday.  So, I made:
(5) Peppermint Oreo Chip Cookies (chocolate chip cookie base with peppermint Oreo pieces and chocolate chips);
(6) Mini Chocolate Chip Cookies (chocolate chip cookies using my smallest sized cookie scoop; one batch yielded over 60 cookies); and
(7) Candy Cane Kiss Blossoms (light chocolate chip cookie batter, with the dough rolled in sugar prior to baking, and a candy cane flavored Hershey’s kiss pushed into the top once out of the oven).

Thursday, December 22, 2011:  Yet again, my Mom got high-jacked at work and the cookies did not reach most of their intended targets.  Plus, my Mom was feeling under the weather on Thursday and was not going to be able to attend the Christmas program at church and I did not want to hold the cookies to Sunday as they would not have been as fresh, so the Mini Chocolate Chip Cookies got broken down from the one tin to several smaller gift bags.  Lastly, I did not feel like the cookies were enough, so I made:
(8) Pecan Brownies (pecan pieces and halves added to my go-to brownie recipe: Baker’s One Bowl Brownie Recipe)

Friday, December 23, 2011: I now needed to remake the chocolate chip cookies for the minister and his wife at my church.  I also received some Virginia peanut as a gift and wanted to use those.  Additionally, I finally saw the Christmas sprinkles I had been waiting for all season at the grocery store, the long green jimmies with red non-perils mixed in.  Lastly, cookies thieves run rampant at my Mom’s job and a couple of the previous day’s cookie packets were pilfered from among my Mom’s things.  I felt the need to replace those packets because some of the best people my Mom worked with had still not received holiday goodies.  So, I made:
(9) Mini Chocolate Chip Cookies (part II);
(10) Holiday Browned Butter Sugar Cookies (sugar cookies covered in green jimmies and red non-perils; note to self--only cover cookie top with sprinkles, because when you cover the entire cookie the underside looks like a red and green blob of melted sprinkles); and
(11) Chocolate Dipped Soft Peanut Brittle (soft peanut brittle, dipped in a mixture of three different kinds of dark and semi-sweet chocolate).

Saturday, December 24, 2011: I went to the grocery store that morning and saw green mint chips!  I had to have them and subsequently had to use them.  I decided that these last batches of cookies would go to some members of my church on Christmas Day.  I wanted to give a chocolate option with the green mint chips and a non-chocolate option with one of my favor ingredients, browned butter.  I made:
(12) Mint Chip Chocolate Cookies (green mint and mint chocolate chips in a chocolate cookies base) and
(13) Browned Butter Oatmeal Butterscotch Cookies (oatmeal cookies made with browned butter and butterscotch chips mixed in).

That is it; 13 batches of holiday cookies in a week!  I was delighted with the results however, and more than happy to be able to get into my kitchen so much considering it was a work-week during this cookies madness!  Now, you can see why I did not have time to pick up the camera.

I hope you all had a great Christmas!

Monday, December 26, 2011

Caramel Pecan Brownie Chip Cookies


These cookies were inspired by my two friends MLJ and BMF.  MLJ loves nuts in here cookies.  BMF loves chocolate in her cookies, followed by some nuts but not as much as chocolate.  Each year I make BMF and MLJ cookies for Christmas.  Usually, they are some form of chocolate and nut cookies—Walnut or Pecan Chocolate Chip are pretty much standard.

This year, I wanted to change it up, giving MLJ and BMF the nuts and chocolate they are used to in a completely new way.  Enter my favorite cookie creation of 2011, the Brownie Chip cookies.  Brownie Chip cookies offer the cewy, cakey, decadent texture of a brownie, in the crisp, yet soft texture of cookie.  It is really the perfect marriage of two of my favorite things to bake.

To take the Brownie Chip cookies to another level, I made the brownie chips from Caramel Pecan Brownies.  I also added in extra pecan pieces to the cookie batter.  I had the intention of adding chocolate chips to the cookie batter as well, but after over stuffing the batter with brownie chips, I could not (with a good cookie baker conscious) add another drop of stuff into the batter without the cookie not holding together while bake.

Because of the additions to the batter, these cookies took a while to bake and I was worried I over baked them, resulting in hard cookies.  However, upon cooling and doing my customary break one cookie in half to check for softness, they were perfectly soft and tasted amazing.  Picture a turtle candy hiding in a brownie that collectively sought refuge in a chocolate chip cookie; that is what these cookies taste like :-)


Caramel Pecan Brownie Chip Cookies

Brownie Ingredients:
1 Brownie Recipe (I used Baker’s One Bowl Brownie Recipe.  My tried and true favorite.)
1 Package Caramel Bits
1/3 Cup Heavy Cream
1 cup (or more Pecans)

Cookie Ingredients:
2 sticks (1 cup) Butter, at room temperature
1 cup Brown Sugar
1/2 cup Granulated Sugar
2 tsp Vanilla Extract
1 Egg or Egg Replacer
1-2 TBS Dry Milk Powder (optional)
1 cup Bread Flour
1 1/4 cup Cake Flour
1 tsp Baking Powder
3/4 Baking Soda
1 tsp Salt

3 cups Brownie Chips
Pecans & Chocolate Chips (optional)

Method:
Preheat oven to 350F.
1. Prepare brownies according to instructions for a 9x13inch pan.
2. Melt caramel bits with 1/3 cup heavy cream.
3. Mix pecan pieces into melted caramel.
4. Drop spoonfuls of the pecan caramel mixture into the brownie batter.
5. Swirl the pecan mixture into the brownie mixture with a butter knife.
6. Bake for 30-40 minutes, until a toothpick comes out with only moist crumbs, no batter.
7.  Cool completely in pan.
8. Remove from pan and cut rectangle in half.  Half will be used to make brownie chips, the other half can be enjoyed as is.
9. Cut the half pan into little pieces about 1/2 inch by 1/2 inch in size.
10. Place pieces on a parchment lined cookie sheet in one flat layer and place in freezer.  Freeze until completely frozen.

To make cookies:
11. Preheat oven to 350F.
12. Cream together butter and both sugars.
13. Add vanilla, egg replacer, and dry milk powder and mix together.
14. Combine flours, baking powder and soda, and salt, then mix with butter mixture.
15. Stir in brownie chip pieces (and pecans and chocolate chips, if you are adding them).
16. Scoop cookies onto a cookie sheet lined with parchment. Flatten cookies slightly with hands.
17. Bake cookies for 15-18 minutes.  Allow to cool on the parchment.

Sunday, December 25, 2011

A Christmas Staple: Decorated Sugar Cookies


I make decorated sugar cookies every year.  It is a holiday staple on my baking list, a must, a requirement.  This tradition started the year I bought $.50 plastic cookie cutters from Safeway my first Christmas in law school.  The original cookie cutters were a tree, star, snowman, and bell.  Since that first year of making Christmas cookies, I have gotten several other more extravagant, more expensive, metal, cushioned, and handled cookie cutters, but the originals are still my favorite.


The originals remind me of a time when I was just starting out with decorated sugar cookies, prior I had only done cakes.  The originals remind me of a time when baking was my little escape from my first semester of law school exams.


This year I stayed true to the originals, but with some additional techniques I have learned over the years.  Luster dust is my all-time favorite finish on a cookie to make it glow, sparkle, and just look like Christmas.


Vanilla Bean Sugar Cookies
I used my favorite sugar cookie recipe for these cookies with one substitution.  I instead of the princess flavor emulsion, I used 1 1/2 TBS of vanilla bean paste.

Saturday, December 24, 2011

Gingerbread Men & Snowflakes


I have never made gingerbread from scratch.  Hard to believe since I am a spice girl, and love these spicy cookies during the holiday, and well, anytime of year.  Lately, I have been indulging in Trader Joes Triple Ginger Thin Cookies.  They are super ginger-y, crisp, and only 170 calories for 9 cookies.


Back to the cookies at hand—I decided to tackle these for the first time this year.  I figured it would get me ready for the gingerbread house that will have to be pushed to next year because I procrastinated on my holiday baking a lot little this year.  Oh well, top 100 list.


I discovered something very important in making these cookies, gingerbread contains molasses.  I did not know this.  No, I am not crazy, just blissfully unaware.  For good reason, you see, I do not like molasses in its natural state.  While making these cookies, molasses was all I could smell.  I could actually tell when they were done by how the molasses smelled while baking.


The finished product was wonderful however, and the awful smell and taste of “raw” molasses was replaced with the pleasant cooked smell and taste of gingerbread.  Whatever transformation happens to molasses in the oven is necessary for my nose and palette.  I would make these cookies again (even suffering through the smell of molasses, just to get the finished results).


Gingerbread Rollout Cookies
Adapted from a Washington Post Recipe

Ingredients:
3 cups Flour
1 TBS Cinnamon
1 TBS Ginger
1/2 tsp Allspice
1/2 tsp Nutmeg
1/2 tsp Salt
3/4 tsp Baking Soda
12 TBS Butter, room temperature (1 1/2 sticks)
6 oz Brown Sugar
3/4 cup Molasses
2 TBS Milk

Method:
1. Combine flour, spices, salt, and baking soda.  Set aside.
2. Cream together butter and sugar.  Add molasses and milk.
3. Stir flour mixture into butter mixture in three parts.
4. Roll dough 1/4 inch thick between parchment paper.  Dip cookie cutters in flour prior to cutting out shapes.
5. Remove dough scrapes.  Re-roll and cut until all used.
6. Place cut shapes in the freezer for about one hour.
7. Preheat oven to 350F.
8. Bake cookies for 15-18 minutes.  Cookies will no longer be glossy.  When set they will barely retain a gentle fingerprint when touched.
9.  Remove and let cool for 5 minutes before transferring to a cooling rack.
10. To decorate use royal icing (and sparkling sugar for the snowflakes).


Friday, December 23, 2011

Peppermint Crunch Pinwheel Cookies


These cookies were inspired by my friend ADH.  When we were in law school together, every Christmas I would make mint chocolate chip cookies.  I would buy the white chocolate peppermint morsels with the bottoms dipped in Christmas colored sprinkles.  Now that I am on the East Coast, those morsels are harder to find.  (I did find some on Sunday, two days after I finished baking these.)


When I saw the Andes Peppermint Crunch Pieces, I thought they would be a festive substitute.  The idea for making the cookie into a pinwheel log came to me randomly while at work.  I sometimes have strokes of baking genius firing off in my head at work.  Ideas hit me like lightening, for no reason and without prompting; they just shock me.  That is what happened here.

So, I hope ADH likes (or liked) these cookies inspired by her love of mint, minus the chocolate, admittedly because I did not want to cover up the pretty design and after tasting them, I decided they did not need the chocolate.


Peppermint Crunch Pinwheel Cookies
Adapted very loosely from Two Peas and Their Pod

Ingredients:
3 cups Flour
1 1/2 tsp Baking Powder
1/2 tsp Salt
1 cup Butter
1 cup Granulated Sugar
1/2 cup Brown Sugar
2 Egg (or Replacer)
1 TBS Vanilla Extract (emulsion or paste)
3/4 Bag Andes Peppermint Crunch Pieces
Red Gel Food Paste

Method:
Day One
1. Cream together butter and sugars.
2. Add eggs or replacer and vanilla.
3. Combine flour, baking powder, and salt.  Stir into butter mixture.
4. Take out about 1/3 of the dough and set aside.
5. Stir in Andes Peppermint pieces into remaining 2/3 dough.
6. In the 1/3 of dough, mix in the red food color.
7. Between parchment paper roll out the red dough until very thin (1/8 in) and in a large rectangle.
8. Between parchment roll out the Andes dough (1/4 to 3/8 inch thick) into a rectangle slightly smaller than the red dough.
9. Place the Andes square of dough on top of the red dough.  Press the two doughs together by quickly running the rolling pin over it a few times.
10. Starting at the long end, fold the red dough over the end of the Andes dough.  From the fold, continue to roll the dough into a log.  Rub/pinch the dough seam together.
11. Wrap the log in parchment paper, followed by saran wrap, and place in the fridge over night to chill.

Day Two
1. Preheat oven to 350F.
2. Take roll out of the fridge.  Slice off both ends and discharge, set aside, or bake as taste-testers.
3. Slice the dough log into pieces and place on a parchment lined cookie sheet to bake.  The cookies will spread so give them room.
4. Bake for 15-18 minutes (depending on the thickness of the slices), until the cookies no longer look doughy in the center of the pinwheel and the bottoms are browning.

Thursday, December 22, 2011

Holiday Baking 2011


This year was about doing something different and re-inventing old classics.  I also took into account the taste buds of the friends I was baking for, and my desire to decorate cookies.  This is the first post in a series of post about my holiday baking adventure.  Each post, after this one, will feature a different holiday treat and its recipe.


This year, I reserved my Christmas baking until last full weekend before Christmas.  Of course, other events and plans came up.  My weekend full of baking turned into a Friday of baking and weekend spotted with some decorating activities in the early morning or late night hours.


All the baking was completed and gifts packed by Sunday night, and transferred to the recipients by Monday.


One final note about the upcoming posts, I apologize in advance for the lack of pictures.  I was so busy over the weekend that I did not want to pause and actually take pictures during the process.  I went from decorating to wrapping, without giving thought to my camera.  So, please bear with the meager pictures.


The holiday baking treats include: Vanilla Bean Decorated Sugar Cookies, Peppermint Crunch Pinwheel Cookies, Gingerbread Men & Snowflakes, and Carmel Pecan Brownie Chip Cookies.


[I started writing this post the weekend before Christmas, but I have been really short on time this week, so unfortunately, this series of posts will extend past Christmas.  I have two suggestions, (1) these recipes are good, so good that you can make them after Christmas, or (2) bookmark these recipes for Christmas baking 2012 and then scold me for not starting earlier.]


Thursday, December 15, 2011

White and Dark Chocolate Cashew Caramel Popcorn


I have not baked since my last post.  Shocking I know.  I talked to a friend this week and she said, “I haven’t seen anything new on your blog in a while, what gives?”  What gives is that I have been extremely busy with Christmas presents (non-food related), work, friends, and oh, did I mention work!


Well, I am also gearing up for a completely all out insane weekend of baking.  I currently have 6 different dessert dishes I plan to make between today (Thursday) and Sunday, with Saturday dedicated to non-baking time with friends.  Bananas, I know!  I figure if I don’t sleep and drink my meals, I can pull it off.  The really crazy part is that I am super excited to take on all these things.


Back to the popcorn at hand-- I wanted to just make something, anything to get into my kitchen.  I decided to tackle caramel popcorn again.  My last attempt came out well, but I wanted to improve.


I used the same Paula Dean caramel popcorn recipe as before.  I reduced the popcorn from 8 quarts to 6 quarts to ensure a more even coating on the popcorn. I also used half granulated sugar and half brown sugar to ensure a nice crisp coating on the popcorn.  I added cashews this time instead of peanuts.  I also do not like to make things twice, so I drizzled the caramel popcorn with white and dark chocolate to change it up a bit.


I think the popcorn came out really well.  The chocolate did not stick well to the caramel popcorn and broke off when I broke the popcorn into manageable pieces to bag it.  It is still tasty, but I wanted the chocolate to stick to the popcorn, not be like chocolate strings in the bag.  Something to work on in the future.  On to my crazy baking weekend!

Monday, December 05, 2011

Flyby Post: Lemon, Lemon, Lemon (in a Jar)


My friend has a Birthday coming up this week and we celebrated over this past weekend.  In June or July she saw the lemon cake I made for mom’s Birthday in 2010 on my blog.  She asked for that cake then, and I told her I would make it for her Birthday in December, figuring (a) she would forget or (b) by December she would not want a lemon cake, which reads summer to me.


So, I thought the cake idea had sufficiently died until 1.5 weeks ago when we were making Birthday plans and she mentioned the lemon cake.  She wanted to share the lemon cake with friends at a Birthday dinner at out favorite vegetarian restaurant.  A full cake would not travel well for this setting, so I decided that cake in a jar would be perfect.


After finishing the meal out came the cake in a jar.  My friend, being the sweet-lover that she is, loved her cake and side stepped the small spoon that was more decorative then useful, and picked up her dinner fork to eat the cake.  Her husband, however, decided to use the little spoon and dropped a fourth of the cake on his pants.  All in all, it came out well and tasted yummy… even if it was a summer cake made in winter.

Thursday, December 01, 2011

Flyby Post: Hazelnut Chocolate Chip Cookie Crisp


This is just a quick post to show a treat I whipped up for work today.


These cookies are really easy and quick to accomplish. I used my favorite Chocolate Chip Cookie recipe and thinned the batter with a little skim milk to get a flatter, crisper cookie. I then chopped (into pretty small pieces) toasted hazelnuts and folded in mini chocolate chips.


These cookies remind me of Nutella, of course, without the overwhelming taste of cocoa. Between the flavor notes of hazelnut and chocolate, you get the luscious taste of vanilla and brown sugar in the cookie batter. YUM!

Monday, November 28, 2011

Sugar Cookie Bars


I was invited over to a friend’s house for dessert after Thanksgiving dinner.  Normally, people have pie for Thanksgiving-- sweet potato, apple, pumpkin, and/or pecan pie.  Other families have cake as well-- red velvet, spice, and/or chocolate cake.  I wanted to bring something different to the dessert table.


I decide on a Sugar Cookie Bar recipe that I have had lying around for a while, just waiting to be used.  I chose the cookie recipe because it was kid friendly (my friend had three little ones over for Thanksgiving), it was a sugar cookie (which my friend is a huge fan of, especially with princess or almond flavoring), and it surely would not be in competition with more traditional Thanksgiving desserts.


What truly made this cookie bar special was the frosting recipe.  The recipe circling the web used shortening and butter.  While, that recipe may have been traditional, I just could not see the benefit of using shortening on top of a flat cookie.  I did not feel the durability of a shortening based frosting was warranted here.


My friend is a lover of traditional buttercream, you know the kind with butter, powdered sugar, a little milk, and flavor extract.  This icing would be perfect for this type of cookie, but I did not want to go the sweet, sweet route.  I decided on a Swiss meringue buttercream, which is light, fluffy, silky, and decadent, but not too sweet.


But I still have not hit on the special part of the frosting… wait for it…. wait for it… Brown Sugar.  This is not typical Swiss meringue buttercream.  These sugar cookie bars are frosted with a Brown Sugar Swiss Meringue Buttercream.  The brown sugar in the frosting adds an almost caramel-y dimension of flavor.  It was delightful.


I got three glowing, sticky face endorsements from the little ones at my friend’s home and the adults liked it just the same.  My sugar cookie loving friend liked them as well, but would have preferred the traditional buttercream frosting…. But hey, I knew that going in.  If I planned better, I would have used fall leaves sprinkles on the top.  These are easily adaptable to whatever holiday you are celebrating by changing the sprinkles.  This is a quick and easy recipe, great for all the Holiday parties coming up.  I hope you will give it a try.


Sugar Cookie Bars
Adapted from Recipe Girl

Cookie Ingredients:
1 cup butter, room temperature
2 cups granulated sugar
4 large eggs
4 tsp princess flavor emulsion
5 cups all-purpose flour
1 tsp salt
1 tsp baking soda

Frosting Ingredients:
4 egg whites
1 cup brown sugar
3 sticks (1 1/2 cup) butter, room temperature
Splash Vanilla

Method:
1. Preheat oven to 375F and line a rimmed cookie sheet with parchment. Try for as close to 13x18in pan that you have.

2. Cream together butter and sugar until fluffy, then add eggs in mixing one at a time, followed by princess flavor emulsion.

3. In a separate bowl whisk together flour, salt & baking soda, then add to butter mixture and mix just until combined.

4. Spread dough on cookie sheet with the use of your hands (sprayed with nonstick spray). Also, to get a flat surface, you can cover the dough with parchment paper and press another pan of equal size on top of the dough (Remove the additional sheet of parchment when done);

5. Bake for 15-20 min, until light golden brown and a toothpick comes out clean or with a few crumbs.

6. Cool completely before frosting.

7. Using the quantities of ingredients listed above, prepare Swiss Meringue Buttercream. Sorry, I am being so lazy right now and not reposting the method of making the frosting.

8. Frost, sprinkle, and the cut into bars. Remember this frosting does not crust and is super silky at room temperature. Once refrigerated, allow to return to room temperature before enjoying.

Monday, November 21, 2011

Pumpkin, Spice, and Everything Nice


As a child, I grew up on Sweet Potatoes.  Yam dishes at Thanksgiving and Sweet Potato was the dessert of choice, not my choice, from October through December.  My mom was traditional and Southern, and not a fan of pumpkin.  Therefore, I did not taste nary pumpkin until I was in high school.


I was at the grocery store and saw the cutest little pumpkin that was the size of a squished softball.  I purchased the pumpkin brought it home and then tried to figure out what to do with it.  I decide to make a pumpkin cookie.  I was by no means that baker then that I am now.  They turned out to be more like orange colored flavorless biscuits, but that was my first attempt with pumpkin.  Over the years, since then I would attempt pumpkin cookies every November with some better results, but never complete success.  By the time I graduated from college, the tradition died hard and I did not touch pumpkin much at all.


Well enter this 2011 autumn season and I cannot get enough of pumpkin.  Sure, I used pumpkin in a single dish last year, but this year I went all out.  This year I become a pumpkin enthusiast.  I have been through 4 fresh pumpkins turned into puree and two cans of pumpkin puree.  I have made cakes, drinks, muffins, and more.


A friend saw my Cinnadoodle Cookies post and asked could I make these for her pre-Thanksgiving potluck.  I said sure and immediately knew that I really wanted to Thanksgiving-it up by adding pumpkin.  I was excited about adding pumpkin to yet another baked good.  I scoured the internet to find a recipe, but I found nothing.  I knew I would have to create the recipe myself.


Immediately, I was flooded with thoughts of the supposed-to-be pumpkin cookies from my youth.  You may have not noticed on the list above, but cookies was not listed as one of the things I have used pumpkin for recently.  I could have run scared of making pumpkin cookies again and just made plain snickerdoodles… But I said no!  Strapped on my apron and got into the kitchen to create these fine dandies right here.


I have a few requirements for typical snickerdoodles and I wanted to ensure they were still present in this cookie.  Specifically, I like only granulated sugar (not brown sugar), the use of cream of tartar, and more than just cinnamon in my coating.  With those thoughts in mind I created the recipe below.  The cookies are crunchy on the exterior due to the coating and soft and chewy on the inside.  They are gloriously orange and taste (and smell) of pumpkin.  Lastly, the cinnamon chips offer nice burst of flavor in addition to the multiple spices in the coating.  These cookies are definitely the best pumpkin cookies I have ever made (though based on my history that is not saying much); I definitely mark these cookies as a complete pumpkin success!


Pumpkin Cinnadoodle Cookies
By: Baker at Law
Makes a little over 2 dozen cookies

Ingredients (at room temperature):
1 cup (2 sticks) Butter
1 1/2 cup Granulated Sugar
3/4 cup (6 oz by weight) Pumpkin Puree
1 egg (or egg substitute)
2 tsp Vanilla Extract
3 1/2 cup All-purpose Unbleached Flour
1 tsp Cream of Tartar
1 1/2 tsp Baking Powder
1 bag Cinnamon Chips (can be found on the baking aisle with the chocolate chips, usually made by Hersey’s)

Topping Mixture:
*You will have extra topping mixture left. I like to make more than needed so I can get an even coat on all cookies. The extra can be used for more cookies or over baked Sweet Potatoes! If extras really bother you, cut the topic mixture recipe in half [provided in brakets].*
1 cup Granulated Sugar [1/2 cup]
3 tsp Ground Cinnamon [1 1/2 tsp]
1 tsp Ground Allspice [1/2 tsp]
scant 1 tsp Ground Ginger [scant ½ tsp]
1/4 tsp Ground Nutmeg [2 heavy dashes]

Method:
1. Preheat oven to 350°F with the oven rack in the center.

2. Cream together the butter and sugar.

3. Add the pumpkin puree, egg, and vanilla to the butter mixture and beat until well combined. Set aside.

4. In a separate bowl mix together the flour, cream of tartar, and baking powder with a fork until well fluffed and combined.

5. Pour flour mixture over pumpkin mixture and stir until all the flour is incorporated.

6. Pour in the cinnamon chips and stir/fold until the cinnamon chips are evenly distributed throughout the batter. Set aside.

7. In a small shallow container mix together all the toping ingredients.

8. With a cookie scoop (I use a 3 TBS capacity scoop for these) or any other method to make consistent sized cookies, scoop up the batter into a ball and roll the cookie ball into the toping mixture. Make sure it is well coated.

9. Place the cookies on a parchment paper lined cookie sheet, leaving space in between them to allow for spreading.

10. With the palm of your hand, press down on the cookie forming a thick disk (as opposed to the ball it was just in).

11. Bake the cookies for 12-15 minutes until the cookies no longer looks raw on top and little cracks on the surface are just starting to form.

12. Let the cookies cool completely and then enjoy.