For the second month in a row, I am running and rushing to get the challenge complete. At least this month I am on time… just barely. (Pictures will be posted later. I don’t feel like uploading them right now.)
Lately, I have just not felt like baking. I knew the challenge due date was coming up and I have slowly bought all the ingredients, but I just have had no inspiration to bake. The few things I have baked this month, mainly the simplest thing ever--chocolate chip cookies-- even came out as a wreck. There is just so much going on that not even baking has been able to life my spirits. But I digress; this post is about the challenge not obstacles.
---------------------------------------------
The 2009 October Daring Bakers’ challenge was brought to us by Ami S. She chose macarons from Claudia Fleming’s The Last Course: The Desserts of Gramercy Tavern as the challenge recipe. [I did not use this recipe 1) because I made a vegan version and 2) I did not have any granulated sugar, so I used the Italian method to create a sugar syrup from raw sugar.]
I wanted to do a fall inspired cookie. In my head I was seeing orange and brown, though in execution the fruit flavoring did not turn the batter in color at all. I made Vegan Orange Tangerine Zinger Macrons. Sorry, I am not a fan of cookie fillings (I do not even like the filling in an Oreo! I know, I know.), so I did not fill these. I was going to dip the bottoms in chocolate, but truthfully, I did not want to waste the chocolate on cookies that will mostly like not be eaten.
THE RECIPE
I kind of winged it for this recipe. Turning a meringue based cookie vegan is difficult and I have very little experience veganizing recipes. So, take the recipe for what it is worth.
6 tbs Ener-g Egg Replacer
1 1/2 cup water
Whip the replacer and water together until it forms medium to stiff peaks. This will take several minutes. Be sure to scrap down the bowl.
150 grams sugar
50ml water
Boil in a pot until the temp. reads 117C. Add to the whipped mixture.
250 grams almond meal
125 grams confectioners sugar
1 bag orange tangerine zinger tea (no teas leaves, just dried fruit)
Process the almond mixture together in a food processor. Then fold the almond mixture into the whipped mixture above.
Pipe circles onto parchment paper and let the shells “dry out” on the counter for at least an hour.
Pre-heat the oven to 280F and bake the shells for 25 minutes. Remove the shells. Turn the oven up to 350 and bake for an additional 5 minutes.
Now my thoughts on the “macrons”…. The negatives: the cookies had no feet and not shiny shells. The positives: they held their shape once piped and baked.
Final thoughts: I never had a non-vegan version of this cookie. So I really have nothing to aspire them to. I really did not like them; nothing special as far as taste is concerned and I could do for a crisper texture. I will most likely not make them again.

Tuesday, October 27, 2009
Monday, September 28, 2009
September (and yes it is still Sept!) Daring Bakers’ Challenge
 First, for the required language:
The September 2009 Daring Bakers' challenge was hosted by Steph of A Whisk and a Spoon. She chose the French treat, Vols-au-Vent based on the Puff Pastry recipe by Michel Richard from the cookbook Baking With Julia by Dorie Greenspan.
Second, and now, for my confession… Hi, I am a slacking Daring Baker and I was late completing this month’s challenge. I don’t know what it is about this month’s challenge but I just was not that excited about completing it. I waited and waited and then figured I would crank it out before the 30th of the month. Then, today, the 28th of the month, I remembered the challenges are due to be posted on the 27th. I have not missed a challenge, and I have not been late with a posting (until now). So, I hauled tail home from work to knock out this challenge.
So, I present Vegan Vols-au-Vent with Fried Apple Filing
 You can find the challenge recipe here for the puffed pastry. The fried apples were really simple: Peel and cube your favorite apple. Melt margarine in a frying pan. Pour in the apples. Stir in raw sugar, allspice, cinnamon, and rum extract. Cook until they reach your desired consistency (be careful not to over caramelize them… a.k.a burn them).
Thoughts and reflectionsI halved the puff pastry recipe and used earth balance margarine instead of butter. Note- margarine is softer than butter and I think a little harder to work with.

(Vols-au-vent before baking. Just in case they totally flopped in the oven
I wanted proof that I tried!)
In baking my vols-au-vent, they did not puff up like puff pastry should. I think I rolled my initial margarine layer to thin and subsequently the dough to thin as well. (Funny enough, as I am typing this my vols-au-vent are in the oven. I decided to taste one of the flower centers and Oh, My! Heaven! Clouds of flakiness!) So, next time I will not roll them as thin to get a high rise, but the texture is golden.
Lastly, my cooking time was longer than the recommended time. I turn the oven from 400 degrees F to 350 after about 25 minutes. Also, they leaked a little bit of margarine at the very beginning of baking, but magically (and thankfully) reabsorbed the margarine and turned out phenomenally.
Closing thoughts: They were absolutely delightful once filled. The pastry had a salty taste and it paired nicely with the sweet, but not too sweet, fried apple filling. It was mommy approved (and that says A LOT)!

Great challenge and I will get October’s challenge done ON TIME!
Final closing thought (yup, it is like a P.P. S.) I did one turn on the excess dough and rolled it into cinnamon sugar palmiers. They are currently resting in the fridge. I could not over achieve and bake those tonight too. Something to look forward to… :o)
Thursday, August 27, 2009
TORTS (to tarts): Daring Bakers’ August Challenge
My status as not just a daring baker, but also a soon-to-be-lawyer baker has come full circle. In June, I finally made a tart. Now in August, I finally made a tort. I have made the two desserts that exemplify the name of this blog. So, I am grateful to the Daring Bakers and this months hostesses for choosing this months challenge.
The August 2009 Daring Bakers' challenge was hosted by Angela of A Spoonful
of Sugar and Lorraine of Not Quite Nigella. They chose the spectacular Dobos
Torte based on a recipe from Rick Rodgers' cookbook Kaffeehaus: Exquisite
Desserts from the Classic Caffés of Vienna, Budapest, and Prague.
 So much for getting the positive out of the way. I was not a huge fan of this recipe. The sponge cake was my favorite part of the recipe. The cake was light and airy, sponge-like, if you will. The sponge by itself was fantastic. In the recipe, I exchange vanilla extract with rum extract to give it a punch of flavor.
What really troubled me about this recipe was the chocolate butter cream. The butter cream would not set to a consistence in which the tort could be served at room temperature. Even refrigerated, the frosting did not hold-up well. To assemble the cake I put butter cream between each layer and then wrapped the cake in parchment paper circle to help it retain its shape while I refrigerated it. Then I frosted the outside of the cake and had to freeze the cake just to get the cake to be halfway presentable for pictures. I was really disappointed with the consistency of the butter cream, though the flavor was okay.
Lastly, the recipe requires the cake to be topped with a toffee/caramel coated sponge layer. I really did not feel like tackling caramel, but in the spirit of the challenge, I wanted to complete all elements. Well, true to form, I burned the first attempt at the caramel. I do this each time I make caramel. So, the second batch came out well and I did a daisy shaped flower topper to my tort.
 As always, I am proud to say I completed the challenge regardless of the results :-). The challenge recipe and the other daring bakers’ torts can be accessed from The Daring Kitchen.
The August 2009 Daring Bakers' challenge was hosted by Angela of A Spoonful
of Sugar and Lorraine of Not Quite Nigella. They chose the spectacular Dobos
Torte based on a recipe from Rick Rodgers' cookbook Kaffeehaus: Exquisite
Desserts from the Classic Caffés of Vienna, Budapest, and Prague.
So much for getting the positive out of the way. I was not a huge fan of this recipe. The sponge cake was my favorite part of the recipe. The cake was light and airy, sponge-like, if you will. The sponge by itself was fantastic. In the recipe, I exchange vanilla extract with rum extract to give it a punch of flavor.What really troubled me about this recipe was the chocolate butter cream. The butter cream would not set to a consistence in which the tort could be served at room temperature. Even refrigerated, the frosting did not hold-up well. To assemble the cake I put butter cream between each layer and then wrapped the cake in parchment paper circle to help it retain its shape while I refrigerated it. Then I frosted the outside of the cake and had to freeze the cake just to get the cake to be halfway presentable for pictures. I was really disappointed with the consistency of the butter cream, though the flavor was okay.
Lastly, the recipe requires the cake to be topped with a toffee/caramel coated sponge layer. I really did not feel like tackling caramel, but in the spirit of the challenge, I wanted to complete all elements. Well, true to form, I burned the first attempt at the caramel. I do this each time I make caramel. So, the second batch came out well and I did a daisy shaped flower topper to my tort.
As always, I am proud to say I completed the challenge regardless of the results :-). The challenge recipe and the other daring bakers’ torts can be accessed from The Daring Kitchen.
Monday, July 27, 2009
Happy Anniversary: Daring Bakers’ July Challenge
Happy Anniversary to me… Happy Anniversary to me… Happy one year as a daring baker… Happy Anniversary to me! Yes, I have been officially daring in my baking for one year. May I also toot my own horn and say that I have not missed a challenge. Come exams, graduation, cross continental moves, and study for the bar, I have not forsaken the promise to be daring at least once a month and challenge myself to bake without fear! Okay… Enough self appreciation, on to this months challenge.
 The July Daring Bakers' challenge was hosted by Nicole at Sweet Tooth. She chose Chocolate Covered Marshmallow Cookies and Milan Cookies from pastry chef Gale Gand of the Food Network.
I could have taken the easy road and made the Milan cookies, but I wanted to be daring and without time to make both cookies, I decided to tackle the Marshmallow Cookies. As most people do not know, as it seems, marshmallow contains gelatin, an animal by-product and as a devoted vegetarian, I do not eat the stuff. For years I have been searching for a veggie friendly marshmallow recipe. Most recipes I have seen and tried called for agar agar and they always turned out to be a mess a mess.
I decided to roll up my sleeves and tackle veggie marshmallows again. [Just as a note, the do actually sell veggie and vegan marshmallows, but this time of year they are expensive and hard to ship because of the heat.] I found a veggie (not vegan) marshmallow recipe using Xanthum gum that turned out wonderfully. So, for the first time in nearly ten years I have been able to enjoy a marshmallow. I was and still am overjoyed! The recipe is posed below.
After tackling the marshmallow recipe, the rest of the cookie pretty much came together without problem. Be sure to check out the other daring bakers at http://thedaringkitchen.com/.
Without further adieu, I present to you Caramel (Veggie) Mallow Cookies.

------------------------------------------------------
Marshmallows with Xanthan
by Elizabeth Falkner (Demolition Desserts)
Ingredients:
• 60 mL water
• pinch of cream of tartar
• 255 g sugar, granulated
• 255 g light corn syrup
• ½ vanilla bean
• 85 g egg whites (about 3 egg whites)
• 5 g xanthan (0.76%)
Ground xanthan with a tablespoon of sugar. Set aside. Heat water, cream of tartar, remaining sugar, corn syrup and vanilla to 120ºC. Discard vanilla bean. Whisk egg whites for about 2 min until still soft. Continue whipping egg whites at slow speed while adding syrup slowly. Sprinkle xanthan mix while still whipping. Turn speed up and continue mixing for 2-3 min or until meringue pulls away from sides. Sprinkle a pan or baking sheet generously with cornstarch and spread out the meringue. Sprinkle top with cornstarch, cover with plastic and leave to set for 4 hours in a refrigerator. Cut marshmallows into desired shapes and dip cut surfaces in cornstarch.
The July Daring Bakers' challenge was hosted by Nicole at Sweet Tooth. She chose Chocolate Covered Marshmallow Cookies and Milan Cookies from pastry chef Gale Gand of the Food Network.I could have taken the easy road and made the Milan cookies, but I wanted to be daring and without time to make both cookies, I decided to tackle the Marshmallow Cookies. As most people do not know, as it seems, marshmallow contains gelatin, an animal by-product and as a devoted vegetarian, I do not eat the stuff. For years I have been searching for a veggie friendly marshmallow recipe. Most recipes I have seen and tried called for agar agar and they always turned out to be a mess a mess.
I decided to roll up my sleeves and tackle veggie marshmallows again. [Just as a note, the do actually sell veggie and vegan marshmallows, but this time of year they are expensive and hard to ship because of the heat.] I found a veggie (not vegan) marshmallow recipe using Xanthum gum that turned out wonderfully. So, for the first time in nearly ten years I have been able to enjoy a marshmallow. I was and still am overjoyed! The recipe is posed below.
After tackling the marshmallow recipe, the rest of the cookie pretty much came together without problem. Be sure to check out the other daring bakers at http://thedaringkitchen.com/.
Without further adieu, I present to you Caramel (Veggie) Mallow Cookies.
------------------------------------------------------
Marshmallows with Xanthan
by Elizabeth Falkner (Demolition Desserts)
Ingredients:
• 60 mL water
• pinch of cream of tartar
• 255 g sugar, granulated
• 255 g light corn syrup
• ½ vanilla bean
• 85 g egg whites (about 3 egg whites)
• 5 g xanthan (0.76%)
Ground xanthan with a tablespoon of sugar. Set aside. Heat water, cream of tartar, remaining sugar, corn syrup and vanilla to 120ºC. Discard vanilla bean. Whisk egg whites for about 2 min until still soft. Continue whipping egg whites at slow speed while adding syrup slowly. Sprinkle xanthan mix while still whipping. Turn speed up and continue mixing for 2-3 min or until meringue pulls away from sides. Sprinkle a pan or baking sheet generously with cornstarch and spread out the meringue. Sprinkle top with cornstarch, cover with plastic and leave to set for 4 hours in a refrigerator. Cut marshmallows into desired shapes and dip cut surfaces in cornstarch.
Saturday, July 11, 2009
Welcome Back!
I have not decorated a cake in three years. While living in CA, I did not have make cake decorating arsenal and I did not want to re-buy the equipment I already had in triplicate at home. I have to admit however, because I could not decorate in CA, it allowed me true time to grow and elevate my baking.
 But a last, I am back at home and decorating cake! This is the first cake I have decorating in nearly three years. I made a cake to celebrate a little girl’s 8th Birthday. It is not a masterpiece by any means. Yet, I am proud of it and happy to be getting back in the saddle. I am excited about what the future holds when I have 1) more time to decorate, 2) more time to practice different techniques, and 3) more training!
But a last, I am back at home and decorating cake! This is the first cake I have decorating in nearly three years. I made a cake to celebrate a little girl’s 8th Birthday. It is not a masterpiece by any means. Yet, I am proud of it and happy to be getting back in the saddle. I am excited about what the future holds when I have 1) more time to decorate, 2) more time to practice different techniques, and 3) more training!
Saturday, June 27, 2009
Daring Bakers' June Challenge
My blog is called “From Torts to Tarts” and it has been my goal to make a tort and a tart. Finally, I made a tart, with much encouragement from the daring bakers. Of course, it is not just a plain tart… Oh, no… That is not the DBer’s style! So, I present to you an Apricot Bakewell tart.
 Unfortunately, I am not able to really blog about this month’s experience. My study schedule is ridiculously hectic right now and I negated half a days work just baking and writing these 3 short paragraphs. But, enjoy the pictures of the finished tart and my brand new Kitchen Aid mixer (Thanks, Ann Marie and Steve!) below.
Required blog check language: The June Daring Bakers' challenge was hosted by Jasmine of Confessions of a Cardamom Addict and Annemarie of Ambrosia and Nectar. They chose a Traditional (UK) Bakewell Tart... er... pudding that was inspired by a rich baking history dating back to the 1800's in England.
Check out my fellow baring bakers and the challenge recipe at: http://thedaringkitchen.com/


Unfortunately, I am not able to really blog about this month’s experience. My study schedule is ridiculously hectic right now and I negated half a days work just baking and writing these 3 short paragraphs. But, enjoy the pictures of the finished tart and my brand new Kitchen Aid mixer (Thanks, Ann Marie and Steve!) below.Required blog check language: The June Daring Bakers' challenge was hosted by Jasmine of Confessions of a Cardamom Addict and Annemarie of Ambrosia and Nectar. They chose a Traditional (UK) Bakewell Tart... er... pudding that was inspired by a rich baking history dating back to the 1800's in England.
Check out my fellow baring bakers and the challenge recipe at: http://thedaringkitchen.com/


Wednesday, May 27, 2009
Sentimental Strawberry Strudel: Daring Bakers’ May Challenge
This month the daring bakers set their sights on conquering strudel… And no, not the Pillsbury Toaster Pastries variety… I am talking authentic German strudel with paper thin dough.
 So, the story behind the challenge name- Sentimental Strawberry Strudel
1) Sentimental- This is the last challenge I will be taking part of in my apartment in California. I became a daring baker in this less then equipped kitchen. I did things the hard way here, everything by hand. I did not have a food processor, standing mixer, or a variety of baking pans and decorating tips. Plus, my oven was the original in my apartment circa 1970. Even with all those challenges, I produced great food and desserts in that kitchen. I got to know my oven and the temperatures and times my creations needed to succeed in my oven. So, it is hard to leave, but I am ready to start baking in my new, state-of-the-art gas stove circa 2008 in Virginia.
2) Strawberry- The original recipe is for apple strudel. I wanted to be a little creative and inventive with the recipe, so apple was not the fruit of choice for me. I thought peaches would be yummy. I went to the store and not one fresh peach in sight. It is not peach season… darn… So, on the Saturday before Mother’s Day I went to the Strawberry Festival and decided to use fresh organic strawberries as the fruit in my strudel.
3) Strudel- The required language for the auto-checker so my completion of this challenge is counted: The May Daring Bakers’ challenge was hosted by Linda of make life sweeter! and Courtney of Coco Cooks. They chose Apple Strudel from the recipe book Kaffeehaus: Exquisite Desserts from the Classic Cafés of Vienna, Budapest and Prague by Rick Rodgers.
 The dough has to be stretched so thin that you can read through it.
 Strawberry and cream cheese filling before rolled.
 Strudel brushed with butter, prior to baking. It looks like a lamb loin wrapped in dough. Being a vegetarian, this look grossed me out.
 The exploded strudel…
 However, I was able to save a small portion.
My thoughts on this challenge:
I wish I had peaches or some other fruit that held its form better with pre-cooking. I boiled the strawberries on the stove with sugar and it became strawberry syrup, which I thickened into a pie filling consistency with cornstarch. But, when put in to the pastry it was too runny and broke open the side of the strudel. So, next time I would not pre-cook the strawberries and see if that cures the problem. Also, I think I added too much filling, so I could not wrap the filling in dough enough times to form a sturdy crust. It tasted great though and I cut some of the sweetness of the strawberry filling with a layer of cream cheese filling.
 Please visit the Daring Kitchen for the challenge recipe and to see the creations of my fellow Daring Bakers.
So, the story behind the challenge name- Sentimental Strawberry Strudel1) Sentimental- This is the last challenge I will be taking part of in my apartment in California. I became a daring baker in this less then equipped kitchen. I did things the hard way here, everything by hand. I did not have a food processor, standing mixer, or a variety of baking pans and decorating tips. Plus, my oven was the original in my apartment circa 1970. Even with all those challenges, I produced great food and desserts in that kitchen. I got to know my oven and the temperatures and times my creations needed to succeed in my oven. So, it is hard to leave, but I am ready to start baking in my new, state-of-the-art gas stove circa 2008 in Virginia.
2) Strawberry- The original recipe is for apple strudel. I wanted to be a little creative and inventive with the recipe, so apple was not the fruit of choice for me. I thought peaches would be yummy. I went to the store and not one fresh peach in sight. It is not peach season… darn… So, on the Saturday before Mother’s Day I went to the Strawberry Festival and decided to use fresh organic strawberries as the fruit in my strudel.
3) Strudel- The required language for the auto-checker so my completion of this challenge is counted: The May Daring Bakers’ challenge was hosted by Linda of make life sweeter! and Courtney of Coco Cooks. They chose Apple Strudel from the recipe book Kaffeehaus: Exquisite Desserts from the Classic Cafés of Vienna, Budapest and Prague by Rick Rodgers.
The dough has to be stretched so thin that you can read through it.Strawberry and cream cheese filling before rolled.Strudel brushed with butter, prior to baking. It looks like a lamb loin wrapped in dough. Being a vegetarian, this look grossed me out.The exploded strudel… However, I was able to save a small portion.My thoughts on this challenge:
I wish I had peaches or some other fruit that held its form better with pre-cooking. I boiled the strawberries on the stove with sugar and it became strawberry syrup, which I thickened into a pie filling consistency with cornstarch. But, when put in to the pastry it was too runny and broke open the side of the strudel. So, next time I would not pre-cook the strawberries and see if that cures the problem. Also, I think I added too much filling, so I could not wrap the filling in dough enough times to form a sturdy crust. It tasted great though and I cut some of the sweetness of the strawberry filling with a layer of cream cheese filling.
Please visit the Daring Kitchen for the challenge recipe and to see the creations of my fellow Daring Bakers.Monday, April 27, 2009
Daring Bakers April Challenge: Cheese and Wine Course
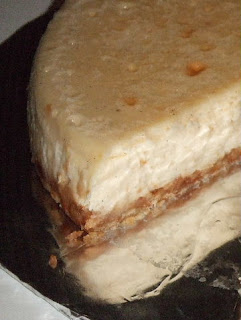
Leave it to me to turn dessert into a dinner course- the well know cheese and wine course :-) The April 2009 challenge is hosted by Jenny from Jenny Bakes. She has chosen Abbey's Infamous Cheesecake as the challenge.
 Daring bakers returned to the sweet side this month and gave us the opportunity to get our creative juices flowing. We were provided with a basic plain cheesecake recipe and given the liberty to add, subtract, and change the recipe to create some unique flavors.
I asked a friend her favorite kind of cheesecake and she said Vanilla Bean. I was thinking, great what a boring choice. Ho-hum, boring, run-of-the-mill vanilla. But, I did have some vanilla beans I wanted to use up. Then I thought… Let’s increase the alcohol content in the cheesecake. Lastly, I had to do a little more tinkering with the basic Vanilla Bean Cheesecake and added a caramel sauce, an alcohol based caramel sauce. Hehehe… I can hear the gasp.
So, I present to you...
 Crust:
- 2 cups Leibniz Butterkeks (German Cookie in Yellow package with Red writing- I bought mine from Wal-Mart)
- 1 stick butter
- 1 ½ tbs sugar
Filling:
- 2 sticks cream cheese
- 2/3 cup sugar
- 2 eggs
- 2/3 liquid- (at least 1/3 cup heavy cream and the rest Kahlua French Vanilla)
- 2 tbs Kahlua French Vanilla
- 2 vanilla bean innards
 Caramel Sauce:
- 2 cups sugar
- 1/2 cup water
- 1 tbs light corn syrup
- heavy cream and Kahlua French Vanilla
- 4 tbs butter
Daring bakers returned to the sweet side this month and gave us the opportunity to get our creative juices flowing. We were provided with a basic plain cheesecake recipe and given the liberty to add, subtract, and change the recipe to create some unique flavors.I asked a friend her favorite kind of cheesecake and she said Vanilla Bean. I was thinking, great what a boring choice. Ho-hum, boring, run-of-the-mill vanilla. But, I did have some vanilla beans I wanted to use up. Then I thought… Let’s increase the alcohol content in the cheesecake. Lastly, I had to do a little more tinkering with the basic Vanilla Bean Cheesecake and added a caramel sauce, an alcohol based caramel sauce. Hehehe… I can hear the gasp.
So, I present to you...
Kahlua French Vanilla Bean Cheesecake with a Kahlua French Vanilla Caramel Sauce...
I am getting really busy with graduation in less than 20 days from the date of this post. So, below I am including the ingredients without instructions. I am pretty sure you can figure out how to put them together on your own, :-)
Cheesecake Ingredients
Cheesecake Ingredients
Crust:- 2 cups Leibniz Butterkeks (German Cookie in Yellow package with Red writing- I bought mine from Wal-Mart)
- 1 stick butter
- 1 ½ tbs sugar
Filling:
- 2 sticks cream cheese
- 2/3 cup sugar
- 2 eggs
- 2/3 liquid- (at least 1/3 cup heavy cream and the rest Kahlua French Vanilla)
- 2 tbs Kahlua French Vanilla
- 2 vanilla bean innards
Caramel Sauce:- 2 cups sugar
- 1/2 cup water
- 1 tbs light corn syrup
- heavy cream and Kahlua French Vanilla
- 4 tbs butter
Friday, April 24, 2009
Celebrate Good Time, Come On!
Today I attended the last class of my law school career! I know…How exciting. I am going to a small celebration of a great year event tonight and I wanted to bring something…special. Well, what better to celebrate than with a little alcohol? I bought a rather large bottle of French Vanilla Kahlúa for a special reason that shall be revealed later this month ;-). So, I have been trying to use up the remainder of the bottle buy cooking different treats.
Adult Chocolate Chip Cookies
The way in which true sophisticated adults would want their cookies- Dark Chocolate, White Chocolate, and Kahlúa!
 The recipe is simple. Start with the basic chocolate chip recipe. Replace half of the chips with dark chocolate chips and replace the other half with white chocolate chips. Lastly, depending on just how much Kahlúa taste you want, start by replacing the vanilla extract in the recipe with Kahlúa. If that is not enough, and in my case it was not, I replaced the liquid the eggs would provide with Kahlúa. Between the Kahlúa and any other liquid you use, go for the consistency to be similar to your normal recipe. I used 3/4 a cup and no eggs.
 Chocolate Cupcakes with Kahlúa Butter Cream Frosting
The best way to celebrate and not look like an alckie is to mix your alcohol in your uncooked food, so the intoxicating components don’t evaporate :-) Just kidding. But, Kahlúa does have a special way of adding an extra diminution of flavor to your treat. Modifying your favorite butter cream frosting recipe, trade off all liquid in your recipe for Kahlúa depending on your taste. I traded off 2 tbs of milk and 1 tsp of vanilla with Kahlúa.
So get out your favorite alcohol and consider how to modify your favorite recipes!
Adult Chocolate Chip Cookies
The way in which true sophisticated adults would want their cookies- Dark Chocolate, White Chocolate, and Kahlúa!
The recipe is simple. Start with the basic chocolate chip recipe. Replace half of the chips with dark chocolate chips and replace the other half with white chocolate chips. Lastly, depending on just how much Kahlúa taste you want, start by replacing the vanilla extract in the recipe with Kahlúa. If that is not enough, and in my case it was not, I replaced the liquid the eggs would provide with Kahlúa. Between the Kahlúa and any other liquid you use, go for the consistency to be similar to your normal recipe. I used 3/4 a cup and no eggs.Chocolate Cupcakes with Kahlúa Butter Cream FrostingThe best way to celebrate and not look like an alckie is to mix your alcohol in your uncooked food, so the intoxicating components don’t evaporate :-) Just kidding. But, Kahlúa does have a special way of adding an extra diminution of flavor to your treat.
Modifying your favorite butter cream frosting recipe, trade off all liquid in your recipe for Kahlúa depending on your taste. I traded off 2 tbs of milk and 1 tsp of vanilla with Kahlúa.So get out your favorite alcohol and consider how to modify your favorite recipes!
Friday, March 27, 2009
Lasagne: Daring Bakers March 2009 Challenge
HAPPY SPRING! For the March 2009 challenge, our fearless fellow members decide to turn our weak and nimble arms into strong, stocky pasta making machines! This month our challenge was to make lasagna, from scratch… Yes, that means the noodles, as well. I actually had a friend, whom I love to death :-), ask “can you even make lasagna noodles from scratch?” I was tickled and had to remind her that there was a time in history with the pasta sheeter attachment to the kitchen aid did not exist!
 But this challenge was no typical American style fair. Oh no…It was so much better! Hi, My name is Rysheda and I am a former over abuser of Ricotta cheese in lasagna. But, I vow never to use that clumpy cheese again. As one of our challenge leaders stated, “the dish should always be a vivid expression of the ‘less-is-more’ philosophy of cooking. Mere films of béchamel sauce and ragu coat the sheerest spinach pasta. Parmigiano-Reggiano cheese dusts each layer. There is nothing more; no ricotta, no piling on of meats (ewww!), vegetables or cheese; little tomato, and no hot spice. Baking performs the final marriage of flavors. The results are splendid.” I could not agree more and my former unsophisticated palette has forever been changed by the sheer cream goodness of a Bechamel sauce!
 My Lasange contains the following ingredients and were layers in this order:
- Spinach Egg Pasta Sheets
- Basil Pesto
- Bechamel Cream Sauce
- Vegetarian Ground “Turkey” Ragu
- Parmigiano-Reggiano
Spinach Egg Pasta
 3 large eggs
4 ounces frozen chopped spinach, defrosted and squeezed dry
1 & 3/4 cups all purpose unbleached flour
Dough:
Mound the flour in the center of your work surface and make a well in the middle. Add the eggs and spinach. Use a wooden spoon to beat together the eggs and spinach. Then gradually start incorporating shallow scrapings of flour from the sides of the well into the liquid. As you work more and more flour into the liquid, the well’s sides may collapse. Use a pastry scraper to keep the liquids from running off and to incorporate the last bits of flour into the dough. Don’t worry if it looks like a hopelessly rough and messy lump.
Kneading:
Knead the dough until it becomes a cohesive mass. Knead the dough for about 3 minutes. Its consistency should be elastic and a little sticky. If it is too sticky to move easily, knead in a few more tablespoons of flour. Continue kneading about 10 minutes, or until the dough has become satiny, smooth, and very elastic. It will feel alive under your hands. Do not shortcut this step. Wrap the dough in plastic wrap, and let it relax at room temperature 30 minutes to 3 hours.
Rolling:
Separate the dough into four parts. Shape it into a ball and begin rolling out to form a circle, frequently turning the disc of dough a quarter turn. As you roll it out keep the dough even and roll it out as thin as possible. The goal is to be able to see the color of your hand through the dough (though mine was definitely not that thin).
Cut the dough into long rectangular sheets and hang over a wooden dowel to dry (or to get counter space for the next roll out).
Basil Pesto
Sorry, I did not measure. Place about 1/3 cup pine nuts, 3 cups fresh basil, and 3-4 tbs olive oil into a food processor and pulse until finely chopped.
Bechamel
4 tablespoons unsalted butter
4 tablespoons all purpose unbleached flour
2 & 2/3 cups skim milk
Salt and freshly ground pepper, to taste
Nutmeg, to taste
Using a medium-sized saucepan, melt the butter over low to medium heat. Sift over the flour, whisk until smooth, and then stir (without stopping) for about 3 minutes. Whisk in the milk a little at a time and keep the mixture smooth. Bring to a slow simmer, and stir 3 to 4 minutes, or until the sauce thickens. Cook, stirring, for about 5 minutes, until the sauce thickens. Season with salt, pepper, and a hint of nutmeg.
Vegetarian Ground “Turkey” Ragu
1 package Vegetarian Ground “Turkey”
1 can Sliced Stewed Tomatoes
Dried Italian Seasoning, to taste
Garlic Powder, to taste
Dried Sage, to taste
Brown the vegetarian ground “turkey” over medium heat, in a pan sprayed with a non-stick spray. Once brown, add the stewed tomatoes and turn the mixture down to low until it comes to a simmer. Once simmering, add the seasonings to taste. Let the sauce simmer on low for 20-30 minutes a it marries the flavors together and thickens slightly.
Assembly
 Assemble the components in the order above. State with a little Bechamel sauce on the bottom of the dish. Finish the top of the dish with an additional layer of pasta, then Bechamel sauce, and Parmigiano-Reggiano. Cover the dish with foil and bake in the over for an hour at 375F. Then remove the foil and allow the top to brown.
Let rest for a few minutes and then enjoy the fruit of your labor!
But this challenge was no typical American style fair. Oh no…It was so much better! Hi, My name is Rysheda and I am a former over abuser of Ricotta cheese in lasagna. But, I vow never to use that clumpy cheese again. As one of our challenge leaders stated, “the dish should always be a vivid expression of the ‘less-is-more’ philosophy of cooking. Mere films of béchamel sauce and ragu coat the sheerest spinach pasta. Parmigiano-Reggiano cheese dusts each layer. There is nothing more; no ricotta, no piling on of meats (ewww!), vegetables or cheese; little tomato, and no hot spice. Baking performs the final marriage of flavors. The results are splendid.” I could not agree more and my former unsophisticated palette has forever been changed by the sheer cream goodness of a Bechamel sauce!My Lasange contains the following ingredients and were layers in this order:- Spinach Egg Pasta Sheets
- Basil Pesto
- Bechamel Cream Sauce
- Vegetarian Ground “Turkey” Ragu
- Parmigiano-Reggiano
Spinach Egg Pasta
3 large eggs4 ounces frozen chopped spinach, defrosted and squeezed dry
1 & 3/4 cups all purpose unbleached flour
Dough:
Mound the flour in the center of your work surface and make a well in the middle. Add the eggs and spinach. Use a wooden spoon to beat together the eggs and spinach. Then gradually start incorporating shallow scrapings of flour from the sides of the well into the liquid. As you work more and more flour into the liquid, the well’s sides may collapse. Use a pastry scraper to keep the liquids from running off and to incorporate the last bits of flour into the dough. Don’t worry if it looks like a hopelessly rough and messy lump.
Kneading:
Knead the dough until it becomes a cohesive mass. Knead the dough for about 3 minutes. Its consistency should be elastic and a little sticky. If it is too sticky to move easily, knead in a few more tablespoons of flour. Continue kneading about 10 minutes, or until the dough has become satiny, smooth, and very elastic. It will feel alive under your hands. Do not shortcut this step. Wrap the dough in plastic wrap, and let it relax at room temperature 30 minutes to 3 hours.
Rolling:
Separate the dough into four parts. Shape it into a ball and begin rolling out to form a circle, frequently turning the disc of dough a quarter turn. As you roll it out keep the dough even and roll it out as thin as possible. The goal is to be able to see the color of your hand through the dough (though mine was definitely not that thin).
Cut the dough into long rectangular sheets and hang over a wooden dowel to dry (or to get counter space for the next roll out).
Basil Pesto
Sorry, I did not measure. Place about 1/3 cup pine nuts, 3 cups fresh basil, and 3-4 tbs olive oil into a food processor and pulse until finely chopped.
Bechamel
4 tablespoons unsalted butter
4 tablespoons all purpose unbleached flour
2 & 2/3 cups skim milk
Salt and freshly ground pepper, to taste
Nutmeg, to taste
Using a medium-sized saucepan, melt the butter over low to medium heat. Sift over the flour, whisk until smooth, and then stir (without stopping) for about 3 minutes. Whisk in the milk a little at a time and keep the mixture smooth. Bring to a slow simmer, and stir 3 to 4 minutes, or until the sauce thickens. Cook, stirring, for about 5 minutes, until the sauce thickens. Season with salt, pepper, and a hint of nutmeg.
Vegetarian Ground “Turkey” Ragu
1 package Vegetarian Ground “Turkey”
1 can Sliced Stewed Tomatoes
Dried Italian Seasoning, to taste
Garlic Powder, to taste
Dried Sage, to taste
Brown the vegetarian ground “turkey” over medium heat, in a pan sprayed with a non-stick spray. Once brown, add the stewed tomatoes and turn the mixture down to low until it comes to a simmer. Once simmering, add the seasonings to taste. Let the sauce simmer on low for 20-30 minutes a it marries the flavors together and thickens slightly.
Assembly
Assemble the components in the order above. State with a little Bechamel sauce on the bottom of the dish. Finish the top of the dish with an additional layer of pasta, then Bechamel sauce, and Parmigiano-Reggiano. Cover the dish with foil and bake in the over for an hour at 375F. Then remove the foil and allow the top to brown.Let rest for a few minutes and then enjoy the fruit of your labor!
The March 2009 challenge is hosted by Mary of Beans and Caviar, Melinda of Melbourne Larder and Enza of Io Da Grande. They have chosen Lasagne of Emilia-Romagna from The Splendid Table by Lynne Rossetto Kasper as the challenge.
Saturday, February 28, 2009
Feeling the DB love: Daring Baker’s February Challenge
 In the spirit of being a tad but cliché, this month’s challenge includes hearts and chocolate, but the challenge is anything but ordinary for me. This month’s challenge is a Flourless Chocolate Valentino Cake with Homemade Ice Cream.
I was excited when I saw this challenge because 1) a good friend gave me a heart shaped cupcake/muffin silicon pan for my birthday and this was the perfect opportunity to use it and 2) I was finally able to afford some fresh vanilla beans to give my ice cream that wonderful intense vanilla flavor and the little black dots.
Shockingly enough, I am not a huge fan of chocolate… waiting for the gasp heard round the world. I do eat chocolate, but I am not crazy about it. Further, when I eat chocolate I am totally Americanized and prefer milk chocolate… waiting for the those who have fainted to regain consciousness… So, for this challenge I used Semi-Sweet Ghirardelli Chocolate thinking I would try to cut the difference between dark and milk chocolate. The chocolate taste was still too intense for me, so next time I try this recipe I will do it with milk chocolate. Nevertheless, I am still super excited about the way the cake came out.
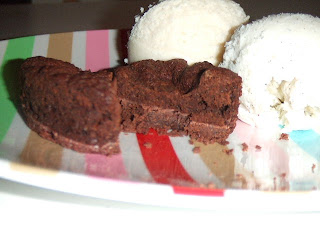 Now on to the ice cream. I was torn between wanting to try two different flavors. First, I decided to make Rum Ice Cream because I had rum extract at home and I love that buttery flavor. Then, when I was at Costco with a friend, I spotted affordable vanilla pods. Seeing as how I have never used a fresh vanilla pod, I immediately wanted to make Vanilla Bean Ice Cream. So, after going back and forth between which to make, I decided to split the recipe given in half and make both!
All-in-all great challenge! Be sure to check out the blogs of my fellow Daring Bakers.
Chocolate Valentino
I fourth the recipe given (using 1 large egg) and that yielded 4 hearts on my muffin pan. I cooked them for 18 minutes.
16 ounces (1 pound) (454 grams) of semisweet chocolate, roughly chopped
½ cup (1 stick) plus 2 tablespoons (146 grams total) of unsalted butter
5 large eggs separated
1. Put chocolate and butter in a heatproof bowl and set over a pan of simmering water (the bottom of the bowl should not touch the water) and melt, stirring often.
2. While your chocolate butter mixture is cooling. Butter your pan and line with a parchment circle then butter the parchment.
3. Separate the egg yolks from the egg whites and put into two medium/large bowls.
4. Whip the egg whites in a medium/large grease free bowl until stiff peaks are formed (do not over-whip or the cake will be dry).
5. With the same beater beat the egg yolks together.
6. Add the egg yolks to the cooled chocolate.
7. Fold in 1/3 of the egg whites into the chocolate mixture and follow with remaining 2/3rds. Fold until no white remains without deflating the batter. {link of folding demonstration}
8. Pour batter into prepared pan, the batter should fill the pan 3/4 of the way full, and bake at 375F/190C
9. Bake for 25 minutes until an instant read thermometer reads 140F/60C.
Note – If you do not have an instant read thermometer, the top of the cake will look similar to a brownie and a cake tester will appear wet.
10. Cool cake on a rack for 10 minutes then unmold.
 Vanilla Bean Ice Cream Recipe
1 cup half and half
1/2 cup heavy cream
1/3 cup sugar
Pinch of salt
2 vanilla pods
1. Scrap the vanilla pods and add it to the half and half and cream. Place the vanilla pods in the mixture and microwave until warm.
2. Remove the vanilla pods and mix in the rest of the ingredients with a beater.
3. Refrigerate the mixture until it is cool about 1-2 hours.
4. Place the mixture in the freezer.
5. Every 45 minutes take the mixture out the freezer. Scrape the ice from the sides and the bottom into the center of the bowl. Mix thoroughly with a beater. Repeat for 4-5 cycles of 45 minutes.
6. Let the ice cream complete freeze through, at least 4-6 hours, but best over night.
Rum Ice Cream Recipe
1 cup half and half
1/2 cup heavy cream
1/3 cup brown sugar
Pinch of salt
1/2 Tbs + 1/8 Tbs rum extract
1. Mix together all the ingredients and beat with a beater. Don’t worry about all the brown sugar, it will dissolve before it starts to freeze.
2. Refrigerate the mixture until it is cool about 30 minutes.
3. Beat the mixture with a beater and place the mixture in the freezer.
4. Every 45 minutes take the mixture out the freezer. Scrape the ice from the sides and the bottom into the center of the bowl. Mix thoroughly with a beater. Repeat for 4-5 cycles of 45 minutes.
5. Let the ice cream complete freeze through, at least 4-6 hours, but best over night.
The February 2009 challenge is hosted by Wendy of WMPE's blog and Dharm of Dad ~ Baker & Chef.We have chosen a Chocolate Valentino cake by Chef Wan; a Vanilla Ice Cream recipe from Dharm and a Vanilla Ice Cream recipe from Wendy as the challenge.
Saturday, February 14, 2009
V-Day Baking
Happy V-day. To celebrate my day I did a 4 mile walk/run to benefit Legal Services of Northern California. It was a lot of fun and supported a great cause. Most importantly, it did not rain so I did not have to fear catching pneumonia.
But I digress, that is not the point of this post. So, ON TO THE BAKING!
For V-day I wanted to make something I usually make special and a completely new recipe.
Red Velvet Bon-Bons
Is it cake? Is it candy? Is it the best of both worlds? YES! I saw a recipe for red velvet cake balls on Bakerella’s site well over a year ago. When it was warm, I did not want to tackle the recipe and worry about the chocolate not setting up in my warm apartment. Then as the weather got cold, I forgot that I wanted to make these. Then low-and-behold V-Day 2009 rolled around and I thought the red center to a classic V-day treat would be awesome.
 Everyone loved these, so I will definitely be making them again in the future. I would like to tweak the recipe some, so stay tuned.
 Deconstructed Chocolate chip Cookies
I make regular chocolate chip cookies all the time with great results. So to change it up I wanted to deconstruct the cookie, i.e.- make a chocolate chip cookie batter (yes, it is different than a sugar cookie batter) without the chocolate chips, then place the chocolate on the outside. The results are okay, but when making the dough I should have decreased the margarine in the batter. The cookies spread a lot while cooking and spread out thinner than I would have liked. Therefore, I made these smaller cookies, instead of the giant ones I had planned.
 They still tasted fantastic and if I did not tell you right above that I wanted to do something different no one would have known the difference, but I believe in transparency. Maybe someone else can learn from my mistakes :-)
On a slightly me tooting my own horn moment. At the race I went to today there was a table set up selling homemade chocolate chip cookies. One of the girls at the table said they were the best she ever tasted. My friend and I politely declined and walked away. Then my friend turned to me and said, “she hasn’t tasted yours!” That made me smile. So, I just had to share that moment. I love to bake and I love that people love what I bake.
HAPPY VALENTINE’S DAY TO ONE AND ALL… SINGLE, COUPLED, TOGETHER, APART OR OTHERWISE!
But I digress, that is not the point of this post. So, ON TO THE BAKING!
For V-day I wanted to make something I usually make special and a completely new recipe.
Red Velvet Bon-Bons
Is it cake? Is it candy? Is it the best of both worlds? YES! I saw a recipe for red velvet cake balls on Bakerella’s site well over a year ago. When it was warm, I did not want to tackle the recipe and worry about the chocolate not setting up in my warm apartment. Then as the weather got cold, I forgot that I wanted to make these. Then low-and-behold V-Day 2009 rolled around and I thought the red center to a classic V-day treat would be awesome.
Everyone loved these, so I will definitely be making them again in the future. I would like to tweak the recipe some, so stay tuned.Deconstructed Chocolate chip CookiesI make regular chocolate chip cookies all the time with great results. So to change it up I wanted to deconstruct the cookie, i.e.- make a chocolate chip cookie batter (yes, it is different than a sugar cookie batter) without the chocolate chips, then place the chocolate on the outside. The results are okay, but when making the dough I should have decreased the margarine in the batter. The cookies spread a lot while cooking and spread out thinner than I would have liked. Therefore, I made these smaller cookies, instead of the giant ones I had planned.
They still tasted fantastic and if I did not tell you right above that I wanted to do something different no one would have known the difference, but I believe in transparency. Maybe someone else can learn from my mistakes :-)On a slightly me tooting my own horn moment. At the race I went to today there was a table set up selling homemade chocolate chip cookies. One of the girls at the table said they were the best she ever tasted. My friend and I politely declined and walked away. Then my friend turned to me and said, “she hasn’t tasted yours!” That made me smile. So, I just had to share that moment. I love to bake and I love that people love what I bake.
HAPPY VALENTINE’S DAY TO ONE AND ALL… SINGLE, COUPLED, TOGETHER, APART OR OTHERWISE!
Thursday, January 29, 2009
Starting the Year off Light (Daring Baker’s January Challenge)
 After last month’s rich, heavy, and decadent challenge (though mine was lighter than others), the DBers decided to lighten things up for the new year. This months challenge surrounded the light and crispy Danish cookies tuiles. We had to 1) shape the tuiles and 2) file them with something light.
So here is a little history lesson: Traditionally, tuiles are thin, crisp almond cookies that are gently molded over a rolling pin or arched form while they are still warm. Once set, their shape resembles the curved French roofing tiles for which they're named. The Dutch angle: traditionally this batter was used to bake flat round cookies on 31st December, representing the year unfold. On New Years day however, the same batter was used but this day they were presented to well-wishers shaped as cigars and filled with whipped cream, symbolizing the New Year that's about to roll on.
So on to what I did. Since this was a new challenge for a new year, I decided to make the cookies and filling New Years resolution friendly. This recipe has whole grains and no refined sugar. Personally, I really did not like the results but they tasted good, just not for me. My mommy pointed out that not everything will be to my taste and liking. So, I will chalk it up to that.
.JPG) Anyway, Here are the recipes I used:
Anyway, Here are the recipes I used: My Tuiles Recipe
1/4 cup Softened Butter
1/2 cup Agave nectar
Dash of Vanilla
1 Egg Whites (Lightly Beaten)
1/2 cup Whole Wheat Flour
Beat together butter, agave, and vanilla to make a homogenous mixture. Then added beaten egg white. Add the flour in 2-3 installments.
Let the batter sit in the fridge for at least 30 minutes to firm up.
Spread batter very thinly (believe me, it cannot be too thin, as long as there are no holes) in stencils or in circles on to parchment paper and cool baking sheet.
Bake in a 375 degree oven for about 8 minutes.
Immediately remove tuiles from cookie sheet and place on object you would like to form cookies around. Let cool completely before removal.
Blackberry Whipped Filling
Blackberries (pureed in a food processor and stained through a sieve)
1/2 cup Agave nectar
1 tsp vanilla
1 1/3 cup whipping cream
Stir together all the ingredients until homogenous. Whip with hand mixer until desired texture for whipped cream. Refrigerate until ready to fill cups right before serving.
.JPG) This month's challenge is brought to us by Karen of Baking Soda and Zorra of 1x umruehren bitte aka Kochtopf. They have chosen Tuiles from The Chocolate Book by Angélique Schmeink and Nougatine and Chocolate Tuiles from Michel Roux.
This month's challenge is brought to us by Karen of Baking Soda and Zorra of 1x umruehren bitte aka Kochtopf. They have chosen Tuiles from The Chocolate Book by Angélique Schmeink and Nougatine and Chocolate Tuiles from Michel Roux.
Subscribe to:
Posts (Atom)