Tuesday, November 30, 2010

9. Cornbread


 Happy (belated) Thanksgiving! I just wanted to take a quick second and blog about my latest baking adventure- Cornbread, which happens to make the 9th item completed off my top 100 list.  After buying the cornmeal and seeing a recipe on the back of the package for cornbread, it seemed too easy-- as in no real challenge at all. Now, where would the fun be in that?

So, I decided to challenge myself and turn our traditional cornbread dressing/stuffing, made with store bought dehydrated cornmeal pieces, into a completely homemade dish. You are forewarned, after a long day of cooking and due to my love affair with dressing there are no pictures of the completed product.

Ready for the oven.

As for the cornbread itself, the true top 100 list item, it was just okay. It was good cornbread to turn into something else, but it was not too tasty all on its own. Do not get me wrong, it was adequate, but nothing sensational. (However, for the dressing it was wonderful). In the future I would use this recipe again, but I would definitely use butter instead of oil and probably more than the recipe recommended. When I make cornbread, I like to melt a whole stick of butter in the pan and just pour the batter into the hot melted butter. I know it is unhealthy, but it taste wonderful! And if I am going to eat cornbread, which I am not a huge fan of anyway, it needs to be delightful.

Cut into cubes...

Cornbread
(as adapted from the back of a Corn Meal Canister [I do not remember which one])
Ingredients
1 1/4 cup all purpose flour
3/4 cup corn meal
1/4 cup sugar
2 tsp baking powder
Pinch of salt
1 cup buttermilk
1/4 cup olive oil
1 egg

Method
1. Mix together all dry ingredients.

2. Add wet ingredients to dry.

3. Preheat oven to 400 degrees.

4. Prepare with floured, non-stick spray a 9X13 pan (if making dressing) or a 9x9 or 8x8 if making plain cornbread to eat.

5. Cook for approximately 25 minutes for the 9x13 pan. Look for the bread to be golden brown in color, the sides to pull away from the pan, and a tester coming out clean when poked in the center.

...and toasted.

My dressing recipe is really free form, but I thought I would include what I put in my dressing, just in case you were interested. If not interested, you may stop reading here :-)
1. 1 pan of the corn bread recipe above, cut into cubes, toasted and set aside.

2. Sauté 1 shallot, 8 oz baby portabella mushrooms, and minced garlic together, in olive oil, until soft.

3. Dice two apple sage vegetarian sausages and add to pan.

3. Mix pan ingredients with cornbread cubes, salt, pepper, and two heaping handfuls of dried cranberries.

4. Add 1 box of veggie stock to mixture and spoon dressing into a lightly greased 9x13 pan.

5. Dot the top of the dressing with butter (or margarine).

6. Bake at 350, uncovered for approximately 30 minutes. I like my stuffing slightly crumbly and not in big massive, stick together bricks. This recipe produces said results. If your stuffing gets to dry add more stock and continue to let it cook. If the cornbread cubes are browning too fast, cover the stuffing with foil and continue to bake if not done.

Saturday, November 27, 2010

The Savory Side of Crostata: November Daring Bakers’ Challenge


 The 2010 November Daring Bakers’ challenge was hosted by Simona of briciole. She chose to challenge Daring Bakers’ to make pasta frolla for a crostata. She used her own experience as a source, as well as information from Pellegrino Artusi’s Science in the Kitchen and the Art of Eating Well.


Rolled out crostata dough.  Look at those dill specks!

When I got this challenge, I was intent on completing it as soon as possible. I wanted to get it out of the way before Thanksgiving madness took over the kitchen and the grocery stores. The challenge recipe was released on Monday and I intended to bake my crostata on Wednesday, my day off. The only requirements of the challenge were to make the crostata dough following one of two recipes given and then fill the crostata with a filling of your choice.

Crostata fresh out of the oven, still puffed up.

For two days I poured over ideas in recipe books, internet sites, and my own thoughts. I could not come up with a flavor combination or any type of filling I actually wanting at that moment. I thought about a cranberry puree with orange zest, mascarpone cheesecake type filling, or a chocolate hazelnut pastry cream, just to name a few ideas. None of them stuck. I was just not feeling anything sweet at that moment.

Dough lined tart pan.

Let me give you a second to pick yourself up off the floor. I know, I was just as surprised by this revelation as you were. Me, the person whose names is synonymous with sweets, to the point where I am automatically placed under the dessert column for pot lucks, did not want something sweet. After I got over the initial shock, I decided I wanted something savory, but also not just veggies. I wanted savory custard, like a quiche but less egg-y.


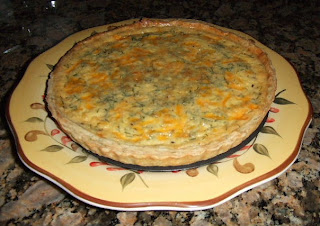
Therefore, I created my own recipe for a Savory Dill and Cheddar Custard Crostata. I made a few adaption’s to the provide challenge recipe to account for the savory verses sweet filling. I was delighted with the results. The crust was flaky and delicious and the custard was creamy and satisfying. I would definitely make this again.

First glorious slice.

CRUST
235g - Flour
Pinch of Salt
1 stick butter/ grated/ super cold
1 large egg & 1 yolk, lightly beaten
Shot of Lemon Juice
3-4 Sprigs of Dill, chopped
Blind baked crust.  Notice the shrinking... I overworked it a tad.


1. Combine flour and salt.

2. Rub in butter until mixture is crumbly. Do not over combine.

3. Create well in the middle of flour mixture and add eggs.

4. Add lemon juice and dill to center of the egg well.

5. Mix wet ingredients into dry with a fork.

6. Flop mixture out onto a floured surface and knead until combine.

7. Refrigerate dough for at least an hour.

8. Remove dough from fridge and roll out into a circle big enough to fill tart pan.

9. Place dough in tart pan, being careful not to stretch it to avoid shrinking in the oven. Trim off the excess dough.

10. Blind bake the crust at 375 degrees- 15 minutes with pie weights/beans and another 15 minutes without the weights until the crust is nice and golden brown. (I should have baked my crust a little longer. So shoot for a shade darker than the pictures of my crust.)

Cheddar cheese in crust awaiting its custard-y mate.

CHEDDAR DILL CUSTARD

3 eggs, room temperature
1 1/2 cups - Heavy Cream
Salt and Pepper to Taste
1 cup – Grated Cheddar Cheese
4-5 spring of Dill, chopped

Ready for baking...

1. With a whisk beat together eggs and heavy cream.

2. Add salt and dill, whisking until combined.

3. Sprinkle cheese over the cooled crostata crust.

4. Pour egg mixture of over the cheese into the crust. The pan can be filled to almost the top of the crostata crust as the custard does not rise much. (Account for your dexterity in moving a full pie to the oven and any un-levelness in your oven.)

5. Bake the completely assembled crostata for about 20-30 minutes in a 350 degree oven until the center is just set.

... And it was good!

Be sure to check out the other Daring Bakers at http://www.thedaringkitchen.com/.

Monday, November 22, 2010

8. Crack Pie


I attended a Thanksgiving potluck at a good friend’s house this weekend. I knew that I wanted to accomplish something off my Top 100 list for this occasion. My mind went through several ideas of what to make. At first I thought of sweet potato biscuits, but we had more than enough savory dishes on the menu. So it was back to my first love, baking sweets.


I then though of Pumpkin whoopie pies with a cream cheese marshmallow fluff filling, rolling the edges in fall colored sprinkles. I was not sold on that idea. I then thought of using cranberries in a dessert. Maybe some sort of decorated cake with a cranberry jam between the layers. I have done that in the past and loved it. Or maybe a cranberry orange spiced crostata. As you can see I debated over the issue for like a week.


Finally, after scanning over my list 10-20 times, my eyes settled on crack pie. I reviewed the recipe and though I had to plan in advance time to make it, it was easy enough. I thought the potluck participants would be amused with the name and brave enough to try the “infamous” or “famous” pie.


If you have never heard of crack pie, I guess I need to explain. “No, there is no crack in the crack pie.” Sorry, I am not your dealer; I do not provide chemically induced highs, maybe sugar highs, but I digress. :-) Most people who try to describe the pie describe it like pecan pie without the pecans. I guess that is truly the best comparison, but it does not really ring true.


Crack pie has a nicely salted yet sweet oatmeal cookie crust with a filling consisting of sugar, butter, more sugar, cream, and oh, yeah, did I mention more sugar. The recipe and the restaurant it originated from serve it cold, I preferred it at room temperature. It was more palate pleasing at room temperature to me. The pie is suppose to be addictive, like crack, hence the name. While I thought the pie was generally okay, it was not my cup of tea. I think the novelty, for me at least, is mostly in it name alone.


At least I can say I had it and I can mark another item off my list, a total win-win the way I see it.

The recipe can be found all over the internet, but was originated at Momofuku’s Milk Bar in New York City. It has been featured on Regis & Kelly, Martha Stewart, and some other morning shows. I followed the recipe from as adapted by Almost Bourdain because I fell in love with his pictures. What can I say; I eat with me eyes first.


I did bake the pie substantially longer than the recipe suggested after reading post all around the internet about the pie not setting correctly. My pies set-up with no problem and the filling was not runny. I baked the pie for 15 minutes at 350 degrees, then lowered the oven to 325 degrees and baked it for another 30-40 minutes. If you want a gooier filling bake the pie for less time.


All in all, it was a fun pie to make for the novelty factor alone, but I really do not get all the hype.

HAPPY THANKSGIVING!

Monday, November 08, 2010

7. Zebra Cake


I was in the mode to bake this past weekend, but what I did not know. For an unknown reason I have been wanting peanut butter all week. So, at first I was going to make (and still probably will in the next few weeks) peanut butter cookies with peanut butter filling, dipped in chocolate. The only thing holding me back was that I felt it was more than time to complete another item off my top 100 list.


After scanning over the list several times, nothing really jumped out at me. I wanted to be a lazy baker this weekend. I wanted it to be homemade, but did not feel like going through some complicated process. Finally, I laid my eyes upon the Zebra Cake recipe. The recipe looked simple enough; it was more about taking time to properly layer the batter than any complicated techniques. So, I decided game on. Oh, did I mention I had everything needed to make this cake already in the pantry? I was definitely sold when I did not have to stop by the grocery store on the way home from work Friday.


I could not sleep Saturday morning and woke-up super early in the morning. After watching TV and crocheting, I decided to tackle this cake about 6am. It was easy enough to mix the batter together and I found myself testing my patience to go only pour a few table spoons of each batter at a time. I must admit, I thought it would be easy, but my technique was severely lacking. I kept dripping batter of one color into the other. So, my zebra cake was not perfect, but it still had the intended effect.


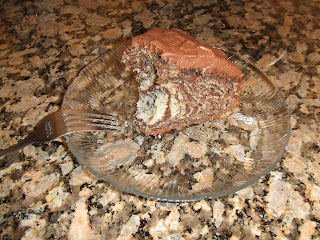
Flavor wise, the cake is not too sweet with a mild chocolate flavor. It was super moist. Because the cake was not too sweet and the top was not visually appealing with all the cracks, I decided to whip up a quick Cocoa Buttercream, which became Salted Cocoa Buttercream after I was too liberal with the salt in the frosting.


All in all it was super yummy and I am proud to say that it all made it out of my house over the weekend (without my house members having to be the sole consumers :-)


ZEBRA CAKE
Recipe adapted from AZ CookBook
And originally inspired by Sugar Coated Bliss

Ingredients
4 large eggs, at room temperature
1 cup granulated sugar
1 cup milk, at room temperature
1 cup oil (corn, vegetable or canola is fine)
2 cups all-purpose flour
1 teaspoon vanilla
1 scant tablespoon of baking powder
3 tablespoons cocoa powder

Method

1. In a large mixing bowl, combine eggs and sugar. Using a hand-held electric mixer or wire whisk beat until the mixture is creamy and light in color

2. Add milk and oil, and continue beating until well blended.

3. In a separate bowl, combine and mix flour, vanilla powder and baking powder. Gradually add the flour mixture to the wet ingredients and beat just until the batter is smooth and the dry ingredients are thoroughly incorporated. DO NOT OVERBEAT to prevent air pockets from forming in the batter.

4. Divide the mixture into 2 equal portions. Keep one portion plain. Add cocoa powder into another and mix well. If the cocoa better becomes too thick, add a little water until it is the same consistency of the plain batter. It is important that both batters be liquidy to create the correct rippling effect.

5. Preheat the oven to 350F.

6. Lightly grease the pan with oil. If you don’t have non-stick baking pan, grease whatever pan you have then line it with parchment paper (baking paper). I used an 8x3in baking pan, but the recipe is for a 9x2in pan.

7. The most important part is assembling the cake batter in a baking pan. Scoop 3 heaped tablespoons of plain batter (you can also use a ladle that would hold 3 tablespoons) into the middle of the baking pan. Then scoop 3 tablespoons of cocoa batter and pour it in the center on top of the plain batter. IMPORTANT! Do not stop and wait until the previous batter spreads – KEEP GOING! Do not spread the batter or tilt the pan to distribute the mixture. It will spread by itself and fill the pan gradually. Continue alternating the batters until you finish them.

8. Bake in the oven for about 60 minutes in the 8 inch pan and 40 minutes in the 9 inch pan. To check if the cake is ready, insert a toothpick into the center. It should come out clean when ready. Remove from the oven.

9. Frost the cake if you desire. I mixed together softened butter, cocoa, powdered sugar, vanilla, warm milk, and salt to make the quick and impromptu Salted Cocoa Buttercream pictured above.