Monday, February 27, 2012

No Loafing Around: Daring Bakers 2012 Challenge


Yeah, it has been awhile since I have participated in a daring bakers challenge.  I do log in every month and view the challenge, print out the recipe, and start thinking of flavor combinations.  Then life, work, and other responsibilities take over and I just do not have time.  This month’s challenge was all about being time efficient.  This month’s challenge was quick breads.


Quick breads are bread that is quick to make because it does not require kneading or rising time.  That's because the leavener in such a bread is usually baking powder or baking soda, which, when combined with moisture, starts the rising process immediately.  In the case of double-acting baking powder, oven heat causes a second burst of rising power.  Eggs can also be used to leaven quick breads.  This genre includes most biscuits, muffins, popovers and a wide variety of sweet and savory loaf breads.


The Daring Bakers’ February 2012 host was – Lis! Lisa stepped in last minute and challenged us to create a quick bread we could call our own. She supplied us with a base recipe and shared some recipes she loves from various websites and encouraged us to build upon them and create new flavor profiles.


This month’s challenge was pretty open ended with only a few requirements: (1) No yeast allowed; (2) Preparation and baking time can take no longer than 1 hour; and (3) Only loaves, muffin, and popovers allowed.  I did not loaf around on accomplishing this challenge.  I thought it was something I could accomplish easily after a day of work and could try several different flavor combinations. 


The first loaf I completed was a Browned Butter Pound Cake Loaf with Rum Glaze on February 8, 2012.  (I was planning on making more than one type of loaf, but the month got away from me.  So, this is the first and only quick bread.)  This loaf turned out wonderfully.  The nutty smell of the browned butter while cooking was heavenly.  The smell was even more intoxicating while creaming the butter and sugar together.  The brown butter flecks spread throughout the loaf like little gold nuggets of yumminess.


My loaf pan was slightly bigger than the recipe called for and as a result, my cake did not rise properly in the center and actually caved in.  Taste great, looks horrible.  I would suggest using a smaller loaf pan and/or increasing the baking temperature from 325F to 350F.  Speaking of taste, the loaf has an amazing not to sweet flavor and the rum glaze paired with it nicely.  The rum alcohol taste in the glaze is strongest when first mixed and does dissipate as it sits overnight to harden.  Do not worry; no one will get tipsy or even slightly buzzed from your cake.  Now, if you serve it with a shot of rum on the side, then that is another story...


Browned Butter Pound Cake Loaf
Adapted from Gourmet Magazine

Ingredients
2 1/4 Sticks of Butter (1 1/4 cup)
1/2 cup Brown Sugar
1/2 cup Granulated Sugar
4 large
2 tsp Vanilla Extract
2 cups Cake Flour
1 tsp Baking Powder
1/2 tsp Salt
Method
1. Preheat oven to 325F. Prepare a loaf pan (8.5 x 4.5 inches) with flour and butter (spray) and a piece of parchment paper running horizontally.

2. Heat butter of medium heat until the milk solid on the bottom of the pan turn brown to dark brown. Watch it closely because once it starts to take on color the change will happen quickly. You will also begin to notice a nutty smell. Place in a bowl and freeze for 15 minutes (stirring every once and a while) until it just starts to congeal.

3. Mix together flour, baking powder, and salt. Set aside.

4. Cream together butter and sugars until light and fluffy. About 5 minutes with a stand mixer. Add eggs one at a time, beating each one until fully incorporated. Add vanilla.

5. At a low speed, mix in flour mixture until just combined. Do not over beat.

6. Pour batter in prepared loaf pan and smooth the top.

7. Bake for approximately 1 to 1 1/4 hours. Cool in the pan for 30 minutes before placing onto a cooling rack to cool completely, for at least on hour.

8. If glazing, whisk approximate 2 cups of powder sugar with rum. Add rum little by little until the desired consistence is achieved. For a whiter glaze add less rum. For a more transparent glaze add more rum. Pour glaze over the loaf over the cooling rake letting it run over the side and down the sides of the loaf. Leave for the glaze to harden.

Thursday, February 23, 2012

Nutrageous Gift Pack: Walnuts, Almonds, and Pistachios


Finally, rounding out the gift pack were two desserts I thought MLJ would love.  Both desserts are traditional, but one traditional to MLJ and one traditional to others.  I wanted to incorporate more nuts into the gift back.  What dessert incorporates nuts? Lots of nuts?  Is all about nuts?  One dessert came to mind, Baklava!


I have made baklava several times before, but I am not sure if MLJ has ever had my baklava.  Though she is a nut lover, I am not sure if she is a fan of baklava.  I decided to give it a try anyhow.  Baklava can be the conduit for nearly any type of nut.  When I looked at my list to determine what nuts I had not included that would be good for Baklava, I came up with almonds. I traditionally use almonds and pecans in my baklava (I call it southern style).  I already used Pecans in another dessert, so I thought of going old world traditional with pistachios.  I never used pistachios in my baklava.  This would be new for me.


Now, walnuts are another traditional baklava nut which I have never used in my baklava as well.  But, I already had a recipe with walnut that I knew MLJ would love, so I decided not to use them in the baklava.  With the walnuts I made Super Walnut Brownies.  On many occasions MLJ and I have discussed how brownies do not have enough nuts.  Some places stir a few nuts into the batter, while other sprinkle a few on top.  I chose to give MLJ the best walnut brownies of all.


I used my favorite Bakers One Bowl Brownie recipe (subbing out some flour with cocoa powder as done here), stirring one heaping cup of walnuts into the batter.  Then after spreading the batter in the pan, I sprinkled another 1/2 cup (or so) of walnuts on top of the brownies.  Once completely cooled, make sure to use a sharp knife to cut the brownies into bars.  You want clean cuts through the nuts.


Now back to the baklava.  Baklava is one of my favorite things to bake.  It take time to prepare, but is not super difficult, just slightly technical.  Preparing it really requires little measurement.  I made the syrup while my phyllo dough came to room temperature out of the fridge.  For the syrup I combined 1/2 cup water, 1/2 cup sugar, 1 tsp vanilla, and 1/4 cup orange blossom honey.  This made the perfect amount of syrup for me as I do not like my baklava syrupy, drippy, or runny.


I also decided to only make an 8x8 pan of baklava.  I ground approximately 4 oz of pistachios with 4 oz of almonds. I mixed in 1/2 cup of sugar and 1 tsp of cinnamon with the nuts.  I also used two stick of melted butter along with the phyllo dough.  Considering the size of my pan, I ended up with six nut layers!  The most I have ever done.  I was nervous that it would fall apart, but the baklava held its shape better than any other baklava I ever made.  I used five phyllo sheets for the base, three phyllo sheets between the next three nut layers, two phyllo sheets between the next 2 nuts layers, and 4 phyllo sheets on the top.  I started to reduce the number of sheets because I did not want to baklava to be too top heavy and topple over after de-panning.


The baklava came out wonderful, definitely one of the best I have ever made.  The dessert was crunchy and not too sweet.  (Even after begin wrapped in plastic wrap, it retained its crunch.)  The pistachios took on a nice toasted color around the edges of the pan.  The whole dessert married perfectly together.  I am glad this was a batch I was sharing with a potential first time baklava tryer-outer.  Another friend, an ol’ time baklava enthusiast, loved it as well.  In her words, she “crushed it.”
  

So, this is last post in the Nutrageous Birthday Gift Pack series.  I am sure MLJ has received the gift by now.  I anticipate her savoring the delightfully nutty treats, trying to keep her mother and sister for pilfering them all, and cursing my name (in a good way) for sending her so many baked goods :-)

Tuesday, February 21, 2012

Nutrageous Gift Pack: Brazil Nuts and Macadamia Nuts


I think the brazil nuts and macadamia nuts are considered, like the grand-puba of nuts.  You do not see these nuts every day in just any ol’ dessert.  When you buy the packages of mixed nuts, you will be lucky to get even a scant palm full of these nuts.  These nuts are special (read expensive).  When these nuts for these recipes, I had to pay two arms and a leg at my local favorite grocery store.  I swear the price of brazil nuts have gone up by 2 dollars a pound since the last time I bought them!


Nonetheless, I wanted to include some nut treats MLJ probably does not have on a daily basis and nut treats I have never made for her.  After all, this is her Birthday and she deserves something special.  I decided to make the Toffee Nut Cookies which I have blogged about before and White Chocolate Macadamia Nut Cookies, which are a classic.


I used one base recipe, similar (if not exactly the same) as my base chocolate chip cookie recipe.  I then separated the batter into two halves.  For the Toffee Nut Cookies, I stirred in approximately 1 cup of Health Toffee Bits and 1 cup of chopped brazil nuts.  Last time I made the cookies, I ground the Brazil Nuts with the Flour into almost a fine meal.  This time, I left the nuts in chunkier pieces and ground them alone.  I like this version better because of the texture; the larger sized nut pieces give the cookies a nice crunch.


For the White Chocolate Macadamia Nut Cookies, I stirred 1 cup of white chocolate chips and 1 cup of macadamia nuts into the batter.  I left the macadamia nuts whole, as I purchased them from the store.  I would suggest a very rough chop next time, however.  For me, the large pieces of macadamia nut were a little overwhelming and I could not taste the white chocolate as much as I would like.  If the nut pieces were smaller, I think it would balance the flavor better, while keeping the crunch I adore.


These two cookies were definitely a step outside of the traditional nutty box.  I hope MLJ enjoyed the grand-puba of nuts.

Saturday, February 18, 2012

Nutrageous Gift Pack: Pecans and Peanuts


These two nuts are featured in the gift pack under the slow and low method.  The nuts were enrobed in a sugar mixture and left to bake in the oven, only stirring every 15 minutes, for about an hour.

Cinnamon Candied Pecans

Caramel Peanut Popcorn


I have made and featured caramel popcorn here before.  I used the same recipe, but added more peanuts, so there will literally be nuts in almost every bit.  I also reduced the amount of popcorn from the first time I made it to 6 quarts as I wanted to ensure a nice even coating on all pieces.


The popcorn was divine!  It was melt in your mouth buttery and delicious.  Out of all the desserts I made, this is the one I had to ensure all leftovers left the house because I could not keep from nibbling on it as I went buy.


At Christmas time, one of my officemates brought in cinnamon candied pecans.  They were delicious.  So delicious in fact, me and my mom where sharing a little bag full as a snack after church one day and got into a fight over the last one.  I asked my officemate for the recipe as I thought my nut loving friend would like it.


Me being the baker that I am, I rarely use a recipe without adapting it in some way.  So, with her recipe as a starting point I made some changes.  The results were absolutely phenomenal.  The pecans are sweet, but not too sweet and the cinnamon gives it just a touch of something extra.  The most important feature is the salt.  The little salty sweet taste came across my palate and I knew we had a winner here.  I asked my mom if there were any leftover she wanted, and these were her only request (not counting the walnut treat she consumed before there were leftovers.)


Cinnamon Candied Pecans

Ingredients:
2 egg whites
1 TBS water
1 TBS vanilla
1 heaping cup sugar
1 tsp Cinnamon
1 tsp Salt
20 oz Pecans

Method:
Preheat oven to 225F.

1. Beat egg whites, water, and vanilla together until nice a frothy. About 2 minutes with a hand whisk.

2. Pour in the pecans and stir in with a rubber spatula.

3. In a separate boil mix the sugar, cinnamon, and salt together. Pour sugar mixture over pecan mixture.

4. Stir all together until all pecans are nicely coated.

5. Spread the pecans in one even layer onto a well-buttered sheet pan.

6. Bake for 1 1/4 to 1 1/2 hours, stirring every 15 minutes. Any liquid you see while slowly dry up/dehydrate in the oven.
7. Pour pecans onto wax or parchment paper to cool completely. The pecans should be dry and crisp, with a visible sugar coating. If they are sticky, they did not spend enough time in the oven.

Thursday, February 16, 2012

A Nutrageous Birthday Gift

I have a friend who is a huge fan of nuts (but doesn’t like peanut butter (yeah, I do not get that either)).  This friend celebrated a glorious Birthday over the weekend and I wanted to sprinkle her with desserts that all have nuts as the star or one of the star ingredients.


I made six different nut desserts with seven different types of nuts.  Yeah, I was in my kitchen half of Friday and all of Saturday, not to mention packaging up the gift on Sunday, but it could not have been for a nicer, more deserving person.  MLJ’s (the Birthday girl) nutrageous dessert package was put in the mail and is on its way to wishing her a great Birthday.


Due to the sheer number of desserts and recipes (and potentially pictures), I have decided to break the gift down into several posts.


Post 1 (this post): Will introduce you to the Nutrageous Gift Pack

Post 2: Will feature Pecans and Peanuts

Post 3: Will feature Brazil Nuts and Macadamia Nuts

Post 4: Will feature Walnuts, Almonds, and Pistachios


Happy Birthday MLJ and I hope you are thoroughly enjoying your gift, preferably before you read these posts.  I would hate to ruin the surprise!

Tuesday, February 14, 2012

Dark Chocolate Strawberries & Cream Brownies


Happy Heart’s Day!  That is right, today is February 14, 2012, and blog all over the internet are filling up with decadent Valentine inspired treats.  Here at torts to tarts, it will be no different.  My Heart Day inspired treat came to me when I saw these Ghirardelli chocolate squares at my local mega superstore shopping center:


I did not buy them on that trip as (1) I am general not a huge fan of chocolate, so I would probably not eat them plain and (2) they were cost prohibitive to buy for no reason except I thought they were cute.  When I am out of town, I tend to spend money on things I would not buy in town.  While at the same mega superstore shopping center about 1.5 hours from my house, visiting a friend, I bought one bag of the chocolates to bake with.


After deciding what to make with the chocolates, I decided I needed at least one more, possible two more bags.  Once an idea has struck me, the chocolate was no longer cost prohibitive… Oh, no; it was a necessity.


I used my favorite Bakers’ One Bowl Chocolate Brownie recipe.  To increase the dark chocolate quotient, I subbed out some of the flour for equal parts dark chocolate cocoa powder.


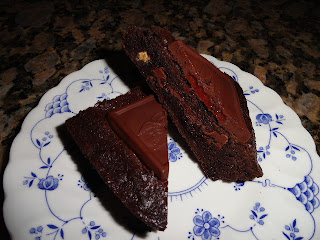
I then spread about half the batter in a 9x13 pan then placed the strawberry filled squares.  I wanted to keep the squares whole in the center, so I laid them strategically to miss the cut lines.  I next sprinkled the vanilla white chocolate bars, broken into pieces, around the squares.  I wanted each brownie to have strawberries and cream in it.


Lastly, I spread the remaining batter over the top and made sure all chocolate was nicely submerged.  Due to the additional content in the brownies, I baked them a little longer than normal.  They were finished when a toothpick came out with a few moist crumbs.


I let the brownies sit for about 10 minutes before genteelly pressing a full chocolate square on top of the warm brownies, again trying to avoid the cut lines.  I let the brownies cool completely (actually overnight) before cutting them into the predetermined sized bars (based on the chocolate squares placement).


The brownies are rich and dark.  The white chocolate pieces provide a little texture to the chewy brownie.  If you want more strawberry taste, go for the brownies with the full strawberry filled chocolate square on top.  If you want less strawberry, go for the bar with the vanilla white chocolate square on top.  Either way, I think you will get something you love.


These are definitely best when shared with others!  Happy Heart’s Day!


Thursday, February 09, 2012

Sweet Potato Pie in a Jar


This will be a very quick post.  I just wanted to share about one of the many items coming from my kitchen.  I had sweet potato puree that I still needed to use left over from this recipe.  When I made the sweet potato puree, it was to be used for sweet potato pie.  Now that half of the puree was gone, I still wanted to make pie.


I did not feel like dealing with a regular pie crust, nor making one (or two) large pies.  I wanted to be able to taste the fruits of my labor and then give the rest away.  Single serving contains would be best for this.  I decided to bake sweet potato pies in a jar!


The crust is a graham cracker crust.  The sweet potato pie filling is pretty basic- sweet potato puree, condensed milk, evaporated milk, and spices.  Of course, in true Mother of the Baker at Law tradition, there is no recipe for the sweet potato filling.  Correct sweet potato pie filling is based on a look, a feel, and a taste.


About half way through the baking, I placed a mixture of graham crackers crumbs (left over from crust), toasted pecans, and candied ginger on top of each pie and let it brown.  I ended up with 12 pie jars and a porcelain 2-serving bowl full of sweet potato pie.  The single serving jars made it that I could share pie with more people than if I made large pies.  The pies went to 3 church members, 1 family member, and 4 barbers.  


The pie taste great and I am a sucker for a graham cracker crust.  (I may have been known to mix up a graham cracker crust or purchase the pre-made crust and eat it… plain… with no pie filling.  Do not judge me.)  The toasted topping provided a nice crunch for the custard-y pie filling.  I am not a huge fan of sweet potato pie (but I love to bake it), and I ate the 2 serving porcelain bowl by myself.  (Again, don’t judge me!)

Saturday, February 04, 2012

39. & 40. German Chocolate Cake with Coconut Pecan Filling


Well, actually, it should be German’s style Chocolate Cake.  German Chocolate Cake did not originate in Germany.  German’s Sweet Chocolate was created by Sam German for the American Baker’s Chocolate Company.  The cake that became famous from this chocolate was originally named German’s Chocolate Cake.  As it rose in popularity, the possessive was dropped and the name was just German Chocolate Cake. (Thanks, Wikipedia!)


Why is my cake German’s “style”?  Because I did not use the traditional recipe nor the official German’s chocolate.  German’s chocolate is a sweetened chocolate.  The traditional recipe calls for 2 cups of sugar.  That seemed like a lot of sugar to me when the chocolate was already sweet.  Also, I already had unsweetened and semi-sweet chocolate at home and found a recipe that used that instead.  So, it is German’s style because it is inspired by the traditional cake.


I made this cake for a friend and her support group as she recovers from a difficult surgery.  At times I feel Southern and in true Southern tradition, when you visit someone who is recovering you bring him or her some food, whether it be savory or sweet, you do not go empty handed.  I always air on the sweet side and think cakes are one of the most appropriate Get-Well-Soon goodies.  


When thinking of a cake for such occasion, I usually steer clear of more celebration type cakes like most confetti cake or traditional layer cakes that call for decorating to look complete.  Some cakes naturally lend themselves better to wishing a speedy-recovery like almost any flavor bundt cake, red velvet layer cake, and german chocolate cake.


My friend is recovering well and this cake brought a little spot of chocolaty goodness not just to her, but her family, and all those caring for her as well.  Baked goods are not medicine; they do not heal the sick.  Nevertheless, they have the power to make the recovery process a little more bearable and let the person recovering know you love them and care.  So, the next time you have someone recovery in your life, consider making them a Get-Well-Soon type cake.  After all, when recovering, calories don’t count :-)


Making this cake also marks two items off my top 100 list!


German Chocolate Cake
Adapted from David Lebovitz

This recipe make one 3 layer 8-inch round cake.

Cake Ingredients:
2 oz semisweet chocolate
2 oz unsweetened chocolate
6 TBS water
1 cup (2 sticks) butter, at room temperature
1 1/4 cup + 1/4 cup sugar, separated
4 large eggs, separated
2 cups all-purpose flour
1 tsp baking powder
1 tsp baking soda
1/2 tsp salt
1 cup buttermilk
1 teaspoon vanilla extract

Filling Ingredients:
1 cup heavy cream
1 cup sugar
3 large egg yolks
6 TBS butter, cut into small pieces
1/2 tsp salt
1 heaping cup pecans, toasted and finely chopped
1 1/3 heaping cups unsweetened coconut, toasted
* I used evaporated milk instead of heavy cream.  Since it does not thicken the same, I had to use cornstarch to thicken it.  I suggest using the heavy cream.

Chocolate Frosting Ingredients:
8 oz semisweet chocolate, chopped
2 TBS light corn syrup
3 TBS butter
1 cup heavy cream

Cake Method:
1. Preheat the oven to 350°F.  Prepare 3 8-inch pans with floured baking spray and parchment paper.

2. Melt both chocolates together with the 6 tablespoons of water in the microwave. Stir until smooth, and then set aside until room temperature.

3. Beat the butter and 1 1/4 cup of the sugar for about 5 minutes, until light and fluffy. Beat in the melted chocolate, then the egg yolks, one at a time.

4. Mix together the flour, baking powder, baking soda, and salt.

5. Add half of the flour mixture into the butter mixture.  Then add the buttermilk and the vanilla extract.  Then the rest of the flour mixture, mixing until just incorporated.

6. In a separate bowl, beat the egg whites until they form soft peaks, then add remaining 1/4 cup sugar.

7. Stir one-third of the beaten egg whites into the cake batter to lighten it.  Then fold in the remaining egg whites just until no trace of egg white is visible.

8. Divide the batter into the 3 pans and bake for about 35-45 minutes, until a toothpick inserted into the center comes out clean.

9. Cool cake layers in completely.

Filling Method:
1. Whisk together the cream, sugar, and egg yolks in a medium saucepan over medium heat. Place the 3 ounces butter, salt, toasted coconut, and pecan pieces in a large bowl.

2. Heat the cream mixture whisking constantly, until the mixture begins to thicken (an instant-read thermometer will read 170°F.  This will happen quickly.).

3. Pour the cream mixture immediately into the pecan, coconut mixture, stirring until the butter is melted. Cool completely to room temperature.  (Here is where I made a cornstarch slurry to thicken the filling.  If you use the heavy cream you should not have this problem.)

Chocolate Frosting Method:
1. Place the 8 ounces of chopped chocolate in a bowl with the corn syrup and butter.

2. Heat the cream until it starts to have little bubbles form around the sides of the pan. Immediately, pour the cream over the chocolate mixture. Let it stand one minute, then stir until smooth.

3. Let sit at room temperature to thicken.  It will happen; give it time.

To assemble the cake, place filling between each layer and on top of the cake.  Some recipes stop here, leaving the cake with open sides, a “rustic” look.  If you choose to continue, ice the sides of the cake with the frosting and smooth with an off-set handled spatula.  Pipe on upper and lower boarders if desired.