Friday, September 30, 2011

Cinnamon Chip Scones


A certain Seattle originating major coffee giant makes a Cinnamon Chip Scone.  I have never tasted it.  Nevertheless, a certain Mr. Boss Man has and he complained that over the years the frosting layer covering the scones has decreased.  The Seattle originating chain used to cover the top completely in glaze and now it is a cute little delicate crisscross pattern.


I decided that it would be nice and try to recreate the original for Mr. Boss Man.  I found a recipe on-line claiming to be similar to the Seattle originating chain’s scone.  Typically, I find scones to be dense and dry.  To combat such, I modified the recipe adding sour cream instead of milk for moisture.


The scone were a little on the soft side upon coming out of the mixing bowl, so I was easily able to shape them by hand before cutting them into eight triangles.  They cooked relatively well, with a tad too much spreading.  This is still a recipe adaption in progress.  *After the fact (like just now), I realized that my reading or memory skills are lacking and I used an entire cup of sour cream--Reading Is Fundamental.*


The scones did receive positive feedback from my office.  Mr. Boss Man confiscated an extra scone to ensure he would have a breakfast treat for the next day.  I believe Mr. Boss Man called it divine or delectable, either way, a winner.


I did not taste actually taste them myself, as the recipe only produced eight scones and I did not want to taste one and throw off the even number, but I would recommend these as a nice breakfast treat.  Also, you could trade out some of the liquid for an equal part of pumpkin puree and have a Pumpkin Cinnamon Chip Scone.  I will be playing around with that combination soon!


Cinnamon Chip Scone
(Adapted from here)

Ingredients:
2 cups All-purpose Flour
2 tsp Baking Powder
1/2 tsp Baking Soda
Pinch of Allspice (to taste)
2 TBS Brown Sugar
1 stick Butter, cold and cut into cubes
1 cup Cinnamon Chips
1/2-3/4 cups Sour Cream*
1-2 tsp Vanilla
1 egg + a little water for Egg Wash
Glaze: Powder Sugar + a little water (to desired consistency) + whatever amount of spices you desire

Method:
1. Mix together dry ingredients (first five above).
2. Rub the butter into the flour mixture, by hand, machine, or otherwise, until it resembles a course cornmeal.
3. Toss in cinnamon chips.
4. Add vanilla and just enough sour cream until dough comes together.
5. Roll out or shape by hand into a square, approximately 1 – 1 ½ inches thick.
6. Cut into triangles by cutting the square into 4 smaller squares, then cutting each smaller square diagonally.
7. Place scones on a parchment lined cookie sheet and brush just the tops of the scones with the egg wash.
8. Bake in a preheated 375F oven for 20-25 minutes. The scones should be golden brown.
9. Cool and enjoy/share!

Thursday, September 29, 2011

31. Cherry Granola White Chocolate Chip Cookies


This will be a quick post, I believe.  I was meeting up with a friend for lunch last weekend and I always bring treats when I meet up with friends.  I wanted to do something different… new… exciting, something I thought he would like and reflect his personality.

I consider this friend a health nut, very outdoors-y and into nutrition.  I did not know he even ate sugar until recently.  Gasp!  So, in his honor I was thinking of what I dubbed “A Mountain Man Cookie.”  It would contain all the things (within reason) people would love about hiking snacks in cookie form.


The ingredient list I came up with: cashews, almond, pecans, sunflower seeds, pumpkin seeds, oats, dried cranberries, dried apricots, butterscotch chips, M&M mini pieces, and the kitchen sink… After looking at this laundry list of ideas, I decided to simplify it just a bit.  When I think of “healthy” yet yummy, I think of granola (I know it can be high in fat and such, but go with my logic here), and dried fruit.


Accomplishing a Cherry White Chocolate Cookie was on my top 100 list, and I LOVE being able to cross things off that list.  Therefore, I decided to scale back the Mountain Man Cookie, into something just as good and more manageable.  This cookie contains Granola (I used a nice organic brand that is not too sweet), dried sweetened cherries (that still actually taste pretty tart), almond slivers, and white chocolate chips (for a punch of sweetness).


These cookies came out phenomenally well.  The granola gives it a nice textural contrast and crunch.  The tart cherries are a welcomed surprise to the palate.  The almond gives it a hint of nature and the chocolate chip gives it the sweetness longed for and necessary in a cookie.  I got rave reviews from my friend and that means a lot.


As a side note, if you noticed the labels on these cookies—No, I did not “buy” the cookies, claim to “make” them, but forgot to remove the label.  This is the name of my new business; I have launched my LLC.  It is still very much in the beginning planning stages, but it feels good to put my name on something and start building a recipe and client base.  I will blog more on my business later.


Cherry Granola White Chocolate Chip Cookies
A Baker at Law Original

Ingredients:
2 sticks (1 cup) Butter, at room temperature
1 cup Brown Sugar
1/2 cup Granulated Sugar
1 tsp Vanilla Extract
1 Egg or Egg Replacer
1-2 TBS Dry Milk Powder (optional)
1 cup Bread Flour
1 1/4 cup Cake Flour
1 tsp Baking Powder
3/4 Baking Soda
Dash of Salt
1 1/2 cup Granola, crumbed into healthy sized chunks
3/4 cup Dried Sweetened Cherries
1/2 cup Sliced Almonds
1/2 Bag of White Chocolate Chips

Method:
1. Preheat oven to 350F.
2. Cream together butter and both sugars.
3. Add vanilla, egg replacer, and dry milk powder and mix together.
4. Combine flours, baking powder and soda, and salt, then mix with butter mixture.
5. Stir in remaining ingredients (granola, cherries, almonds, and chocolate chips).
6. Scoop cookies onto a cookie sheet lined with parchment. Flatten cookies slightly with hands.
7. Bake cookies for 15-18 minutes. Cool on cooling rack.
8. Enjoy.

Monday, September 19, 2011

Samoa Brownies


Don’t you hate it when you think you have a brilliant original idea, but then you find out it is not original at all.  I have been playing around with the idea of making a dessert inspired by the Girl Scout’s Samoa Cookies(or Caramel deLites Cookies, depending on where you partake of these).  At first, I was thinking of making a Samoa Bark, or maybe some type of Samoa Pie, but then I came up with Brownies.  I thought I was a genius.  I have never seen this idea before.


I set out creating the recipe and purchase the ingredients.  I decided to use my typical go to brownie recipe.  I love it; it is perfection; why mess with it?  I then decided to use a secret ingredient, which I will discuss in a moment, along with toasted coconut, caramel, and melted chocolate.


I had been planning these brownies for a few weeks, but had not yet put them into action as other baking tasks (and let’s not forget my real job and life responsibilities came up).  When I finally decided to start baking these, I decided to do a quick Google search of the name “Samoa Brownies.”  I was shocked by what came up—TONS of other bakers have already had this idea and executed it.  Genius, I am not.


I looked through page after page of the same recipe—boxed brownie mix, 3 1/2 cup toasted coconut, 2- 14oz bag of caramel bits, 4 TBS milk, and 3oz Semi-sweet chocolate chips.  The recipes were similar to what I had created.  My recipe was not a copycat, because I did create it on my own, but it was not unique.


And that is when I remembered my secret ingredient.  The one ingredient I have not seen in any of the recipes and pages that I reviewed; the ingredient I consider necessary to a real Samoa Cookie and gives a textural contrast to the fudgy-ness of the brownies and gooeyness of the caramel.  SHORTBREAD COOKIES!


Think about a real Samoa Cookie for a minute.  It is a SHORTBREAD Cookie, covered in caramel and coconut, with the bottom dipped in chocolate and the top drizzled with chocolate.  That is what I wanted to accomplish here and what I planned from the start, to basically make the cookies, but use the brownie batter like the chocolate coating on the bottom of the cookie.


Feeling better about my genius status now being restored, I was off to the kitchen.  (Also, different from any other recipe I saw, I baked the caramel and toasted coconut on top of the brownies, as opposed to just slathering it on after the brownies cooked and cooled.)


I was honored with the compliment that these were one of the best items I have ever made.  The brownie is rich and chocolaty.  The shortbread cookies lend texture and contrast to the creamy brownie and chewy topping; the cookie is no longer super crunchy, but it does hold its own texture.  The toasted coconut and caramel topping is simply divine.  The caramel layer is not sticky or runny and is nice and toasted because it was baked in the oven.  It has a very finished appearance (and makes the brownie easier to package).  The chocolate drizzle on top is mostly decorative and gives it the distinct look of a Samoa.


These brownies, by far, went the fastest at work from the break room.  I had co-workers eating them for breakfast.  Coconut is like granola, right?  :-)  I will definitely be making another batch of these very soon.  I need to have their awesomeness confirmed by my west coast Caramel deLite consumers.


Samoa (or Caramel deLite) Inspired Brownies

Ingredients:

Brownie recipe of your choice (I use Baker’s 1 bowl brownie recipe)
1 package of Short Bread Cookies (chopped or broken into smaller pieces)
4 cups Toasted Coconut (more or less)
1 1/2 package Caramel Bits
6-8 TBS Heavy Whipping Cream
Semi-sweet Chocolate, chopped into pieces

Method:

1. Preheat oven and prepare brownies in accordance with the recipe you have chosen.

2. Prepare a 9x13 pan with parchment paper, then pour in brownie batter and smooth out to an even layer.

3. Places shortbread cookies, evenly spaced, on top of the brownie batter.

4. Place in the oven and cook brownies for half of the time recommended in the recipe you chose.

5. In the meantime, melt the caramel with the cream stirring until smooth. Stir in the toasted coconut. Do not do this too early or it will begin to cool and get too stiff to pour.

6. Remove the brownies from the oven and gently pour, spoon, or spread the caramel mixture over the brownies and shortbread. Spread out the caramel into an even as possible layer. Be careful not to tear the delicate brownie.

7. Put brownies back into the oven and finish cooking.  A tooth pick inserted should come out with moist crumbs and caramel, no batter.

8.  Let brownies cool completely before removing from pan and drizzling with melted chocolate.

9. Let chocoalte set-up before cutting into pieces.  You can put the brownies in the fridge to speed up the process.

10. Cut into deserved pieces and enjoy.

Thursday, September 15, 2011

The Start of Fall Baking


Fall baking has officially begun in this Baker’s house.  Ironically enough, the first item of fall I made this year used the last but of pureed pumpkin out of my freezer from last year.  I was baking-blog searching, as I do quite often, when I stumbled upon a blog that made Pumpkin Yeast Bread.


I was immediately intrigued.  I have done pumpkin bread in the past, but that was quick bread, leavened with baking powder, but yeast?  This was different.  I immediately wanted to give it a try.  Since that was during the workweek, I had to painstakingly wait until Saturday, after running a ton of household errands.


By the time I got home, I was tired, and the last thing I wanted to do was knead bread.  I still wanted to eat pumpkin bread however.  Dilemma, dilemma, what to do?  That is when my red kitchen aid mixer caught my eye.  I remembered the brioche cinnamon roll dough that I made with that mixer and immediately, I was inspired all over again. 


I softened the yeast in the mixer bowl, before stirring all the ingredients together with the paddle attachment.  I added in the flour for the recipe and mixed, then I attached the dough hook.  As the hook kneaded the dough into shape, I continued to add in a little flour along the way.  “I” kneaded the dough for about ten minutes.  It was the easiest knead of my life :-)


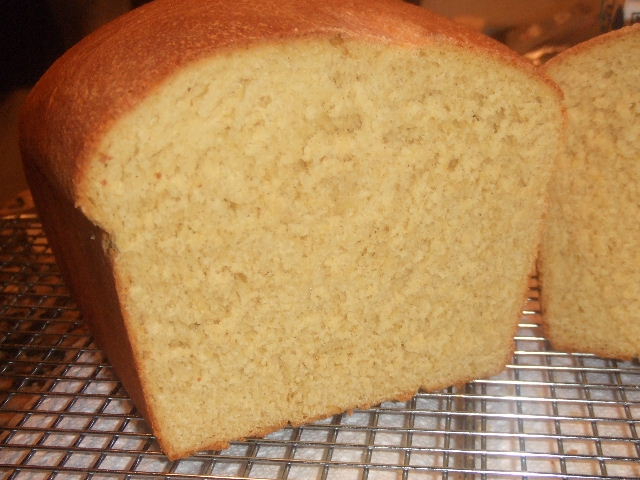
The bread came out wonderfully.  I mean hello, goodnight, look at the crumb!  I cannot believe I accomplished bread that is actually sandwich bread worthy.  (I ate a tofurky sandwich on this bread the next day).  The pumpkin taste is light, not overwhelming.  If you are using the bread for savory dishes or general use, it is perfect.  If you want the bread for sweeter applications, I would up the sugar and spices, and maybe even add in a little more pumpkin.


I did use the bread for a sweeter application, however, and it was good.  I am speaking on how to make good, gooder, I mean better.  My office is having a breakfast next week to welcome a new staff member, as is customary, and I wanted to make a French toast soufflé my friend Aye had told me about several months ago when she made it for her brunch group.  I thought using not just homemade bread, but homemade pumpkin bread, would give it a special touch.  Knowing my history with yeast however, I had to try it out in advance.


I baked the bread and was waiting to receive the recipe for the soufflé from Aye.  When I received the recipe, I realized that it was written to be used with croissants, a bread that is more buttery, airy, and flaky than my bread.  I decided to give it a go with the pumpkin bread anyhow, and boy, it was good.


It reminds me of a cheesecake bread pudding, which I have never had, and admittedly have never found a bread pudding that I liked, but go with me here.  Though the cream cheese mixture was poured on first, it remained as a top coating to the bread pieces and the egg mixture went down to the bottom binding everything all together without being custardy.


It was good, really good, but a few changes I plan to incorporate when I make this for my office this weekend: (1) add another teaspoon of vanilla to the cream cheese mixture and (2) whisk the spices into the egg mixture.  If you really wanted the pumpkin flavor to sing, you could add pumpkin puree to the cream cheese mixture, but I will not be doing that this weekend.


This breakfast dish is topped with a warm maple syrup and butter mixture.  I sprinkled on pecans for an added crunch and some textural contrast.  You could also place a dollop of fresh whipped cream on the top or sprinkle powder sugar on top, neither of which are necessary but look pretty. 


Lastly, please use real maple syrup in this dish.  I know it cost a heck-of-a lot more than the flavored stuff, but you need that authentic maple flavor notes that the fake stuff cannot give you.  Further, there is no granulated sugar in the recipe, so the only sweetness comes from the maple syrup.   Do yourself a flavor favor and get the real stuff; trust me, this was the first time I bought real maple syrup, and it was worth every dime, quarter, and dollar I spent!


Just because I could not get enough of fall (and wanted to make this post as long as possible), I had to use a butternut squash bought from the farmers market in the same evening I was making all of the above.  The butternut squash risotto became my dinner, at 10 PM at night, when I finally finished everything else previously mentioned.


This risotto was delightful.  There is nothing special about this risotto, except that I was proud to cook a savory dish so well.  I bake; I do not cook as well.  Let’s not talk about me making plain rice… disaster!  So, when the dish came out creamy with the roasted (in the oven) squash on top, I had to share my accomplishment.  I love this photo!


All recipes provided below.  Welcome FALL BAKING SEASON, I am ready to take full advantage of your fresh harvest and familiar warm spices in traditional and new exciting ways!


Yeast Pumpkin Bread

Adapted from King Arthur’s Flour

Ingredients:

1/4 cup warm water
1 packages active dry yeast
1/3 cup warm water + 2 TBS dry milk powder
1 large eggs, beaten
2 cups puréed pumpkin, either fresh or canned
1 tablespoons melted butter
1 teaspoon vanilla extract
3 1/4 cups (approximately) flour (half bread flour and half all purpose)
1/4 cup brown sugar
1 teaspoons salt
1 teaspoon cinnamon
1/2 teaspoon allspice

Method:

1. In the bowl of your electric mixer with the paddle attachment, stir yeast into water to soften. Add milk, eggs, pumpkin, butter, 2 cups flour, brown sugar, vanilla, salt, cinnamon, and allspice to yeast mixture. Beat vigorously for 2 minutes.

2. Gradually add remaining flour, a little at a time, until you have a dough stiff enough to knead. Switch over to your dough hook. Knead, adding flour as necessary (you will need to add flour even if doing this by mixer), until you have a smooth, elastic dough, at least 10 minutes.

3. Put dough into an oiled bowl. Turn once to coat entire ball of dough with oil. Cover with a towel and let rise until doubled, about 1 hour.

4. Punch dough down. Turn dough out onto a lightly oiled work surface. Shape dough into loaves and place in well-greased 10 x 5-inch pans. Cover with a towel and let rise until almost doubled, about 45 minutes.

5. Bake in a preheated 375°F oven for about 30 minutes. The loaf should be dark brown in color and sound hollow when tapped.

6. Immediately, remove bread from pan and cool on a wire rack to prevent crust from becoming soggy.


French Toast Soufflé
Adapted from ????
**NOTE: This recipe is prepared, placed in the fridge overnight, and cooked the next day.**

Ingredients:
4 thick slices (half a loaf) of Pumpkin Yeast Bread

Cream Cheese Mixture
4oz cream cheese (1/2 of a package)
1/4 cup of butter, softened
1/4 cup maple syrup
1 tsp vanilla
1/4 cup half and half, room temperature

Egg Mixture
5 large eggs, room temperature
1 1/4 cup half and half
1/8 cup maple syrup
Sprinkle1 teaspoon ground cinnamon
1/2 teaspoon allspice

Topping
Equal parts butter & maple syrup
Chopped pecans

Method:
1. Cut or tear pumpkin bread into pieces. Be careful not to smash the bread. Evenly place in an 8X8 pan.

2. Combine cream cheese mixture ingredients with an electric beater (or whisk). If combining by hand, I suggest mashing the cream cheese and butter together with a spatula until soft and creamy. Pour mixture over the bread in the pan.

3. Combine egg mixture ingredients and pour over the mixture in the pan.

4. Sprinkle cinnamon and allspice over the entire dish. Cover the dish with plastic or foil and place in the fridge.

5. The next day, pre-heat the oven to 350F. Once oven is ready, place soufflé in and bake for 45 minutes, or until golden brown.

6. In the microwave or over the stove in a small pan, combine syrup and butter for sauce. Cut soufflé, sprinkle with pecans (if desired), and top with sauce. Serve. Eat. Enjoy.


Roasted Butternut Squash Risotto

Ingredients:

1 Butternut Squash (any size)
1 TBS Olive Oil
1 Shallot
Minced Garlic to taste
1 cup Arborio Rice
1/2 cup Dry White Wine
4-6 cups Vegetable Broth
1/2 cup Parmigiano Reggiano Cheese, shredded

Method:
1. Skin and cube butternut squash. Roast butternut squash in a 375F oven until tender, brown, and toasty.

2. In medium pot add olive oil and shallot, cooking until tender, about 5 minutes; add garlic, cook for another minute; and add rice to toast, cooking for 2-3 minutes.

3. Add wine and simmer for a few minutes.

4. Add stock a few ladles at a time. Keep the stock warm buy microwave or in anther pot heated oven gentle flame. Stir and leave dish uncovered to simmer, stirring frequently.

5. When stock is almost gone (about 5-8 minutes), add a couple more ladles of stock and stir. Continue this process for about 25 minutes and risotto looks creamy.

6. Turn off the heat and stir in cheese (without cheese it would be vegan!). You can stir in the butternut squash or simply spoon it on top of the dish.

Friday, September 09, 2011

Cookies & Cream Chunk Chocolate Cookies


These cookies are like heaven, personified cookie-fied (yes, I made up that word).  The cookies remind me of a less fudgy and less dense brownie, in cookie form, with milk’s favorite cookie, the Oreo, running throughout.  The Cookies & Cream part of this cookie brings me back to my childhood and reminds me of the similarly named ice cream flavor.  You take all these positive attributes and put it together and you have this cookie--a chocolate cookie this non-chocolate lover loves!


I friend recently asked me where I get my recipes from for all the things I bake.  I told her they are mostly self-created, though inspired by and adapted from other baking blogs.  My general process for creating a recipe usually begins with a Google search of the ingredients I want to use or the recipe I am thinking of making.  I will then usually look at the pictures and recipes listed and find the attributes about the item that I do and do not want to reproduce.

I usually never find one recipe I like; I take a sample of 10-20 recipes and see how they combine the ingredients and the results that come from it.  I look at their results and think about what I would like my results to be.  Next, I get to writing with all those things in mind.


Where did this cookie come from?  Well it is my own, with inspiration from Baking Illustrated and Brown Eyed Baker.  I like how Baking Illustrated used melted chocolate, though far too much in my opinion, and a higher content of flour than other recipes with melted chocolate, but they still did not use enough flour.  I also did not like that the Baking Illustrated recipe used 4 eggs.  I like the buzz Brown Eyed Baker’s recipe had been getting around the internet, but I wanted to use some melted chocolate in the cookie.  I love how brownies with melted chocolate come out, compared to brownies with only cocoa powder.  I wanted qualities of both in my cookie.


Therefore, I took the things I loved about the two recipes and combined them.  Then tweaked some other ingredients, after all baking is a science, as I thought I would get better results.  Did I mention I desperately needed to use the mega sized Hershey’s Cookies & Cream bar before it was consumed without being surrounded by a baked product?  That is another reason I created this recipe.  If I made this recipe a few weeks ago, when the bar was still whole, I would not have used any white chocolate chips.  Shhhhh, don’t tell!


So, there you go.  A little glimpse into my overly analytical and time-consuming way of adapting/creating a recipe.  It may be crazy to look at hundreds of pictures and a couple dozen recipes, but I generally (actually, overwhelmingly) get good results.  At a later point, I will discuss how I come up with my flavor combinations.


Cookies & Cream Chunk Chocolate Cookies

About 21 cookies

Ingredients:

2 1/2 cups All purpose flour
1 tsp Baking Powder
1 tsp Salt
1/2 cup Cocoa Powder
1 cup Butter
4 oz Semi-Sweet Chocolate
1 cup Granulated Sugar
1 cup Brown Sugar
2 Large (Brown) Eggs
2 tsp Vanilla Extract
24 Oreos (1/2 cut into small pieces, ~9+ per cookie, and 1/2 broken into fourths, by hand)
4 oz (or more, approx. 6 oz) Hershey’s Cookies & Cream Bar cut into chunks
Optional handful of White Chocolate Chips

Methods:

Pre-heat oven to 350F.

1. Melt butter and semi-sweet chocolate together. Set aside to cool.

2. In a separate bowl mix together flour, baking powder, salt, and cocoa powder.

3. Mix brown and granulated sugar into melted chocolate mixture.

4. Add eggs to chocolate/sugar mixture one at a time. Then add vanilla extract.

5. Shift the flour mixture over the chocolate mixture and stir to combine.

6. Add in Oreo pieces, Cookies & Cream bar pieces, and white chocolate chips. Stir until just mixed.

7. On a parchment lined baking sheet, scoop cookie dough. I used a standard size ice cream scoop.

8. The dough will not spread too much, so flatten it with the palm/heel of your hand. Smooth any rough edges.

9. Bake for 10-11 minutes. Let cool and enjoy!

Monday, September 05, 2011

29. & 30. Brioche Cinnamon Rolls


These are two of the items on my top 100 list, I have been wanting to accomplish for a LONG while.  There were logistical issues to completing this challenge however.  1) I needed somewhere to take them once complete while still warm, and 2) I needed to craft a finely tuned schedule to ensure they were completed at the right time.

Dough after initially combining and kneading...

So, I decided to make these beauties and take them to work for a Monday morning breakfast treat.  I made the dough and did the first rise on Sunday.  I then woke up at Monday morning to take the dough out the fridge, roll it out, sprinkle out the cinnamon sugar mixture, and roll & cut the cinnamon rolls.  Then the cinnamon rolls had to rise, so I placed them on top of the stove with the oven preheating.

...then left to rise at room temp.

I went back to sleep until 5 AM, when I normally get up for work, and placed the cinnamon rolls in the oven.  I went back up stairs and took my shower and laid out my suit for work.  Then I went back down stairs and removed the cinnamon rolls from the oven.  Next, I went back up stairs got dressed for work, while the cinnamon rolls cooled slightly.  I then came back to the kitchen, made the cream cheese frosting, topped the cinnamon rolls with the frosting, placed them on a serving plate, and in a box.

Rolled out dough sprinkled with cinnamon/sugar mixture, leaving one end uncovered.

All that time, preparation, broken sleep, and several trips up and down the stairs was so worth it.  The rolls were buttery, fluffy, and decadent.  The dough was easy to work with.  It came together just as the instructions said without any kneading by hand.  Thank you Kitchen Aid mixer with dough hook attachment.

Rolls cut and placed in a pan, covered...

If I did this again, first, I would place the rolls in a larger pan to rise or not let them rise as long.  The 1.5 hours I let them rise setting on top of my stove with the oven pre-heating was more then enough time (and heat possibly).  The rolls completely filled the pan losing their signature circle shape.  Second, of course, I would not do this while trying to get ready for work either, but it worked out.  My office loved the rolls and they were a nice unexpected breakfast treat.

...to rise.

YAY!  Check off two more successfully completed Top 100 challenges.  Also, another pat on the back for working with YEAST successfully.  Yeast and are, slowly, becoming BFFs (baking friends forever)!

Rolls, fresh out the oven, prior to frosting.

I used the brioche recipe from Baking Banter’s Brioche French Toast recipe and added one teaspoon of vanilla extract to the recipe.  To transform the butter rich bread into cinnamon rolls, I did the following:

1. After the dough comes out the fridge, roll it into a rectangle. Do not roll between parchment paper, trust me and save yourself the time. Roll it out old school style with flour.


2. Spread half a stick of soft room temperature butter over the dough.

3. Combine 1 cup of brown sugar (lightly packed) with 2 teaspoons of cinnamon and 1 teaspoon of allspice.

4. Sprinkle as much of the mixture as you care for on top of the butter. Leave about 1 inch of dough uncovered from topping & butter along the longer side of the dough. (See picture above.)

5. Roll the dough into a log toward to uncovered side. Once completely rolled, pinch together the roll and uncovered end to seal as much as possible.

6. Place the roll sealed side down and cut into pieces with a sharp knife, approximately 1 to 1.5 inches. Do not squash the rolls with downward pressure as you cut it.

7. In a greased pan, place the rolls facing cut side up and down.

8. Let the dough rise for at least an hour.

9. Preheat the oven to 350F.

10. Bake the rolls for 25-30 minutes, until the rolls are nice and browned and sound slightly hollow with tapped.

11. Top with cream cheese frosting or enjoy plain.