Monday, June 27, 2011

I Must Be Nuts! (Daring Bakers’ June Challenge)


This month the Daring Bakers were not only daring; we went NUTS, Nuts for Baklava that is.
Erica of Erica’s Edibles was our host for the Daring Baker’s June challenge. Erica challenged us to be truly DARING by making homemade phyllo dough and then to use that homemade dough to make Baklava.


Our challenge, if we chose to accept it, and I did, was to make homemade phyllo dough. Yes, you know the dough bought in the freezer section near the puff pastry and pie dough, the dough that requires you to place a wet towel over the unused portion while layering it so it does not dry out, the dough that is mass produced and rolled out by a machine to be uber paper thin. Yes, that dough was made… from scratch… by me… in my kitchen and then layered into baklava.


The dough recipe is fairly simple and easy to work with. It is stretchy and comes together with ease. The technique used by old-world, home phyllo rollers is to role the dough around a dowel to get it as thin as possible. I tried that technique and it worked pretty well, but I had a lot of problem with the dough sticking together. I floured, floured, and floured some more, but the dough still stuck.


When I finally got all the dough rolled out and set aside, it all stuck together so badly that I was not able to separate the leafs of phyllo to layer the phyllo for the baklava. At that point I did not want to scrap all the hard work that I had already accomplished and decided to cut the sheets with a circle cookie cutter and layer it in a standard sized muffin tin. I was able to salvage enough dough to make about 8 baklava “cakes.”


One of my baklava-loving friends calls my baklava southern style. I browned the butter. (I <3 browned butter!) I used almonds and pecans mixed with brown and white sugar for the filling. For the syrup I used locally harvested honey infused with cinnamon, cloves, all spice, nutmeg, and bourbon vanilla.


The baklava was flavorful and sweet, but not too sweet (I go light on the syrup and only pour on what the baklava can absorb in a few minutes). I was suppose to taste one piece so I could comment on the flakiness of the homemade dough, the toothsome-ness of the filling, and get a cute one bite picture; but, we are talking about me here and 3-4 bites later, I had officially had baklava… for breakfast… at 8 AM. It was good, too!


And then at some point later on that day, I had another piece. Then I promptly decided the other pieces had to get out of my house, immediately! To keep the baklava intact and give it away, I made these cute little baklava packets which I distributed.

May I mention again, I rolled this dough… MYSELF! :-D


 You can get the recipe on the Daring Kitchen web-site and check out the other Bakers’ baklava.

Tuesday, June 07, 2011

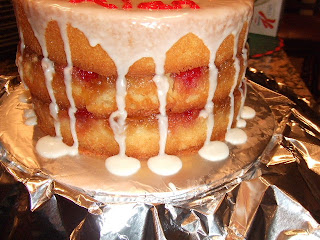
21. Pineapple Upside Down Inside-Out Cake


Yet again, if you follow my top 100 you are thinking, there was not a pineapple upside ins… whatever that long ridiculous name… cake by any name on that list. And again, you would be correct. However, there was a Moist Yellow Cake on the list and I used that recipe, with a few adjustments, to make this cake.


I am sure your next question is “what is up with the name of this cake?” Well, my dear inquisitive reader, this is not a traditional upside down cake. There are no pineapple rings making a glorious appearance on the top of this cake; therefore, it is not completely an upside down cake. The pineapple toping, here, is used between the cake layers, on the inside. Hence the name.


Now you may be thinking “Why?” And I would ask you “Why not?” But seriously, I needed to make a Birthday cake for work. This is the third Birthday we have had in about a month. Personally, I thought some maybe tired of the usual cake and frosting. So, I wanted to do something a little different—pineapple upside down cake. But wait, since this was a Birthday cake I wanted to be able to write on the cake. That is when I can up with the idea of placing the pineapple layers in between the cake.


Not to toot my own horn, but “toot, toot!”; this cake idea was genius. I made one batch of the Moist Yellow Cake recipe below. In two of the pans, I started to traditional pineapple upside down cake topping (melted butter, brown sugar, pineapple, and maraschino cherries). I used crushed pineapple as opposed to rings to make the cake easier to cut. I divided the cake batter evenly between three 8-inch pans.


To assemble the cake, I unmold and flip the two pans with pineapple bottoms while still very warm to prevent the brown sugar from cooling and the topping from sticking to the pan. Once the cakes are completely cool, you can stack them pineapple side up, for the bottom two layers of the cake and then place the plain cake (without pineapple bottom) on the top. The completed cake is covered in a simple glaze made from powdered sugar and pineapple juice. If you are worried about the cakes remaining together, place a little of the glaze mixture between the layers for glue.


If you want to put a new twist on traditional pineapple side down cake, give this method and recipe a whirl. The cake is unbelievably moist and the pineapple notes come through the cake wonderfully. Lastly, because this is not a traditional buttercream frosted birthday cake, it is a little lighter for this time of year… Well as light as anything can be when made with brown sugar.


Moist Yellow Cake(Adapted from the awesome Bakerella)

Ingredients
- 1 cup (2 sticks) of butter (room temperature)
- 2 cups of sugar
- 4 eggs (room temperature)
- 3 cups of sifted self-rising flour (or use 3 cups All-purpose flour minus 6 tsp, then add 4.5 tsp baking powder & 1.5 tsp salt)
- 1 cup of whole milk (room temperature) (For pineapple cake, use 1 cup pineapple juice and optional- 3 TBS dried/powdered milk)
- 1 teaspoon pure vanilla extract
- 1/2 teaspoon butter flavoring (I excluded for pineapple cake)

Method
1. Preheat oven to 350 degrees.
2. Grease and flour (3) 8 inch cake pans.
3. Using a mixer, cream butter until fluffy.
4. Add sugar and continue to cream until light, fluffy, and pale yellow in color.
5. Add eggs one at a time. Beat well after each egg is added.
6. Alternate adding the flour (or flour mixture if using alternative) and milk, beginning and ending with flour.
7. Add vanilla and butter flavoring to mix; until just mixed.
8. Divide batter equally into three cake pans.
9. Tap each cake pan on the counter to release any air bubbles trapped in the mixture.
10. Bake for 25 – 30 minutes until done.
11. Cool, assemble, enjoy.