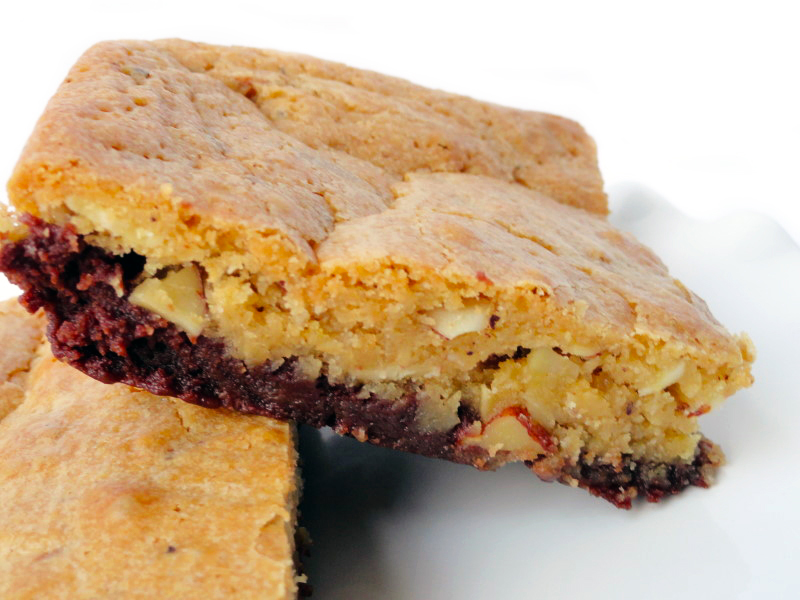
Friday, August 31, 2012

The Cake that needs No Explanation

Excuse the drool.  This picture had me ready to lick my computer screen.


Usually, there is some type of story or related event to go along with my recipes.  But this time, I have nothing.  Absolutely nothing.  I have actually delayed posting this recipe to see if a story would develop, yet nothing has occurred.  This cake is too good to wait, so I am sharing it sans story.


This cake is literally too good to wait.  A friend emailed me a link to this cake on a Thursday and I made it Saturday.  Yup, the promise of brown butter, pumpkin, and fall flavors will do that to me.  So, do not wait or hesitate make this cake now!  Hint- you can make it in a jar now and make it as a whole cake for Thanksgiving.  Yes, it is so good you will want it twice.


Brown Butter Pumpkin Cake with Brown Butter Cream Cheese Frosting and Salty Sweet Pecans... (gasping in a breath of air)... In a Jar
(Adapted from Fine Cooking
Original recipe in black, my changes and comments in red.

Ingredients:

Cake
6 oz. (3/4 cup) unsalted butter; more for the pans (I used spray to prepare pans. )
9 oz. (2 cups) unbleached all-purpose flour; more for the pans (I used spray to prepare pans.)
1-1/2 tsp. baking soda
1-1/2 tsp. ground cinnamon
1 tsp. ground ginger
3/4 tsp. table salt
1/4 tsp. ground cloves (I used 1/2 tsp. allspice instead.)
1-1/2 cups granulated sugar
2/3 cup firmly packed light brown sugar
1-1/2 cup pumpkin puree
2 large eggs
1/3 cup buttermilk (I used almond milk. I did not have buttermilk on hand.)

Topping I kind of doubled the recipe.
1-1/2 Tbs. unsalted butter (3 TBS)
2/3 cup pecans (2 cups)
1/2 cup unsalted, raw, hulled pepitas (I did not use, as I did not have any on hand.  I added more pecans instead.)
2 Tbs. firmly packed light brown sugar (4 TBS)
1/4 tsp. table salt (1/2 TBS; this was an accident I read TBS instead of tsp.)
1-1/2 Tbs. chopped crystallized ginger (Did not use.)
Caster (extra fine) Sugar, amount to taste to roll nuts in (This was to make up for the accidental additional salt.)

Frosting
4 oz. (1/2 cup) unsalted butter
8 oz. cream cheese, at room temperature
1/4 cup firmly packed light brown sugar (Did not use.  I was concerned the brown sugar would clump or lead to a gritty texture.)
5 oz. (1-1/4 cups) confectioners’ sugar (1 1/2 pound; I added more sugar to sweeten frosting and to detract some of the saltiness of the nuts.)
Splash of almond milk (To get icing to easily pipeable consistency as a result of the added sugar.)
2 tsp. vanilla extract

If using jars you will need 8-eight oz. jars, a circle cookie cutter (optional, but preferred), piping bag (ditto), and piping tip (ditto).

Method:

Cake

1. Position a rack in the center of the oven and heat the oven to 350°F.

2. Butter and flour two 9-inch round cake pans with removable bottoms (or butter two 9-inch round cake pans, line the bottoms with parchment, butter the parchment, and flour the pans).  I used one 9x13-inch pan, lined with parchment and sprayed.

3. Melt the butter in a heavy-duty 1-quart saucepan over medium heat. Cook, swirling the pan occasionally until the butter turns a nutty golden-brown, about 4 minutes. Pour into a small bowl and let stand until cool but not set, about 15 minutes.  To save dishes, I let the browned butter cool in the pan.

4. In a medium bowl, whisk the flour, baking soda, cinnamon, ginger, salt, and cloves (all spice, instead). In a large bowl, whisk 1-1/2 cups of the pumpkin purée with the granulated sugar, brown sugar, eggs, and buttermilk (almond milk, instead.  I do not necessarily recommend using it.  After mixing the cake, I was concerned it would not rise properly because of the lack of acid with leaving out the buttermilk, and therefore lacking the chemical reaction necessary with the baking soda.  Luckily, it came out okay.  If you have buttermilk or the old milk and vinegar/lemon juice technique available, use it.) until very well blended. With a rubber spatula, stir in the flour mixture until just combined.  I continued to use my whisk (gently) as it was impossible to “stir” the flour in with a rubber spatula.  Gently whisk in the brown butter until completely incorporated. Divide the batter evenly between the prepared pans.

5. Bake the cakes until a tester inserted in the center comes out clean, about 28 minutes. Let the cakes cool in the pans for 10 minutes. Turn the cakes out onto racks, remove the pan bottoms or parchment, and cool completely.  My cake baked in about 35 minutes and I let it cool completely in the pan.

Topping

1. Melt the butter in a heavy-duty 12-inch nonstick skillet over medium heat. Add the pecans and pepitas and cook until the pecans brown slightly and the pepitas begin to pop, about 2 minutes. I used pecans only.

2. Sprinkle in the brown sugar and salt and stir until the sugar melts and the nuts are glazed, about 2 minutes. Stir in the ginger. Remove from the heat and let the mixture cool in the skillet.  If you really like salty sweet (and to cut some of the sweetness of the frosting) use the greater amount of salt.  I omitted the ginger.  I laid the mixture out on a parchment lined sheet to cool.  I then shook the warm pecans with caster sugar to coat, and then poured the pecans back into a single layer on a parchment lined cookie sheet to cool completely.

Frosting

1. Melt the butter in a heavy-duty 1-quart saucepan over medium heat. Cook, swirling the pan occasionally until the butter turns a nutty golden-brown, about 4 minutes. Pour into a small bowl and let stand until the solids settle at the bottom of the bowl, about 5 minutes. Carefully transfer the bowl to the freezer and chill until just firm, about 18 minutes. Using a spoon, carefully scrape the butter from bowl, leaving the browned solids at the bottom; discard the solids.  I poured the brown butter into the bowl I plan to make the icing in to cool.  I always keep my browned solids in my brown butter.  They contain the most amazing buttery, nutty, toasty flavor, and it would be a shame to discard them.

2. Using an electric mixer, beat the butter, cream cheese, and brown sugar on medium-high speed until light in color and the brown sugar has dissolved, 2 minutes. I creamed the butter and cream sugar together separately, first.  I omitted the brown sugar.  Gradually beat in the confectioners’ sugar and continue beating until fluffy, 1 to 2 minutes.  Add in a splash of milk, achieving a nice, smooth, and pipeable consistency, and a little vanilla extract.

Assemble the cake

Put one cake layer on a cake plate. Spread 1/2 cup of the frosting on the layer. Sprinkle 1/2 cup of the nut mixture over the frosting and top with the second layer. Frost the top and sides of the cake with the remaining frosting. Arrange the remaining topping in a ring 1-1/2 inches in from the edge of the cake and serve

1. Remove cake from pan.  Using a circle cookie cutter a little smaller than the size of the jar, cut out sixteen circles.  Cutting the circles as close together as possible, you should get 15.  Taking two sides and placing them together and then cutting out a circle, you can cut a 16th circle.

2. Press a cake circle into the bottom of each of the eight jars.  Using a paper towel clean any cake smears and crumbs from the jar.  Pipe in a layer of frosting.  Sprinkle in some pecans.  Repeat from the cake layer, being careful not to overfill with frosting and pecans so you can screw the top on.

3. Store in the fridge, but enjoy at room temperature.

Friday, August 24, 2012

Blondie Brownies


I have written about Blondies on this blog before, and trying to define what exactly they are, which to remind you—Blondies are much more than chocolatefree brownies.  I have written about Brownies several times before and incorporated them into just about everything—Samoa inspired, Rocky Roaded, Forgotten Valentine, and Remembered Valentine.  I have even incorporated brownies intocookies.  With all these variations on two basic bars, why did it never dawn on me to put the two together?

Blondies and brownies are the perfect marriage, making for a great bar treat.  While they complement each other nicely, placing them together shows their inherent differences.  Blondies bake up like a denser more chewy cake/cookie with the delicious flavor of butter (brown in this case) and brownies bake up like a gooey, chewy chocolate flourless cake.  They work so well together.


I used my normal brownie recipe, with the good chocolate, and my brown butter blondie recipe.  I wanted to keep the two layers separate, so I baked the brownie layer for about 10 minutes before pouring the blondie layer over the top.  Also, I added shredded coconut and almond slices to the blondie layer to add texture.  Flavor wise, the coconut and almonds are milder compared to the chocolate, but they do add a subtle something extra; there texture is a necessary addition to an otherwise chewy, heavy, gooey, bar.

These bars came out well and were well received.  Combining two very successful treats into one was a grand slam, thank you ma’am, slap your momma, some kinda good idea!  (Oh and did I mention the extra chewy edges are the best?  No.  Well, the chewy edges are the best, Best, BEST!!!!)


Friday, August 17, 2012

Pink Ombre Cake


I am a firm believer that you can have cake at any time, at any place, and at any occasion.  The flavor of the cake and frosting may need to be tweaked for the event (a celebration cake with confetti and balloons may not be appropriate for a funeral), but cake is always welcome.   This includes just because cake, which is cake that is made just because a recipe looked good or better yet, you just want some cake.

The problem with just because cake is that you have a whole cake.  Usually after one or two slices, just because cake has hit the spot, but there is still an entire cake left to go.  A friend emailed me this cake months ago.  I was thinking awesome cake and wanted to make it that weekend.  My friend told me that she did not want a whole cake at her house and to wait for a special occasion, basically ensuring the cake would be shared and not consumed by one person.


That same friend just finished her chemotherapy treatment and decided to have a celebration to mark the end of the most difficult part of her cancer treatment/recovery to health.  When my friend announced this celebration, I instantly thought of this cake.  This would be the perfect time to unveil a cake my friend had been wanting for a while.

The original cake was gradient shades of purple.  I know my friend loves purple, but I thought pink was more fitting for breast cancer.  The cake was flavored simple enough, vanilla cake layers with a little bit of lemon curd smeared between the layers to hold the cake together.  The cake was cover in a Swiss Meringue Buttercream and topped with SPRINKLES.  Sprinkles always make everything better.


The cake went over well and came out amazing.  Moreover, my friend forgot that she loved this cake and I promised to make it at some point.  She was pleasantly surprised when she cute the cake, pulled out the first piece and saw all the shades of pink.  That is what this cake is—a show stopper.  It will surprise and amaze, and is even better when made not just because, but made for and shared with an amazing person who inspires and amazes, just like my friend.


Pink Ombre Cake
Adapted from raspberri cupcakes
*Notes: The original recipe divides the cake into five layers, I did six.  I also increased the original recipe by half (as provided below) to create six nice height layers with an eight inch diameter pan.  Lastly, it was easiest to multiple this recipe using the weight measurements, so those are provided below.

535.5g All-purpose Flour
1 ½ TBS Baking Powder
1 tsp Salt
337.5ml Milk (~ 1 ½ cups), room temperature
4 tsp Vanilla Extract
600g Caster (Extra Fine) Sugar
337.5g Butter (3 sticks), room temperature
5 Large Eggs, room temperature

Lemon Curd, homemade or store bought is fine

Swiss Meringue Buttercream—ratio 5 oz. egg whites; 10 oz. granulated sugar; and 15 oz. butter (nearly 4 sticks) (instructions, kinda sorta but not really)

Method
1. Preheat oven to 350F.

2. Prepare appropriate number of 8-inch circle pans.  Cut out a parchment circle for the bottom, and flour/shortening the sides.  I used three pans, cleaned them out, and used them again to bake six layers.

3. Combine flour, baking powder, and salt in a medium bowl, and set aside.  Mix together milk and vanilla in a measuring cup, and set aside as well.

4. Weigh bowl in which you will do your mixing and write down this number.  Beat together butter and sugar until well blended, creamy, and pale.  Beat in eggs one at a time.

5. Alternate adding flour and milk mixtures in 2-3 parts, beginning and ending with flour. 

6. Weigh full bowl.  Subtract the empty bowl weight from the new bowl weight.  Take the resulting number and divide by six.  This new number is the amount of batter to be placed in each of six bowls.

7. Divide batter evenly into six containers (or five if you keep the white in the bowl you are already using) using a scale to weigh each container to ensure it is even.

8.  To create the gradient colors, keep one bowl white.  Then using gel food colors (I used Ameri-gel), add 1 drop to bowl 2, 2 drops to bowl 3, 3 drops to bowl 4, 5 drops to bowl 5, and 7 drops to bowl 6.  Gently mix until there are no more streaks of color.  Be careful not to over mix.

9.  Pour the batter in to the pans and bake for about 20 minutes, until a cake tester comes out clean. 

10. Let cake cool in pan for 5-10 minutes.  To get flat, even layers without trimming cake, try this method: Flip cake onto parchment paper and cooling rack.  Cover cake with another piece of parchment.  Place cookie sheet on top of cake with a bag or two of powdered sugar on top to apply gentle pressure and flatten the cake.  Leave the cake this way for 20 minutes.  Remove cookie sheet, weight (bag of powdered sugar) and top piece of parchment and allow cake to cool completely.

11. Once cakes are completely cool, layer from darkest to lightest, separating the layers with a thin smear of lemon curd.

12.  Crumb coat the cake with a thin coat of SMBC.  Refrigerate until firm.  Place a final layer of frosting on the entire cake and/or decorate as desired.

Friday, August 10, 2012

Will Work for Cookies


I have a friend, who happens to be the editor of my horrible photography, who also redesigned this blog; you see her name on the contributor list as thribb.  She is graphic designer by profession.  She does amazing work.  She is also very efficient and can turn around things with amazing quality, very quickly.  I think the quality of my blog has grown by leaps and bounds all thanks to her.  How much is this type of work worth?  Probably more than I could monetary afford, or a lifetime of goodies.

My friend also loves cookies, cakes, and most sweet things.  A few days ago, she turned around some photos in mere hours.  (Sometimes the photos are ready before I even start drafting the blog post words.)  Upon thanking her for her awesome edits, I told her “I am glad you let me pay you in baked goods :-)”  She emailed me back saying, “Will work for cookies.”  This has pretty much been our unofficial arrangement/understanding (as an attorney not having a concrete piece of writing to refer to kills me, but what is a few pounds of butter between friends?).


As part of my continual supply of baked goods in exchange for services (not really, as I would bake cookies without consideration), I made these cookies for her nephew’s birthday.  She said that he wanted Angry Birds.  After working out the details--when, how many, etc… I said sure I could do it.  Notice that I did not do my research before saying I could do something. 

I did a quick search and could not find angry bird shaped cookie cutters.  What to do?  I examined the shape of those little critters to determine if I had something of similar shape at home.  I did not at first glance.  More internet searching yielded these two blog posts (1 and 2) from bloggers about how the formed the shapes with cookie cutters they already had.  Between those blogs and my own ingenuity, I had the shapes ready to go.


I set down and constructed a detailed plan for decorating these cookies.  Drawing something in 2D is not the same as applying and layering icing in real life.  From drawing out the birds I realized 1) planning and timing are going to be key; 2) I am not artist; and 3) I may be in over my head, lacking the necessary talent to make these.

Nonetheless, with a lack of faith and confidence, I set out to make these cookies.  Day 1 was making the dough, cutting out the cookies, shaping them prebaking, making royal icing, coloring all the icing, and doing my background flooding.  Day 2 was drawing and placing all the first level details like eyes, beaks, brows, and noses.  I mentioned, I am not an artist and this was definitely something that required a drawers hand to place correctly.  Day 3 was placing in the final details, like pupils and nostrils, and trying to cover all the sink holes that inexplicable formed in the eyes.  Day 4 was pictures, packaging, and getting those little monsters out my house.


The positives: I think the cookies are mildly recognizable and kids can related them back to what they are supposed to be.   The negatives: These cookies were probably the most detailed thing I have ever done, requiring more days, icing colors, gel color, and steps than any other cookie I have ever made.  I took the pictures and sent then to my friend, still cringing any time someone said a word that even sounded like icing or angry birds (I even deleted the app of my ipad).

A few days later my friend sent the pictures back and I swear those cookies actually looked like angry bird characters.  Her editing made my horrible photography and cookies look better.  At that moment I knew I was officially lucky to have her AND pay her in cookies because I could never afford the quality of her work otherwise.  See what I go through to make this little blog’s space on the internet more pretty?


P.S.- I had extra sugar cookie dough and frosting, so I made cookie pops and decorated them with my favorite embroidery technique.

Friday, August 03, 2012

The Most Wonderful Time of the Year


My favorite part of the year is arriving.  No, I am not talking about the Christmas season, which is 5 months away, in case you are wondering.  I am referring to the next 6 glorious months (not counting August).  These are the best months of the year. These months are when there are mandated, prescheduled, paid holidays/days off from work!  Free-off days, as I call them.

These glorious free-off days are the best and over the next 6 months they are sprinkled out where I (and most other non-retail/medical/emergency… let’s just say other federal, state, and local government employees, including teachers) get at least one a month.  Wow, that sounded like I was rubbing it in.  I really am not rubbing it in; just trying to share my joy.


Think about it, the following holidays are on the horizon over the next 6 months:
·         September- Labor Day
·         October- Columbus Day
·         November- Veteran’s Day; Thanksgiving and the day after (and a half day before, if you are lucky); maybe even election day this year
·         December- Christmas Eve and Day
·         January- New Year’s Day; Martin Luther King, Jr.’s Birthday
·         February- President’s Day

Then after February, there is a perennial drought of free-off days.  There is nothing in March or April (I pointed out to my boss that in college we got spring break in March/April.  He said that they are called furlough days in the real/adult world.  No, thank you; Point taken; and I will pass!).  Then there is finally a holiday in May, 3 months after the last holiday, and another 6 weeks before the next holiday. 

It feels like mental torture during these long months with no provided breaks.  Free-off days are little nuggets of mental health happiness that are necessary for a happy healthy me employee.


To celebrate the last holiday, before the holiday drought comes to an end, I decide to randomly bake something new.  On July 4th, while sitting on my couch watching some random rerun I pulled out my Martha Stewart Cookie Book and baked the first recipe that seemed interesting to me and which I had all the ingredients.  The result was these Chewy Molasses Cookies.

These cookies came out crisp on the edges and chewy in the center.  The overwhelming and over powdering smell of molasses bakes out, leaving behind an in depth, not-too-sweet, indescribable flavored cookie.  It is hard to describe the flavor of molasses.  You just have to try it and I think you will like it, or it will grow on you (as it has on me… but only in its baked form, the “raw” stuff’s smell still turns my stomach).

Anyway, these cookies baked up so flat that I thought the recipe was a failure and it made nearly double what Martha estimated.  I hate wasting cookies.  They were edible, but imperfect.  I decided to still share them with my office and my mom’s co-workers.  These cookies were so well received; I was astounded.  They are definitely a must try and a recipe I will pull out again, maybe on one of those free-off days around November or December.


Chewy Molasses Cookies
(adapted from Martha Stewart’s Cookie Book)
Makes about 2 Dozen (according to Martha)

Ingredients:
2 cups all-purpose flour
1 tsp baking soda
1 tsp cinnamon
1 tsp allspice
1/2 tsp nutmeg
1 tsp ginger
1/2 tsp salt
1 cup brown sugar
1/2 cup granulated sugar
1/2 cup (1 stick) unsalted butter, room temperature
2 large eggs, room temperature
1/2 cup molasses
2 TBS vegetable oil
Extra granulated sugar or sparkling/sanding sugar for rolling

Method:

1. In a medium bowl, whisk together flour, baking soda, spices, and salt; set aside.

2. Beat butter, granulated sugar, and brown sugar until combined and smooth. Beat in eggs one at a time and then molasses and oil.

3. Gradually mix in dry ingredients, just until a dough forms. Wrap dough in plastic, put dough in the fridge, and chill it for at least an hour.

4. Preheat oven to 325F.  Place sugar for rolling in shallow dish.

5. Use 1TBS cookie scoop to form cookies. Roll cookies in sugar to coat.

6. Arrange dough on baking sheets, about 3 inches apart.  The cookies will spread. Bake for approximately 17 minutes, until the cookies are flat and the centers are set.  Cool completely before storing.

7. Because cookies are chewy, store between layers of parchment.