Thursday, May 31, 2012

Strawberry Cheesecake Cookies


I have posted before about having a great, unique, and individual idea, only to have my ego crushed by a Google search that shows several hundreds of other people have had this idea before.  Sometimes, some of those ideas are even a little better than mine.

Well, this is not the case this time.  For once, I did a Google search and it did not crush my creative spirit.  I could not find another recipe, blog entry, or even a thought bubble that mentioned my idea.  After talking myself off the ledge that there was nothing out there because the idea would not work, I decided to try it.  And not only did it work, it worked without any hiccups.


So, I am really geeking out about this recipe: Strawberry Cheesecake Cookies!  These cookies contain a Strawberry Cheesecake Filling baked inside of a graham cracker crumb cookie.  I know it does not sound genius, but look at the picture!  It. Is. Genius.  And Good.

For all the genius that this recipe is worth, it is really quite simple to achieve.  The cheesecake filling is frozen to allow for it to be surrounded by the graham cracker crumb cookie.  That way, as it bakes, the cookie and filling spread out evenly and the filling stays just that, a filling, only on the inside of the cookie.  


Strawberry Cheesecake Cookie
By Baker at Law

Filling:
1-8oz package of Cream Cheese
1/4 cup Powdered Sugar (more or less to taste)
Splash of Cream or Milk
1/4 cup Strawberry Pie Filling (more or less to taste)
* I had a lot of filling leftover.  You may want to half the recipe.

Cookie:
2 sticks (1 cup) Butter, room temperature
3/4 cup Brown Sugar
3/4 cup White Sugar
2 tsp Vanilla
1 Large Egg, room temperature
1 1/2 cup All-purpose Flour
1 cup Graham Cracker Crumbs
1 tsp Salt
1 tsp Baking Powder

Method:

1. Stir room temperature cream cheese until soft with rubber spatula.  Add in powdered sugar and a splash of milk.  Stir.  Add in strawberry pie filling and stir until well combined.  Mixture should be soft, yet easily retain its shape.  (Do not over do the cream.)

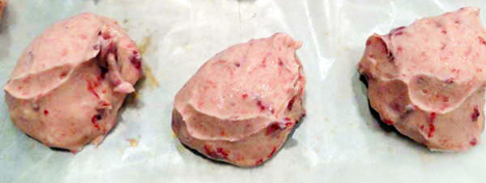
2. Using a tablespoon sized cookie scope, scope up a spoonful of filling and release it onto a parchment lined cookie sheet.  Continue until all filling is gone.  Place the filling cookie sheet in the freezer for at least 30 minutes before starting the cookie dough recipe.


3. Preheat oven to 350F.

4. Cream together the butter and both sugars.  Next add in the egg and vanilla, mixing until fully incorporated.  Set aside.

5. In a separate bowl, combine the flour, graham cracker crumbs, salt, and baking powder.

6. Stir the flour mixture into the butter mixture.  Make sure everything is mixed well.

7. Remove frozen cheesecake filling balls from the freezer.

8. Using a 3TBS cookie scope (or an Ice cream cookie scope for larger cookie) scope up one ball of dough.  Eject the dough into your hand.  Press into the center of the dough with your fingers creating a well.  Place a frozen cheesecake-filling ball in the dented area.  Continue to work the cookie dough around the filing cover the top.

9. Place the cookie ball on a parchment lined cookie sheet.  Place the cookies a good distance apart as they will spread.  Continue making dough/filling balls until the cookie sheet is filled.  Place any remaining filling in the freezer if you are baking cookies in batches to keep them frozen.

10. Bake the cookies for 16-19 minutes, until they  are brown around the edges.

11. Remove from the oven and allow to cool completely before moving as the center is very soft when warm.  Enjoy at room temperature, but store any uneaten cookies (after a day or two) in the fridge.

Wednesday, May 23, 2012

What is a Blondie?


Until this point, I have developed a few different takes on a blondie.  At first, I thought it was a brownie, without chocolate.  I thought it would be fudge-like and dense.  Then, I thought a blondie was really just a chocolate chip cookie in bar form.  It seemed like a blondie was a different dessert, with different textures, to different bakers.  So, what would my desired blondie texture be?

I thought blondies should take the crusty/crispy top of a brownie, the slightly softer center of a chocolate chip cookie, the fluffiness of a cake, the chewy edges of a brownie, and be its own dessert—not an ill comparison to other desserts.  Can all this exist in one humble dessert?  SPOILER ALERT—keep reading!

I earmarked a Browned Butter Blondie recipe weeks ago, but it was not on the top of my to-bake list.  I really just love almost anything with brown butter!  Sunday afternoon I wanted to bake a treat to take into the office the following morning.  I initially planned on making cookies, but with a kitchen at 88F before I even cut on the oven, I just did not feel like being stuck in the kitchen in and out of the oven every 13-15minutes!  I still wanted to bake though and thought making a bar would be the perfect solution.


I went through a few cookbooks and internet recipe prints outs before I remembered the earmarked recipe and my curiosity was re-peaked.  Best of all, I kind of had all the ingredients, or at least substitute ingredients that went well together, on hand.  I created Brown Butter Toffee Almond Coconut Blondies.  The toasted coconut really gives these blondies a little something extra flavor and texture wise.  It started as a filler because I did not have enough almonds, but after tasting it all together, it is a requirement (unless you are allergic or do not like it).  I used extra fine shredded unsweetened coconut; using of the normal sweetened shredded stuff might yield a less pleasing texture and the sweetness would be way too much.

These blondies were Oh, My Goodness, Awesome!  The texture was not like anything I have had before.  It was not brownie without chocolate; it was not a cookie in a bar form; it was a Blondie—a remarkable dessert in its own right.  The taste is subtle of brown butter and brown sugar.  You get a nice crunch from the almonds and a sweet little burst from the toffee bits.  Lastly, the coconut is almost undetectable, but it added a lusciousness and secret flavor.


Brown Butter Toffee Almond Coconut Blondies
Adapted from Recipe Girl

Ingredients:

1 1/2 cups (3 sticks) Butter
2 1/4 cups All-purpose Flour
1 1/2 tsp Baking Powder
1 1/2 tsp Salt
4 Large Eggs
2 cups Brown Sugar
1 TBS Vanilla Extract
1 cup Toffee Bits
1 cup Shredded Unsweetened Coconut
1 cup Almonds, sliced

Method:

1. Preheat the oven to 325F. Spray a 9x9-inch baking pan with nonstick spray. Line the pan with parchment paper so that it covers the bottom and comes up the sides of the pan. Spray the parchment paper with nonstick spray as well.

2. Browning the butter: In a saucepan over medium heat, melt the butter. Continue to heat the butter until it turns a deep golden brown.  You will notice foam on the top, brown golden particle on the bottom of the pan, and a nutty smell.  It will go from melted to browned butter quite quickly.  Keep an eye on it, so it does not burn.  Burnt browned butter is bitter.  Remove from heat and let it cool to room temperature.

3. Sift together the flour, baking powder and salt. Set aside.

4. In a large bowl, combine the eggs and sugar. Beat on medium-high speed until light and fluffy, about 3 minutes. Mix in the vanilla and browned butter, scraping the sides of the bowl to incorporate all of the ingredients, as needed.  

5. Add the flour mixture to the butter mixture, and mix until just combined.  Lastly, fold in the toffee bits, coconut, and almonds. Scrape/pour the batter into the prepared pan.

6. Bake 45 to 55 minutes, or until a toothpick inserted into the center comes out clean.  Let the bars cool to room temperature before removing from the pan and cutting.

Friday, May 11, 2012

Blog (and Photography) on the Rise


A good friend of mine, who is a loyal reader of my blog and a willing guinea pig to my baked treats and who is also a graphic designer, has taken pity on me and this poor little blog.  She has graciously volunteered to redesign my blog for me.  As you know, redesigning my blog was on my new year’s promise-to-do list.  Five months into the New Year and besides taking down the hideous back ground, I have done little else.  To my credit there has been little time to redesign, but I have been blogging pretty consistently.


So, when my friend volunteer to re-do my blog, I willing accepted (after making sure she was not taking on too much.  After all, I do not want to overwhelm her with a pity job).  I was so excited, thinking about colors, design, fonts, and logos… Then it hit me.  My photography skills will need to be elevated to live up to what fantastic-ness my blog is getting ready to become.


Currently, I spend about 5-10 minutes taking 100 pictures of my desserts, with my flash on usually at midnight after an evening of baking.  I pray that a few shots come out okay out of the 100.  I then shift through them and pick the best and upload them, as is (resized but unedited), to my blog.  I have always been more concerned with the taste of my food over the pictures of my food.   But out in blog world readers literally eat with their eyes, and my pictures need to start being visual treats.


I have very minimally started to care more about pictures.  There are a few things that I need to get, like some backing to block out the random junk on my kitchen counter in pictures, but I can still begin to practice some of the techniques I am picking up from random internet searches.  The first technique I am practicing is the use of natural light as opposed to my camera’s flash, which up until this point, I was a huge fan of due to nighttime photography sessions.


This brings a whole new level of having to prepare to take pictures, as there is not natural light at midnight.  The Birthday Cake Oreo Crispie Treats are the first treats I captured by natural light.  Friday morning before work, I took the treats out onto my balcony and tried to get a few photos.


Over all they came out okay, I definitely need to spend more time taking photos.  Even with natural light, taking photos before work in 5-10 minutes does not a brilliant photo make.  Oh, by the way, I have no clue how these taste.  I do not eat marshmallows, but I was told they are wonderful.  I used the standard Rice Krispies Treat recipe, but melted extra marshmallows, chopped up an entire package of Birthday Cake Oreos, and added extra sprinkles because everything is better with sprinkles.

Tuesday, May 08, 2012

The Ultimate Salty-Sweet Cookie


I have a friend who likes sweets, but is much more of a crunchy, salty, snack person.  This past weekend she invited me to come see her new home and I wanted to bring her a treat.  I love to bake, so creating and baking new things is kind of selfish, but I always make sure to take the individual person’s likes, allergies, and dislikes into account.

I have made it a mission to know all the crazy food quirks about my friends.  I mean, I may not remember the name of their adorable 2-year-old niece or their beloved pet cat, but I can tell you that they are semi-allergic to some nuts, do not like peanut butter but loves peanuts, or has a serious thing for lemons.  Yes, those important things in life I do not forget.


Well this friend, let’s call her VJ, has always had a thing for chips.  I remember back in our college days, on Thursday night when we had to use up the rest of our weekly meal plans before they reset on Friday, I would always stock up on cookies and VJ would always go for the chips.  When VJ does go for something sweet, she prefers salty-sweet, like peanut butter cookies or snickers bars (which I have combined into a cookie for her before).

This time, I wanted to take salty-sweet over the top and came up with a cookie that was so VJ that I was worried I would not even like them.  Instinctively, I knew all the ingredients would work together, but I still just was not sure about these.  Anyway, I got over my apprehension, put on my big girl panties, and just made the cookies.  No guts, no glory!

The cookies are a simple chocolate chip cookies base, but that is where conventional ends.  The mix-ins contained Ruffles Potato Chips, Peanut Butter Filled Pretzels, and Chocolate and Peanut Butter Chips.


These cookies are the epitome of salty-sweet.  You get the crunch and fried, saltiness of the potato chips, and the salty, flaky crunch of the pretzel.  You also get the strong, slightly dry peanut butter taste from the pretzel filling.  Lastly, you get sweet burst of chocolate and peanut butter chips with the cookie being one big, soft and chewy fifth texture holding all that goodness together.  Seriously, it hit so many taste buds on my tongue upon first bit that I was actually overwhelmed… by a cookie.  Did I like it?  Did I love it?  It is weird?  Did I hate it?  Maybe too much salty?

All those questions were answered upon second, third, and fourth bite.  No, I did not like it; I LOVED it.  Yes, it is weird, but I don’t hate it.  Not too salty at all.  Though I would not eat potato chips in everyday life, I would in a cookie, this cookie!  That says it all.  Oh, and VJ liked them too!


Friday, May 04, 2012

46. Eat to live. Bake to love. (Pecan Shortbread)


Shhhhh!  Lean in really close and be prepared to learn a secret from the Baker at Law kitchen.


Whispering--On average, I usually only take two bites of the desserts I prepare.  One bite to taste the flavor and test the texture of the edges and a second bite to test the texture of the center.


That’s it.  Then I take pictures of the desserts, package them up, take a few more pictures, and then distribute the desserts to happy partakers.    Out of the cookie, for example, that I had two bites, I put the leftovers in a Ziploc bag and leave it on the counter.  Usually, in about a week or so, the tester gets thrown away.


I really do not eat much of what I bake.  I had a friend try to explain this concept to her niece and she seemed completely perplexed by it.  I am sure in the mind of a kid, if food tastes good you eat it.  But, that is not how my mind works, generally.  I eat to live, and although I do enjoy food, I bake to love.


I enjoy baking immensely, but let’s face it, if I ate everything I baked I would be unhealthy, unfit, and two TBS of butter away from a heart attack.  That is not a life I want to lead.  I bake purely because I like to do it.  I love to share it with people who enjoy it.  And I try and spread the wealthy around—no giving too many sticks of butter to one person.


With all that being said, these cookies are one of the few things I baked that I literally had to get out of the house as I ate three cookies the night I made them.  They ARE that good.  These cookies are simple in theory: pecans, butter, sugar, flour, eggs, and vanilla.  Yet, sometimes a magical mix of minimal ingredients allows each to shine and yields perfect results.


These cookies are subtly sweet, rich, and buttery.  Toasting the pecans is a must!  With so few ingredients, each one has to be used to its highest potential.  I made these cookies in two ways.  I divided the batter in half.  With one-half, I formed a log and refrigerated it for 24 hours.  I then sliced the cookies from the log and baked.  The other half of the batter I used immediately, using a 1 TBS capacity cookie scope.  Both cookies came out just as well.  I baked the log-sliced cookies a little longer than the scope cookies.


So bake these and share the love!

Pecan Shortbread Cookies
Adapted from Dessert Magazine

Ingredients:

3 sticks Butter, room temperature
1 cup White Sugar
1 large Egg, room temperature
1 TBS (yes TBS) Vanilla Extract
1 TBS Water, room temperature
4 cups All-purpose Flour
1 tsp Salt
1/4 tsp Baking Soda
2 1/2 cup Pecans, chopped and toasted

Method:

1. Preheat oven to 325F.

2. Cream together butter and sugar.

3. Add egg, vanilla, and water, one at a time.

4. Mix baking soda, flour, and salt in a separate bowl before mixing into butter mixture.

5. Add pecans and mix in completely.

6. Use 1 TBS cookie scope to portion evenly sized cookies.  Slightly flatten.  Cookies will spread very little.

7. Or form dough into a cookie log.  Wrap in plastic and place in the fridge.  Once cookies are cold all the way through, slice them to your desired thickness.

8. Bake cookies 15-17 minutes if using the cookie scope method, or 17-20 minutes if using the sliced log method.  Cookies are done with the edges are just beginning to brown.

9. Cool completely and enjoy!

Tuesday, May 01, 2012

45. Cherry Almond Biscotti


The reason behind my top 100 list was to challenge myself to try new things.  I wanted to learn new techniques, try different recipes, and expand my baking expertise.  I will not like everything on the list, but it will not stop me from making it and trying it.


That is the case with biscotti.  I like crisp cookies, but I am not a huge fan of biscotti.  Biscotti can be so rock-hard that you must dip it in a beverage to actually be able to eat it.  That is where the problem lies.


Imagine it—you can have a nice, creamy, warm cup of coffee and a flavorful, not-to-sweet, crisp, nutty cookie.  Then you take that cookie, dip it into the coffee, hold it there for a few seconds, then pull the cookie out and eat it.  After savoring the now bitable cookie, you look back down at your cup of coffee and what do you see?  Floating crumbs, cookie residue, textures that are unbecoming of a drink.


THAT is why I do not care for biscotti, because the vehicle to make the cookie palatable creates unwanted consequences.  I want my coffee cookie-crumb free!  So, when making my own biscotti, I wanted it crisp but not jaw-breaking hard.  I wanted the cookie to be enjoyed with or without dipping.


These cookies have a crisp exterior and a softer, chewy interior.  I love that they are not super sweet, and the cherries provide an extra tartness.  Lastly, to bump up the decadence, I half dipped them in semi-sweet chocolate and showered some with almonds.


If you choose to dip them or not, they are perfectly enjoyable.  These cookies can stand on their own or be nicely paired with a warm beverage of choice.

Cherry Almond Biscotti
Adapted from Joy of Baking

 Ingredients:
1 tsp Baking Powder
1/8 tsp Salt
2 cups All-purpose Flour
3/4 cup White Sugar
4 large eggs
1 tsp Vanilla Extract
1/2 tsp Almond Extract
approx. 1 cup Dried Cherries
3/4 cup Slivered Almonds

 Method:
1. Preheat oven temperature to 330F and line a baking sheet with parchment paper.  

2. In a small bowl lightly beat eggs and extracts together. 

3. In a medium bowl combine the flour, sugar, baking powder and salt. Add the egg mixture and mix until a dough forms.  Adding almonds and cherries about halfway through.

4. On a lightly floured surface shape dough into a log about 14 inches long and 3 - 4 inches wide. Transfer log to the prepared baking sheet and bake for 30 - 40 minutes, or until firm to the touch (log will spread during baking). Remove from oven and let cool on a wire rack for about 10 minutes.

5. Transfer log to a cutting board and, using a serrated knife, cut log into slices 1 inch thick slices on the diagonal. 

6. Arrange pieces evenly on baking sheet with bottom of log down, so that each piece is standing up with the cut side out.  Bake for 30 minutes or more, until firm to the touch.

7. Remove from oven and let cool.

8. If dipping, melt 8-oz of semi-sweet chocolate with a little vegetable oil.  Once cookies are completely cool, dip each cookie.  Sprinkle with additional sliced almonds if desired. Place on parchment paper, and in the fridge, until chocolate is completely set.