I can officially mark another three items off my top 100 list. And Bonus, I scored some additional tasty recipes to add to my go-to recipe file in the process.

I have always been a fan of almond cake, but not just any almond cake. I like the cake made with almond paste as part of the batter. The fake “almond” cakes flavored with just almond extract are not good enough. When I sought out to bake an almond cake of my own, I searched high and low for a recipe that used almond paste, but was not heavy. I stumbled upon a recipe from an on-line dessert magazine that seemed to fit the bill.

My kitchen was immediately saturated with intense almond fragrance upon placing the almond paste in the mixing bowl to break it up. That decadent almond aroma did not dissipate during the entire cake preparation.

The recipe made a hefty amount of batter calling to fill three 9-inch circle pans. I used three 8-inch circle pans. The cake came out great, but was seriously too tall to consider putting all three layers together. Therefore, I used two layers to make the Birthday cake to take to my office and one layer I used to make cake in a jar.

Another element of this cake is the homemade raspberry filling. I did not use a recipe to make this filling because I have made filling in this manner before. I mashed one pint of raspberries through a sieve and then warmed the puree mixed with confectioners’ sugar to taste. I then dissolved some cornstarch in a small amount of puree before stirring the slurry into the larger bowl of puree. I placed the mixture back in the microwave until it thickened to a consistency I thought was good for a filling.

I took this cake to my office to celebrate the Boss Man’s birthday, after covering the cake with a Chocolate Swiss Meringue Buttercream (for every 2oz of egg whites, stir in 4oz of melted chocolate at the very end of the icing make process, after the swiss meringue buttercream has completely come together) and placing sliced almond around the top edge.
Generally, I liked how this cake came out. The almond flavor was amazing. The cake was a little dense however. The next time I will try combining a combination of flours, as opposed to just cake flour and whipping some of the egg whites to lighten the cake.

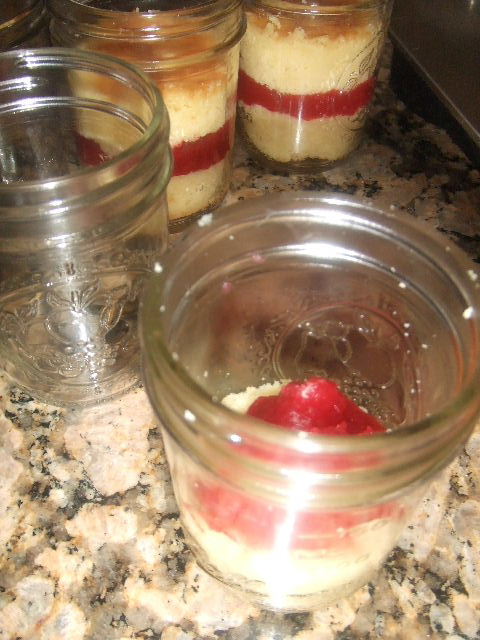
After the office cake, I still had one whole remaining layer of cake left. I had some left over mason jars from a canning project I took on earlier this week (which I will post about in a future post) and thought they would make a great container for transporting cake. The single layer of cake was not high enough for me to consider passing it off as another cake. I like my cakes tall and impressive.

Also, I wanted to share the cake with several different people and one frosted cake would not allow me to accomplish that. Hence, I took a circle cookie cutter and cut out six rings of cake. The cake layer was thick enough for me to separate the rings into two halves. I placed one half in the bottom of the mason jar, followed by the raspberry filling. Then I placed the other half of cake over the filling before piping in some chocolate swiss meringue buttercream and topping it off with some sliced almonds.

Finally, I decided to attach a spoon to the front of the jar so the cake-in-a-jar recipients could be able to enjoy their treat as soon as I passed it to them, instead of having to wait until getting home. Cake in a jar is a great way of giving the gift of cake in a unique and special way.

Almond Layer Cake
(Adapted from an on-line dessert magazine whose name I cannot remember.)
Ingredients:
7 oz (or 8 oz) Almond Paste
2 2/3 cups Sugar
4 1/2 cups Flour
4 1/2 tsp Baking Powder
3/4 tsp of Salt
2 1/2 sticks (10 oz) Butter
1 tsp Almond Extract (or more to taste)
10 Egg Whites (or Egg Beaters Equivalent)
1 1/2 cup Half-and-half (or Whole Milk)
Method:
1. Preheat oven to 350F.
2. Prepare 3, eight or nine inch baking pans with parchment paper and either nonstick/flour spray or butter then flour traditional method. Set aside.
3. In the bowl of a mixer combine the sugar and almond paste. Let the mixture continue to blend for several minutes. Until the almond past has broken down into little pieces.
4. In a separate bowl combine flour, baking powder, and salt. Blend with a fork and set aside.
5. In the mixer bowl add the butter, followed by the almond extract.
6. Next add in the egg whites 2 or 3 at a time and beat until just incorporated.
7. Sift 1/3 of the flour mixture over the egg mixture and fold it in. Followed by 1/2 of the half-and-half.
8. Repeat adding the flour mixture (1/3) and half-and-half (1/2), followed by the last (1/3) of the flour mixture. Folding/Stirring after each addition, until all ingredients are just combined and no white streaks remain.
9. Pour the batter equally between the three prepared pans.
10. Bake for approximately 40-45 minutes, until a cake tester inserted in the center of the cake comes out clean.
11. Let cakes cool before removing from pan.