Friday, December 31, 2010

Holiday Sugar Cookies 2010


I absolutely love making and decorating sugar cookies. I have been making holiday inspired sugar cookies for the past couple of years.


Usually, I make tons of sugar cookies. But this year I tailored my holiday baking to making friends something that is like their favorites.

I only have one friend who truly loves, loves, loves sugar cookies with frosting.


So, I <3 her enough to take out 2-3 days to make, decorate, and package sugar cookies just for her.

Wednesday, December 29, 2010

Doggie Treats


For the holiday season I have been baking treats for each of my friends based on their own person preferences. I made Ferro Rocher cupcakes for a friend recently and she likes to share everything with her dog. But dogs cannot have chocolate and I did not want him to feel left out, so I whipped up some quick and easy doggie treats for him.


He loved the doggie treat. When I gave it to him, at first, he sniffed it and turned away from it. So, I left him there and walked to the kitchen. When I returned not 1 minute later looking for the treat, it was gone and he was licking his lips. The faker did not want anyone to seem him eat like a little piggy and it was like pulling teeth to get him to share with his doggie cousin.

So, these cookies have been given the Miniature Dachshund and Shih Tzu paws of approval.

DOGGIE TREATS

Ingredients
1/2 cup Peanut Butter
1/8 cup Honey
1/2 cup Veggie Broth (or Chicken/Beef)
1 cup Rolled Oats, roughly chopped
1 cup Flour (I used All Purpose, but you can use Whole Wheat and increase liquid slightly)
Method

1. Preheat oven to 350F degrees.

2. Mix together wet ingredients.

3. Add dry ingredients to wet and mix thoroughly.

4. Roll out between wax paper or on a floured surface and cut with cookie cutter. Scraps can be re-rolled.

5. Bake for approximately 15-20 minutes until the cookies are golden brown on top. This produces crunchy cookies which dogs tend to like.

6. Remember: Though these use all human edible ingredients, they will probably not taste super good to you-- there is not enough sugar for a true peanut butter cookie, not to mention the addition of savory stock. :-)

Monday, December 27, 2010

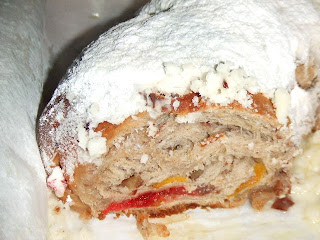
Stollen Wreath: December 2010 Daring Bakers’ Challenge


The 2010 December Daring Bakers’ challenge was hosted by Penny of Sweet Sadie’s Baking. She chose to challenge Daring Bakers’ to make Stollen. She adapted a friend’s family recipe and combined it with information from friends, techniques from Peter Reinhart’s book.........and Martha Stewart’s demonstration.


This challenge was like a twist on fruit cake. Some people love fruit cake; some people hate fruit cake; but EVERYONE has an opinion on fruit cake. Personally, I do not like fruit cake. It is dense and all those candied and unnatural colored fruit is off putting. My mother, on the other hand, loves fruit cake and actually bought a fruit cake from the grocery store which she has since consumed in it entirety; it was not a second rate handed down gift.


So, with this history I assumed I would not like the stollen, but my mother would. Wrong! Completely wrong! I loved the stollen. Putting the fruits and nuts into a bread makes it lighter and a substantially better texture than fruit cake. As I type this, I am enjoying a piece for breakfast that has been toasted under the broiler. Yum! My mother, however, hated the stollen. Why? Because she is not a bread person and that bread texture is off putting to her. Go figure.


I did make a few changes to the challenge recipe to accommodate my taste. I used cranberries instead of raisins and pecans instead of almonds; I added some different extracts and upped the spice level. And though I halved the recipe, I still ended up with a pretty large stollen wreath which I gifted over half away on Christmas day!

Homemade Candied Orange Peel

The best stollen of all is that shared with good friends and family. Merry Christmas!

STOLLEN

Dough ball before placed in fridge.

Ingredients
1/8 cup Lukewarm Water
1 package of Active Dry Yeast
1/2 cup Milk
5 TBS Unsalted Butter
2 1/2 + 1/4 cup All Purpose Flour
1/4 cup Brown Sugar
1/2 tsp Salt
1/2 tsp Cinnamon
1/2 tsp All Spice
1/4 tsp Nutmeg
2 large Eggs, beaten
1 tsp Vanilla Extract
2 tsp Rum Extract
Scant 1/2 cup, Candied Orange Peel, chopped fine
1/2 cup Dried Cranberries
Cranberry Apple Tea, seeped (to rehydrate the cranberries)
12 Candied Maraschino Cherries, roughly chopped
½ cup Candied Pecans, lightly chopped
Melted Butter
Powdered Sugar

Dough ball after coming out of fridge.

Method

Day 1 -- Make Dough

1. Night before you intend to make dough, rehydrate cranberries.

2. Pour warm water into a small bowl, sprinkle with yeast and let stand for 5 minutes. Stir to dissolve yeast completely.

Rolled out...

3. In a small sauce pan, combine milk and butter over medium/low heat until butter is melted. Let stand until lukewarm.

4. In the bowl of an electric mixer fitted with a paddle attachment, stir together the flour, sugar, salt, cinnamon, all spice, and nutmeg.

5. On low speed, add in water/yeast mixture, eggs, extracts, and milk/butter mixture. This should take about 2 minutes, forming a soft but not sticky ball.

6. Once dough has come together, cover with plastic wrap and let it rest for 10 minutes.

... with Candied Cherries.

7. Add in orange peel, cranberries, and pecans until incorporated.

8. Affix dough hook(s) to mixer and beginning kneading for approximately 6 minutes, completely mixing in fruit. The dough should be tacky, not sticky and a few fruit may fall away from the dough when it is ready.

9. Lightly oil a large bowl and transfer dough to the bowl, rolling around to coat it with oil. Cover the bowl with plastic wrap and place in the fridge over night. It should rise slowly in the fridge.

Rolled into Wreath and Sliced.

Day 2 -- Finished Stollen

1. Take dough out of the fridge and let it rest for 2 hours to warm slightly.

2. In the mean time, line a sheet pan (with sides) with parchment paper.

3. Preheat oven to 350F degrees. (I would do this during step 10 and the 2 hour proof period. It is a long time to keep the oven on with nothing in it.)

After Proofing.

4. Punch down dough and roll into a rectangle approximately 8 x 12 inches and 1/4 an inch thick.

5. Sprinkle the dough with the chopped cherries.

6. Roll up tightly, forming a long thin cylinder.

7. Place a bowl in the center of the sheet pan to provide shape. Place cylinder of dough on sheet pan wrapped around the bowl, joining the ends together by overlapping the dough and pinching together.
8. Using kitchen shears make cuts along the top of the circle spacing them evenly and cutting 2/3 of the way through. Gently roll cuts to the outside of the circle.

Before getting its dressing...

9. Mist the dough with oil spray and cover loosely with plastic wrap.

10. Proof for approximately 2 hours, until the dough is 150% bigger than its original size.

11. Bake the stolen for 20 minutes, then rotate the pan and bake for another 20-30 minutes.

12. Brush the top with melted butter while still hot. Then sift a generous layer of powder sugar on top. Wait one minute and shift another layer of powder sugar over the stolen.

13. Repeat the butter and powder sugar at least three times, but more if you like.

... after dressing, but resting before its debut.

Sunday, December 26, 2010

14, 15, & 16. Ferrero Rocher Cupcake with Swiss Meringue Chocolate Buttercream


Making these cupcakes killed two birds with one stone. 1) Ferrero Rocher is the favorite candy of one of my good friends. It is not a holiday unless she has been given at least a 12 pack of the golden wrapped candy. So, giving her these little hidden treasure type cupcakes was a nice holiday treat for her. 2) These cupcakes were on My Top 100 List. So, completing them is another check mark of my list.


The recipe I found originally called for 24 candies, but I thought that was just a little too glutinous to give to my friend. So, I cut the recipe in half and still had enough batter left over to make three jumbo (Texas muffin sized) cupcakes. The batter was a little runny making it harder to work with, but it baked up like a dream- spongy, light, moist, and chocolaty. I think the Rocher candy definitely added to the flavor of the cupcake, without it, it was just plain chocolate and tasted like something was missing.


I topped the cake with an impromptu Swiss Meringue Chocolate Buttercream. Without even trying I knocked two more items off my top 100 list- chocolate buttercream and an icing made with melted chocolate! All in all, I thought it was tasty, but I am not a huge chocolate fan, so it was tad bit over kill. BUT to my friend, the chocolate enthusiast, they were great. She loved them! So give these a try if you have a chocolate and hazelnut lover in you life.


Ferrero Rocher Cupcakes
Adapted from Sugar Coated Bliss
Ingredients
1 cup All Purpose Flour
1 cup Sugar
1/4 heaping cup Cocoa Powder
1 tsp Baking Soda
1/2 tsp Baking Powder
1/4 tsp Salt
1/2 cup Vegetable Oil
1 Egg
1 cup Buttermilk
1 tsp Vanilla
12 Ferrero Rocher candies, frozen


Method

Preheat oven to 350F degrees.

1. Sift together flour, sugar, cocoa powder, baking soda & powder, and salt into a bowl. Set aside.

2. In separate bowl mix together oil, eggs, buttermilk, and vanilla.

3. Add wet ingredients to dry and mix well, for approximately 2 minutes.

4. Fill lined cupcake tins only HALF WAY full with batter. The batter will rise up.

5. Place a frozen, unwrapped Ferrero Rocher candy in the center of each cupcake.

6. Bake for about 15 minutes, until a cake tester stuck into the cake part only, comes out clean.

7. After cooling in the pan for 10-15 minutes, remove to a cooling rack to cool completely.


Swiss Meringue Chocolate Buttercream

1 part Egg White; 2 part Sugar; 3 Part Butter. Plus Chocolate and Vanilla.


In this case I used- 2 oz egg white heated with 4 oz sugar and then whipped until fluffy and cool. Add 6 oz of butter (1 and 1/2 sticks) cut into 1 TBS slices to frosting. Beat until frosting curdles and reforms into a fluffy frosting making a nice slapping sound against the sides of the mixer bowl. Fold in melted chocolate (I used 1 Hersey’s milk chocolate bar and a palm full of semi-sweet chocolate chips. It is all I had on hand after I burned the first batch of melted chocolate) and vanilla. Frost cupcakes and garnish with chopped hazelnuts.

Thursday, December 16, 2010

13. Soft Peanut Brittle


I bought some peanut brittle from a road side fresh market stand. I asked the clerk did he like the brittle; was it good? He responded, and I quote, “Yes.” Based on the gushing recommendation, I purchased an overpriced small bag of brittle. Upon tasting the brittle I was disappointed. It was good, but there were hardly any peanuts.


I mean if I was measuring, there was a good 1 inch of more of space from one peanut to the next. I mean come on; it is peanuts, one of the cheapest legumes! If I wanted to eat hard caramelized sugar, I would have bought such, but I didn’t; I bought PEANUT brittle.


In the spirit of wanting more peanuts, I decided to whip up a quick batch of peanut brittle. Not that I had ever made it before, but I had all the ingredients and the recipe seemed easy enough. The crazy part is that we were in the middle of baking/cooking for a large dinner party that afternoon and I decided to just randomly make peanut brittle. My mother stepped away from the stove to cut up her trimmings for the stuffing and I quickly shuffled in and started making brittle.


Though I had all the ingredients on hand, I did not have enough of them. I halved the recipe because I only had one cup of Peanut Butter and after starting I realized I did not have enough corn syrup. But it did not matter, the soft brittle was delightful. It was crunchy, but not hard. All my fillings remained intact. And though peanut butter was an ingredient, it was not overwhelmingly peanut-butter tasting. I decided to put the make shift, last minute brittle out at the dinner party (so I would not eat it all myself).


But the biggest compliment came from my mother. First, as I have discussed before she tells me everything I make is fine--not good, great, wonderful--just fine… So I will not get a big head, she says. The brittle actually got a “good” from her. Second, this really tripped me out. I placed two pieces of brittle aside, so all would not be eaten by the party goers. Later when I go back to the baggie I placed aside, I noticed two extra pieces added to the bag. She made sure to put some aside so she would have some for later. NOW THAT is when I really knew this recipe was a keeper.


Soft Peanut Brittle
Adapted from Wives with Knives

Ingredients
1 cup Creamy Peanut Butter
3/4 cup Sugar
1/2 cup Light Corn Syrup
1/4 cup Honey (or just use all corn syrup, total 3/4 cup)
1/8 cup Water
1 TBS Butter
1 heaping cup Peanuts, salted
1/2 tsp Baking Soda
1 tsp Water
1/2 tsp Vanilla

Method

1. Prepare cookie sheet with parchment paper.

2. Combine sugar, syrup, honey, and 1/8 cup of water in a sauce pan.

3. Cook over high heat until the temperature reads 275 degrees.

4. Lower heat to medium and stir in butter.

5. When temperature reaches about 290 degrees stir in peanuts.

6. Meanwhile, melt peanut butter in microwave.

7. When mixture reaches 300 degrees pull it off the heat.

8. Dissolve baking soda in 1 tsp water and stir, along with vanilla, into mixture.

9. Fold warm peanut butter into the mixture. Work quickly.

10. Pour out onto parchment paper. Take another piece of parchment paper and place it over the top of the brittle. Covering your hands with a pot holder, press the brittle down. Press as thin as possible.

11. Let cool completely before breaking it into smaller pieces.

Monday, December 13, 2010

12. Red Velvet Cake


There is not much to say about this recipe or this cake. I did typical me and researched and poured over hundreds of recipes, pictures, taste comparisons, etc… Before deciding to create my own recipe based on the attributes I want to see in the final cake. The recipe I designed in the end did not match any other recipe I saw… for good or for bad?


The biggest challenge I had to settle was the debate over using oil verses butter for the fat in the cake. Modern cake bakers swear by butter because it lends a better taste to the cake. Traditional cake bakers swear by vegetable oil to keep the cake super moist, giving it its recognizable character. The draw backs of butter is that the cake is not as moist as the oil based cake. So if making the cake in advance (which I would have to by a few days) there is a chance it would be dry. The draw back with the oil was that I could not imagine dumping nearly 2 cups into one cake; it seemed nearly tragic.


I do understand the importance of the fat in the cake. The first red velvet cake I ever made I decided to replace a good portion of the oil with apple sauce, and though I was told the cake was good by a Red Velvet enthusiast and friend, it was no comparison to her Aunts. I really wanted my cake to have the positive properties of both butter and oil--taste and moisture. I decided to combine my fats.


Also, the other major debate was the amount of cocoa powder used. Red velvet cake to some is a light chocolate cake and to others it is not really chocolate at all and the chocolate should almost be unnoticed. Which directions was I going to go? The same friend/enthusiast also told me that my previous attempt was too chocolaty (I was in the light chocolate cake fan club then). When looking at pictures I noticed the cakes that were like neon blood red did not use much cocoa powder. I did not like the bright look. I liked the look of darker, richer cake. So, I had to decide how to walk the fine line between using the cocoa to achieve the color I wanted but not the taste I did not desire.


As you can tell, this cake became a birthday cake for a good friend. I am always nervous about taking untested recipes for big events, but the feedback was extremely positive. I myself thought it was good. I could taste the hint of chocolate running through the cake, but it most definitely was not a chocolate cake. Not if, but WHEN I make this cake again, I will use a different frosting however. I have never been a fan of the “butter & sugar” buttercreams and though this had cream cheese in it, it was still too sweet and heavy to me. Next time I will tackle a Swiss Meringue Cream Cheese Buttercream!


Sorry the pictures are not the best. That is what happens when you are trying to take pictures of the interior of the cake while trying to hold back the herd of hungry party goers.

Red Velvet Cake
By Baker at Law (That would be me :-)

Ingredients
1/4 cup (1/2 stick) Butter, softened
1 1/2 cup Sugar
3/4 cup Vegetable Oil
2 large Eggs, room temperature
1 tsp Vanilla
1 oz Liquid Red Food Coloring
2 1/2 cup Cake flour (I used the 1 TBS corn starch in 1 cup All Purpose Flour substitution method)
3 TBS cocoa powder
1 tsp Salt
1 c Buttermilk
1 tsp Baking soda
2 tsp Vinegar

Method
Pre-hear oven to 350 degrees

1. Sift together flour, coco powder, and salt. Set aside.

2. Mix together butter and sugar to well incorporated.
3. Add vegetable oil.

4. Add eggs one at a time and wait until the precious is fully incorporated before adding the next.

5. Add vanilla and food coloring.

6. Add flour mixture and buttermilk alternatively, beginning and ending with the flour mixture.

7. Scrap down the bowl as needed.

8. Mix baking soda and vinegar together in separate bowl.

9. Add baking soda/vinegar mixture to cake batter.

10. Pour batter in 3 prepared 8 inch circle pants. The batter will sit low in the pans, don’t worry, you will get three good sized layers.

11. Bake for 25-30 minutes. If cooking all pans at once, make sure to rotate you pans in the oven to avoid one cake over cooking in an oven hot spot.

12. Let fully cool before frosting.
Cream Cheese Frosting

8 oz Cream Cheese, room temperature
1/2 cup (1 sticks) Butter, softened
1 lbs (or less) powdered sugar (based on your taste and consistency desired)
2 tsp Vanilla

Mix together cream cheese, butter, and vanilla. Sift powder sugar and incorporate until desired consistency/taste is achieved.

Thursday, December 02, 2010

11. Cranberry Orange Muffins


In two previous posts I have talked about going through several different options of what to bake, one for a friend’s potluck and another for the Daring Bakers’ November Challenge.  In both of those posted I listed a few ideas that I had. Me being the over preparer that I am, I made sure that I had some of the ingredients on hand so that if I changed my mind back to something I previously crossed-out, I could still make the dish.


That is where these glorious cranberries came from. I bought them originally to make a crostata with for either of the two previously mentioned purposes, but I went a different way. My mother is not a fan of cranberry sauce, so that crossed out a simple cranberry relish with thanksgiving dinner. So, what to make? Immediately, I thought of cranberry orange muffins.


I think these muffins are like those warm hugs you wake up to on Thanksgiving morning or Christmas morning and have for breakfast before the big feast later. For me however, they have just been wrapping me in their tart yet sweet warmth before I head to the office for work.


On a slightly ironic note, as I was updating my top 100 list and checking off my two previous accomplishments, what do I see as one of the items on my list? Cranberry orange muffins! Sometimes, I go to my list for inspiration regarding what to make and other times I am simply inspired by something I want to taste. These muffins where inspired by the fact that I just wanted to taste cranberry orange muffins, but low and behold, they are on the list too. Yippee!


Cranberry Orange Muffins
(Completely transformed and adapted from the Barefoot Contessa’s Blueberry Coffee Cake Muffins)

Ingredients
12 TBS butter, room temperature
1 1/2 cup sugar + 6 tsp orange zest sugar*
4 Large eggs, room temperature
1 1/2 vanilla extract
8 oz sour cream
Juice of 1 orange
Zest of 2 oranges (1 for batter and 1 for orange zest sugar)
2 1/2 cup all purpose flour
2 tsp baking powder
1/2 tsp baking soda
1/2 tsp salt
12 oz fresh cranberries

Method
1. Preheat oven to 400 degrees.

2. Place 12 jumbo muffin cup liners into jumbo muffin pans.

3. With an eclectic mixture, like a Kitchen Aid Stand Mixer, cream butter and sugar with a paddle attachment until light and fluffy, approximately 5 minutes.

4. Lower mixer speed to low and add eggs one at a time.

5. Then add vanilla, sour cream, orange juice and orange zest increasing the mixers speed and scraping down the bowl when needed.

6. In separate bowl combine and mix well the flour, baking powder, baking soda, and salt.

7. With mixer back on low slowly add flour mixture until just blended well; do not over mix.

8. Fold in fresh cranberries, making sure the batter is mixed well.

9. Using an ice cream scoop, scoop two nearly two full scoops into each liner. Top off any muffins that are not filled to 1/2 inch under the top of the liner.

10. Gentle tap pan on counter to spread out batter or use the back of a spoon.

10. Spoon orange zest sugar on top of each muffin.

11. Bake at 400 degrees for 20 minutes. Then for another 10-15 minutes at 350 degrees. Be sure to rotate and turn the muffin pans.
*Orange zest sugar is just the zest of one orange mixed with approximately 1/2 cup of sugar. Shake to mix and let the mixture sit for a few hours to mingle and get friendly.

Wednesday, December 01, 2010

10. Honey Spice Cake


Over Thanksgiving I wanted an additional something sweet to go along with our dinner. My mom bought a peach praline pie from a kid selling pies for a school fundraiser. I wanted something that would be a gentle opposite to the pie and offer some different texture and flavor. Come to find out, the pie was horrible, HORRIBLE! I never thought something could be too sweet nor have too much sugar; I was wrong. The pie tasted like syrup, pure simple syrup with peach juice. But at least the money went towards a good cause. As for my cake, oh honey, it saved dessert.


I choose to make this cake because 1) I could cross off another item on my top 100 list and 2) it was a simple cake and did not need frosting. Let me let you in on a little secret. Lean really close and promise not to tell anyone. I generally do not like cake frosting. Gasp! Shhhhh! Want to know an even dirtier secret? Lean closer. My favorite part of the cake is moist crumbs that are left behind on the cake board after the cake is sliced, served, and long gone. Those moist crumbs are like jewels to my palate. Excuse the drool… But I digress.

I tend to over prepare my pans; I have a fear of cakes sticking.

This cake truly celebrates the natural flavor of honey. I choose to use Orange Blossom honey because I like the flavor better then clover honey. If you have never had it, you are missing a treat. This cake does not need any frosting; it is great just sliced and eaten plain. Next time, I think I may sprinkle a few pecans in the pan, just to give a little gentle crunch and textural difference to the cake.


I nearly doubled the spices as called for in the original recipe and still did not really taste them, but I like to think the cake tasted better overall just because they were there. So, if you are expecting a honey SPICE Cake, this is not it. This is a HONEY spice Cake :-)

HONEY SPICE CAKE
(Originally from Second Helpings Please, Revised Edition and adapted from Mel’s Sweet Treats)

Ingredients
4 eggs
1 cup sugar
1 cup oil
1 lb. or 16 oz. orange blossom liquid honey
1 tsp vanilla
3 cups flour
3 tsp. baking powder
1/2 tsp. baking soda
1 1/2 tsp. cinnamon
3/4 tsp. allspice
1/2 tsp. nutmeg
1 cup cold tea
zest of one orange

Method

1. Beat eggs and sugar.

2. Add oil and honey and blend well.

3. Combine dry ingredients and add alternately with liquid.

4. Pour into a prepared bunt pan.

5. Preheat oven to 350 degrees.

6. Once cake is placed in the oven immediately reduce heat to 325 degrees and bake for 1 hour.

7. Let cake cool in pan and remove when it is still slightly warm. Let it cool completely before covering.